Icon: ![]()
Function: SalesForceOut
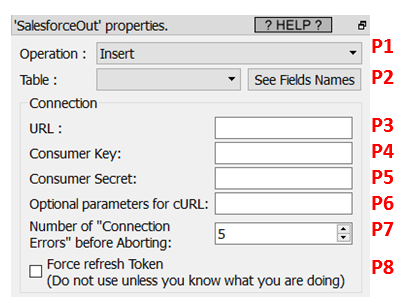
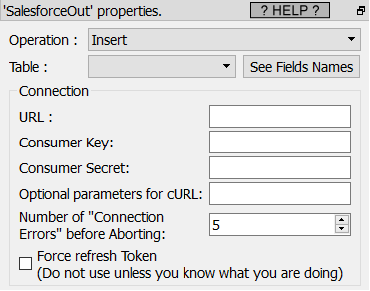
Property window:
Short description:
Upload data to Salesforce.
Long Description:
This Action also works when accessing the web through a PROXY server: Please consult the section 5.1.9.2. for more details on how to setup the parameter P6 for web-access through a PROXY server.
To use this Action, you’ll need to get several parameters from Salesforce:
•your “URL” (parameter P3)
•your “Consumer Key” (parameter P4)
•your “Consumer Secret” (parameter P5),
See the section 5.23.25.1. on how to get these 3 parameters.
Once you have completed the “setup process” described in the 5.23.25.1, you can use the parameters P1 and P2 to upload data to your Salesforce system.
The parameter P1 selects the operating mode amongst 3 choices:
•Insert data
•Update data
•Delete data
When the operating mode is “Delete”, the input table to the ![]() SaleforceOut Action must contains a column named “Id” that contains the list of “Id” to delete from the given table inside Salesforce.
SaleforceOut Action must contains a column named “Id” that contains the list of “Id” to delete from the given table inside Salesforce.
When the operating mode is “Insert” or “Update”, the columns of the input table to the ![]() SaleforceOut Action must match the column’s names of the table to modify in Salesforce. For your convenience, you can get the required column’s names when clicking here:
SaleforceOut Action must match the column’s names of the table to modify in Salesforce. For your convenience, you can get the required column’s names when clicking here:
You don’t need to provide *all* the columns from the Saleforce table in input: Many columns are usually optional.
When the operating mode is “Update”, you must provide in input a column named “Id” (in addition to the required columns to upload&update into Saleforce).