Icon: ![]()
Function: unlockAzure
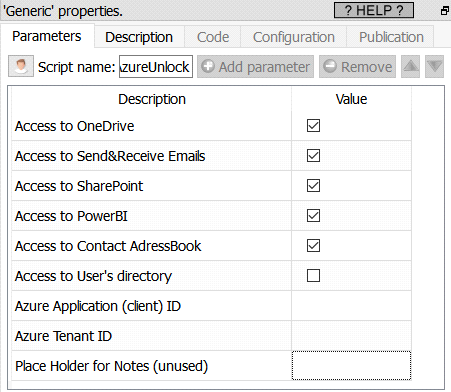
Property window:
Short description:
Unlock access to Azure services
Long Description:
You need to get your Azure credentials (i.e. you need to get from Azure these 2 parameters: your “Application (client) ID”, and your “Anatella Secret Token”) before using any of the following Actions:
•OneDrive:
oList the files on a OneDrive (section 5.23.35)
oDownload files from a OneDrive (section 5.23.36)
oUpload files to a OneDrive (section 5.23.37)
oDelete files stored in a OneDrive (section 5.23.38)
•Email
oReceive Emails from an Azure account (section 5.23.53)
oSend Emails using an Azure account (section 5.23.54)
•SharePoint
oRetrieve Lists and Objects from a SharePoint site (section 5.23.28)
oAdd items inside a SharePoint List (section 5.23.29)
•PowerBI: Add/Update/Delete datasets inside PowerBI (section 5.23.90)
•Manage Contact from Azure users and List All users (section 5.23.98)
![]()
All these Azure fonctionnalities require you to pay to Microsoft. You must pay even for the most basic functionalities such as listing some files on your OneDrive. Hopefully, if you buy the “Office 365 E1” (On the 2022-11, the cost is: 11.80€/month or 100.8€/year) you already get access to your OneDrive, to your Email and to SharePoint.
A limited version of PowerBI is also accessible for free.
The procedure to get your Azure Credentials (i.e. to get a “Application (client) ID” and an “Anatella Secret Token”) is the following:
1.First, a word of caution:
You will need your “Application (Client) ID” and an “Anatella Secret Token” to use (nearly) all the Azure Services actions inside Anatella.
There are no ways to copy/paste back these 2 informations from one Anatella action to another (this is, of course, “by design”).
So, you should keep yourself these 2 informations in a secure place, if you intend to re-use them later.
The steps 1 to 19 must only by performed once by an Azure Administrator. The easy steps 20,21 & 22 must be performed by all the users that want to access Azure data.
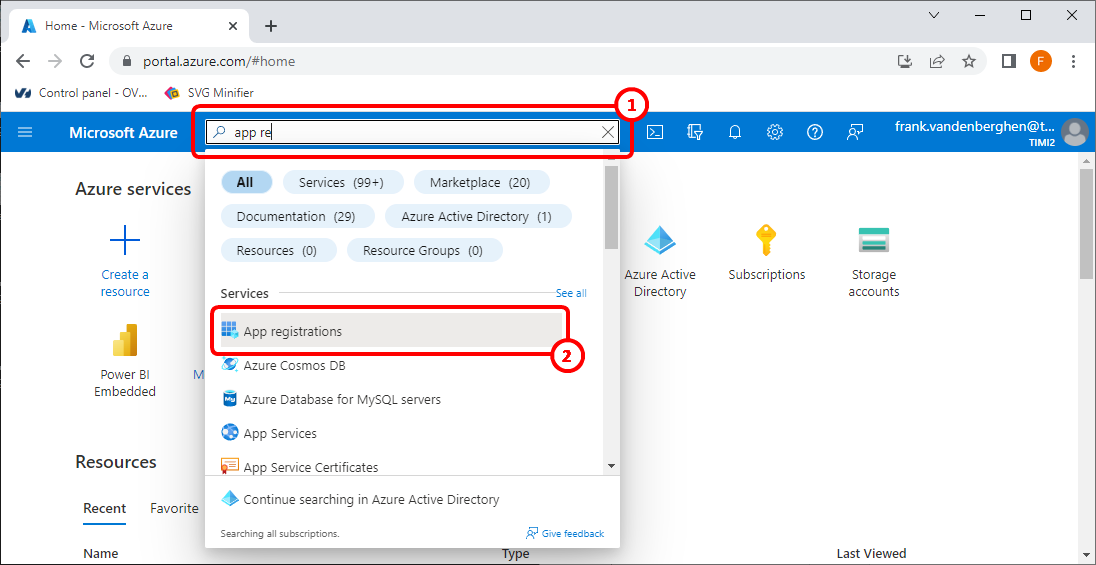
2.Open the URL https://portal.azure.com and “log-in” using your normal “Login” and “Password” for Azure. Then, type “App Registration” in the searchbar ![]() and click on the corresponding icon
and click on the corresponding icon ![]() :
:
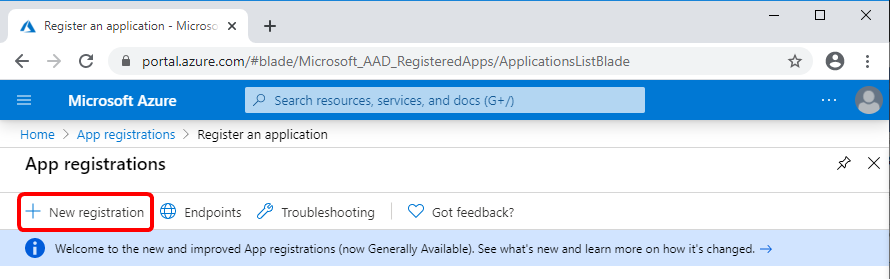
3.We will create a new Azure App: Click the “New registration” button:
4.Give a name to your Azure App (you can use any name) ![]()
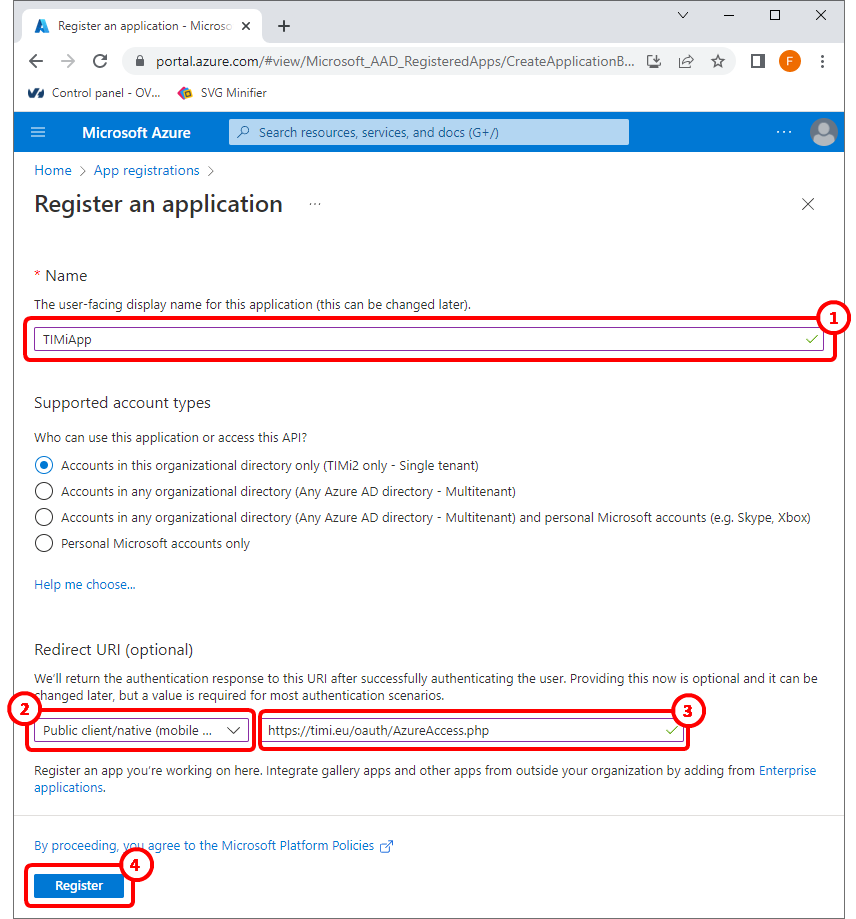
5.For the redirect URI: select the “Public client/native (mobile&desktop)” ![]() type of application and enter:
type of application and enter:
https://timi.eu/oauth/AzureAccess.php
…as the “redirect URI”. ![]()
WARNING: This is a very important step: the URI must be exactly the one given here above (this is case sensitive).
6.Click the “Register” button at the bottom of the page to go to the next page.![]()
7.You are now receiving the Anatella parameter P1 and P2 (i.e. your “Application (client) ID” and your “Tenant ID”): They are here ![]() :
:
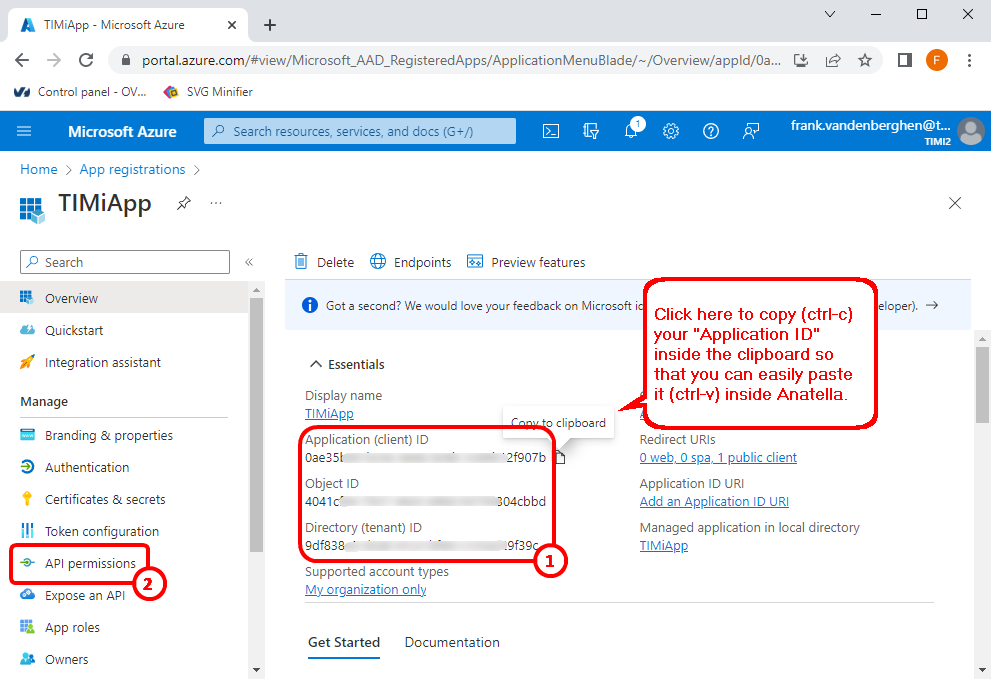
8.Click on “API Permissions” in the left panel here ![]() :
:
9.Grant Permission to access SharePoint (you can skip the section 9 if you don’t intend to access SharePoint)
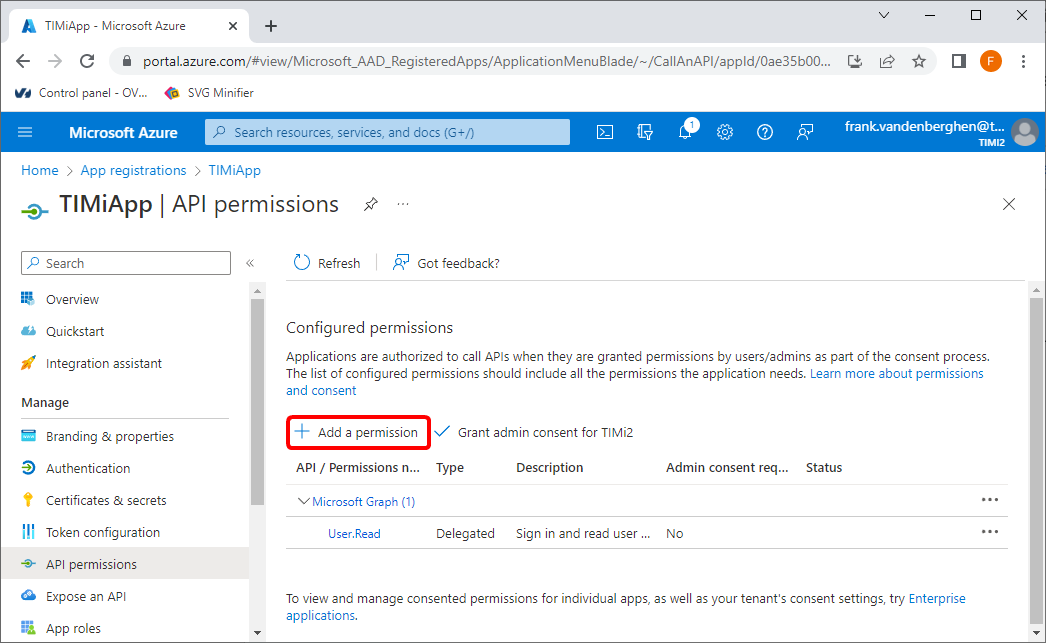
9.1 Click the “+ Add permission” button here:
9.2 Click on “Microsoft Graph”:

9.3 Click on the “Delegated Permissions” button : ![]()
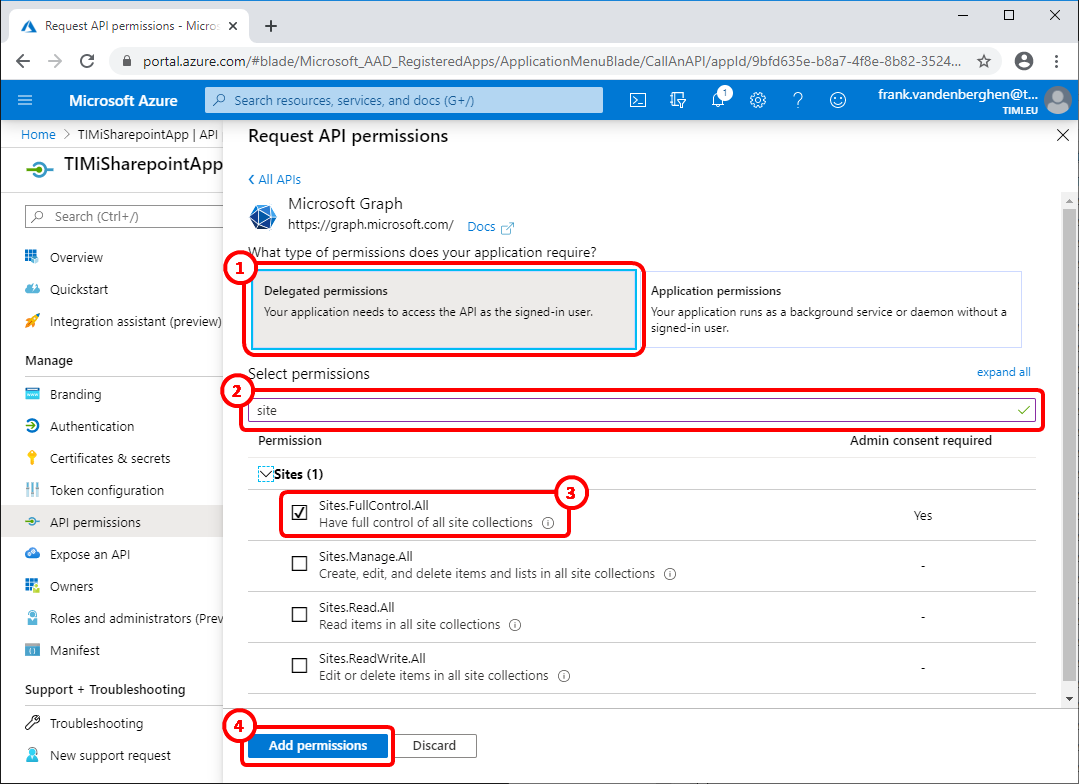
9.4 Write “site” in the search box here: ![]() ..and tick the checkbox named “Sites.FullControl.all” here :
..and tick the checkbox named “Sites.FullControl.all” here : ![]()
9.5 Click on the “Add permissions” button: ![]()
9.6 Click on the “Grant admin consent for…” button:
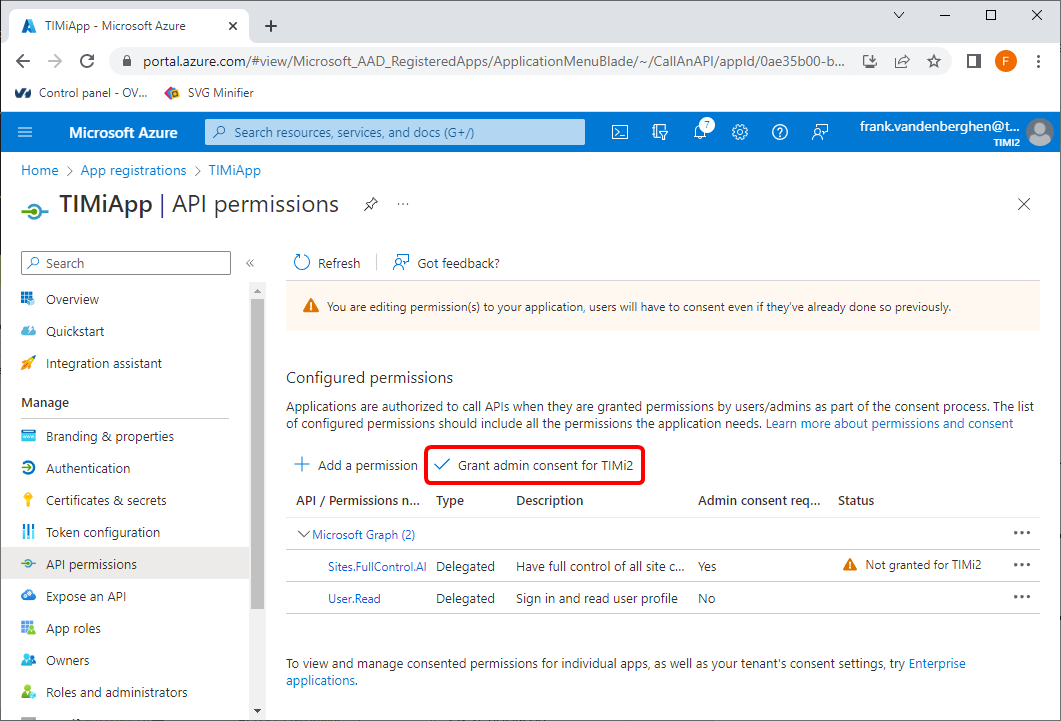
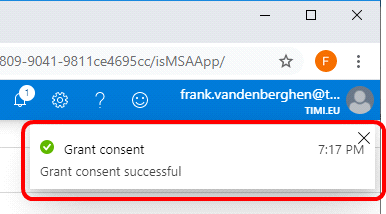
9.7 You should see “Grant consent succesful” in the top left corner of your browser:
9.8 You should see the “![]() …” message here:
…” message here: ![]()
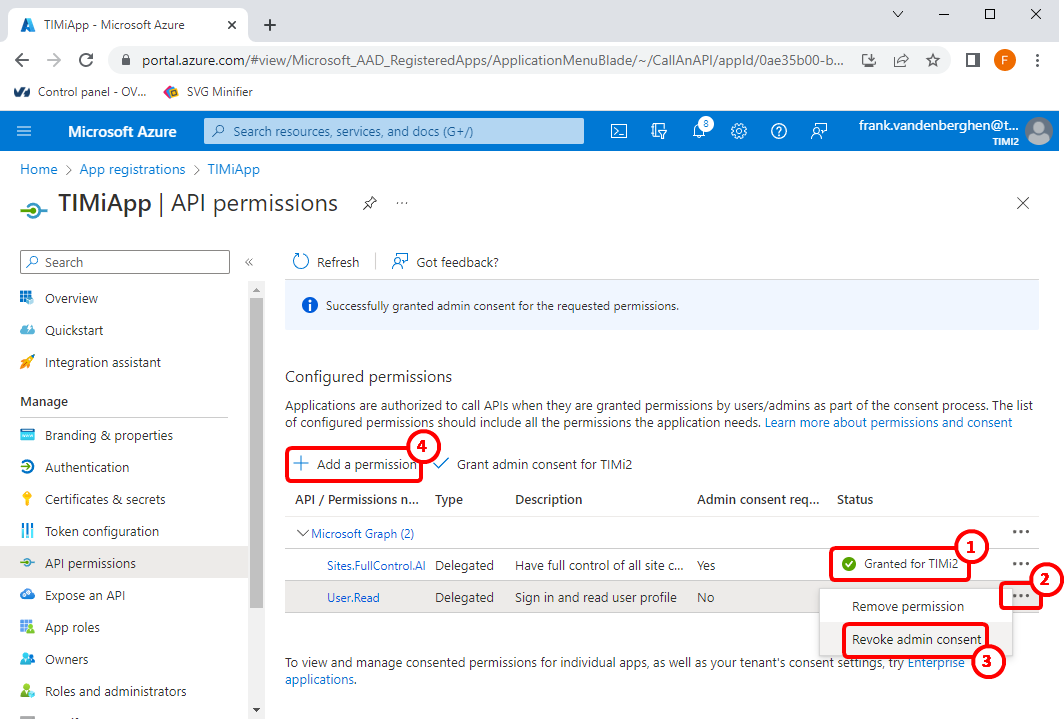
9.9 Click on the ![]() icon for the “user Read” permission:
icon for the “user Read” permission: ![]() …and click “Revoke admin consent”:
…and click “Revoke admin consent”: ![]()
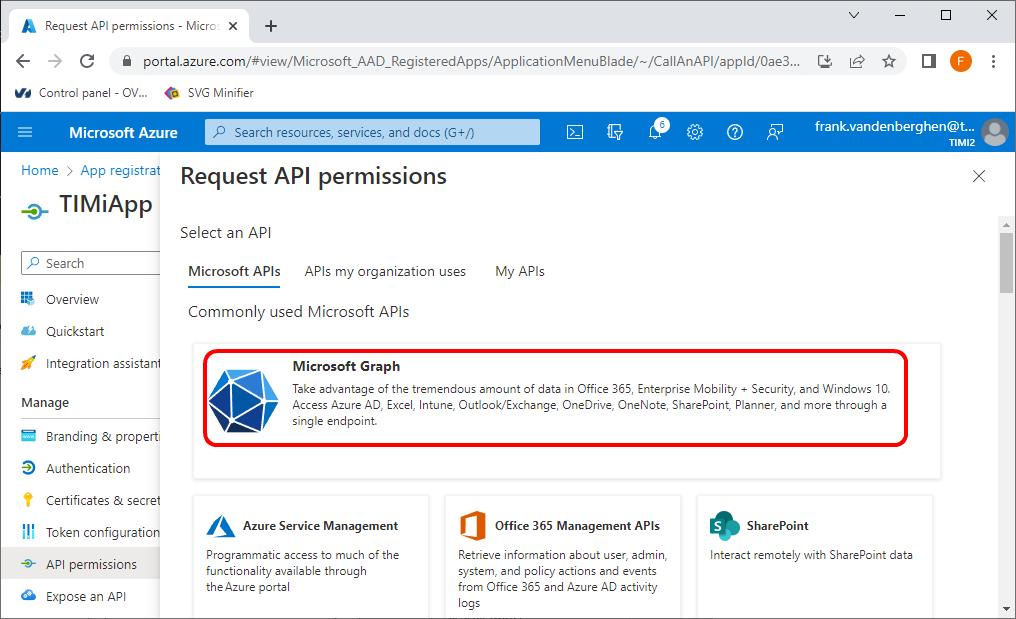
10.Click the “+ Add permission” button here: ![]()
11.Click on “Microsoft Graph”:

12.Click on the “Delegated Permissions” button: ![]()
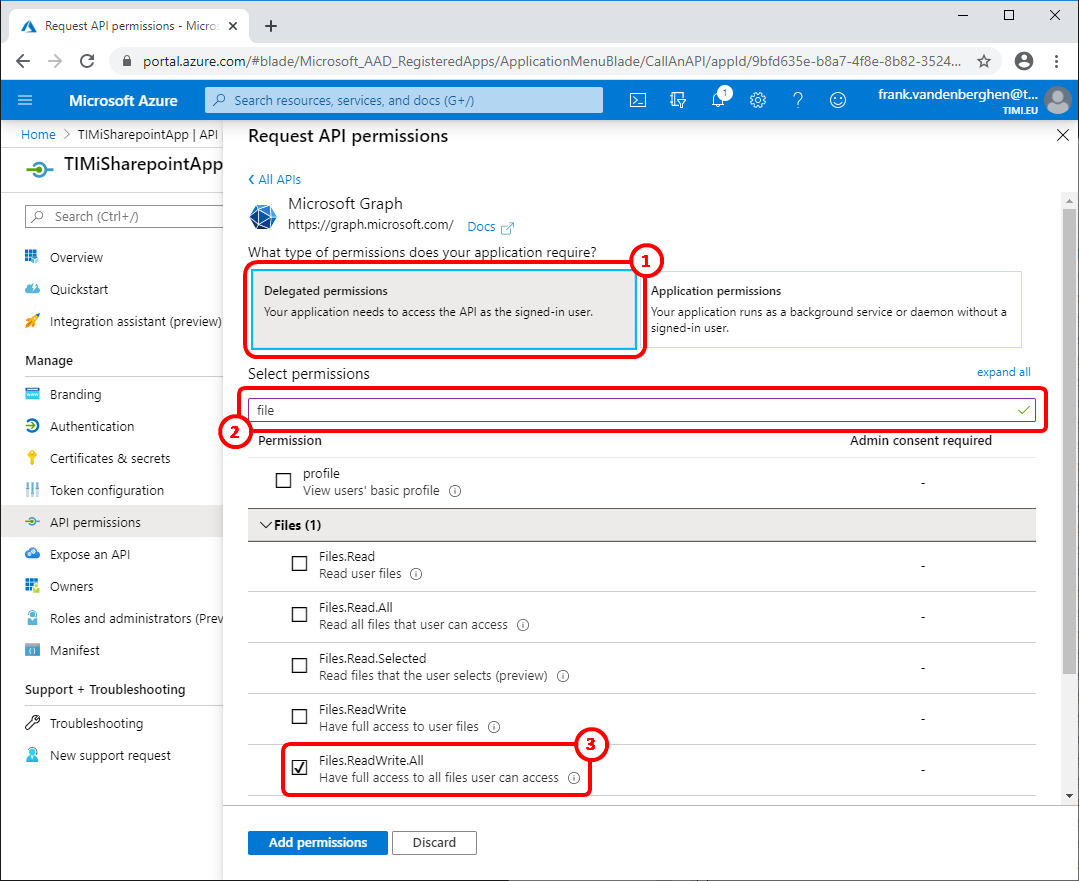
13.This permission is required to use OneDrive:
Write “file” in the search box here: ![]() ..and tick the checkbox named “Files.ReadWrite.all” here:
..and tick the checkbox named “Files.ReadWrite.all” here: ![]()
(do not enable this permission if you don’t intend to access OneDrive)
14.This permission is required to send/receive emails using Office 365:
Write “mail” in the search box here: ![]() ..and tick the checkboxes named “Mail.ReadWrite” and “Mail.send” here:
..and tick the checkboxes named “Mail.ReadWrite” and “Mail.send” here: ![]() . (do not enable this permission if you don’t intend to send/receive emails using office 365)
. (do not enable this permission if you don’t intend to send/receive emails using office 365)
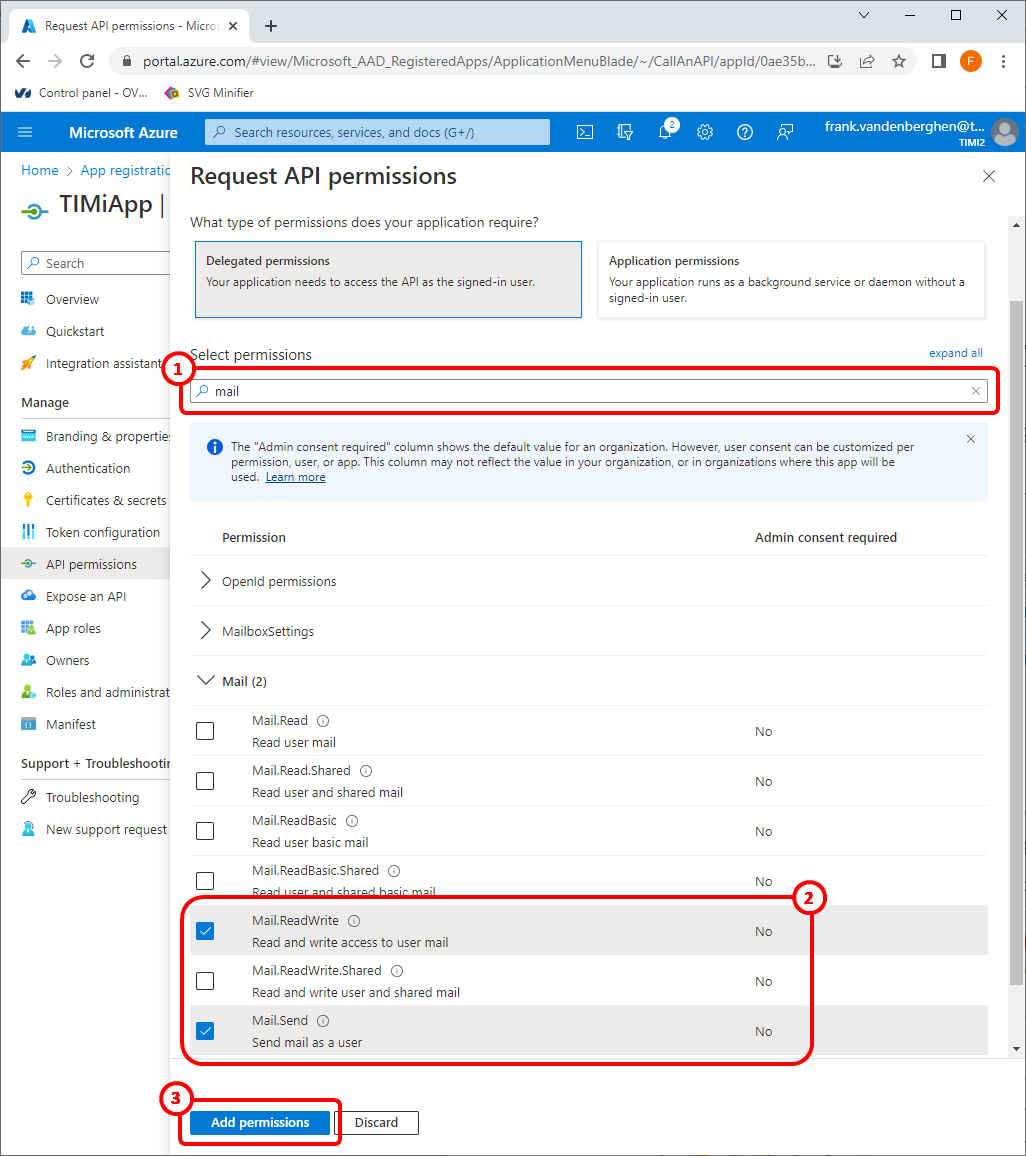
15.Click the “Add Permissions” button ![]()
16.Grant Permission to access PowerBI (do not follow section 16 if you don’t intend to access PowerBI)
16.1 Click (again) on the ![]() button
button
16.2 Scroll down and click on “Power BI Service”:
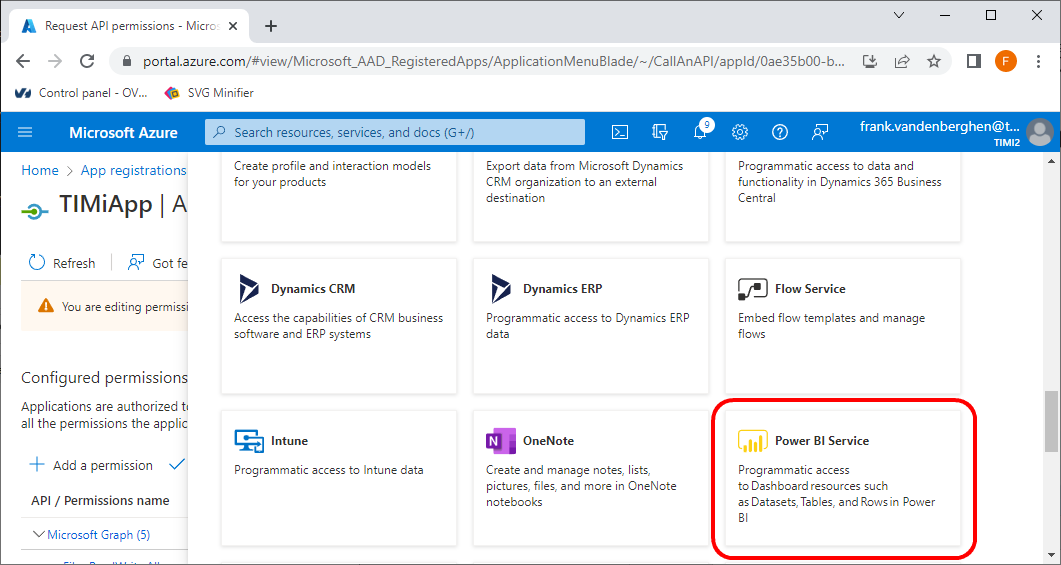
16.3 Check the permissions named “Dataset.ReadWrite.All” ![]() and “Workspace.ReadWrite.All”
and “Workspace.ReadWrite.All” ![]() :
:
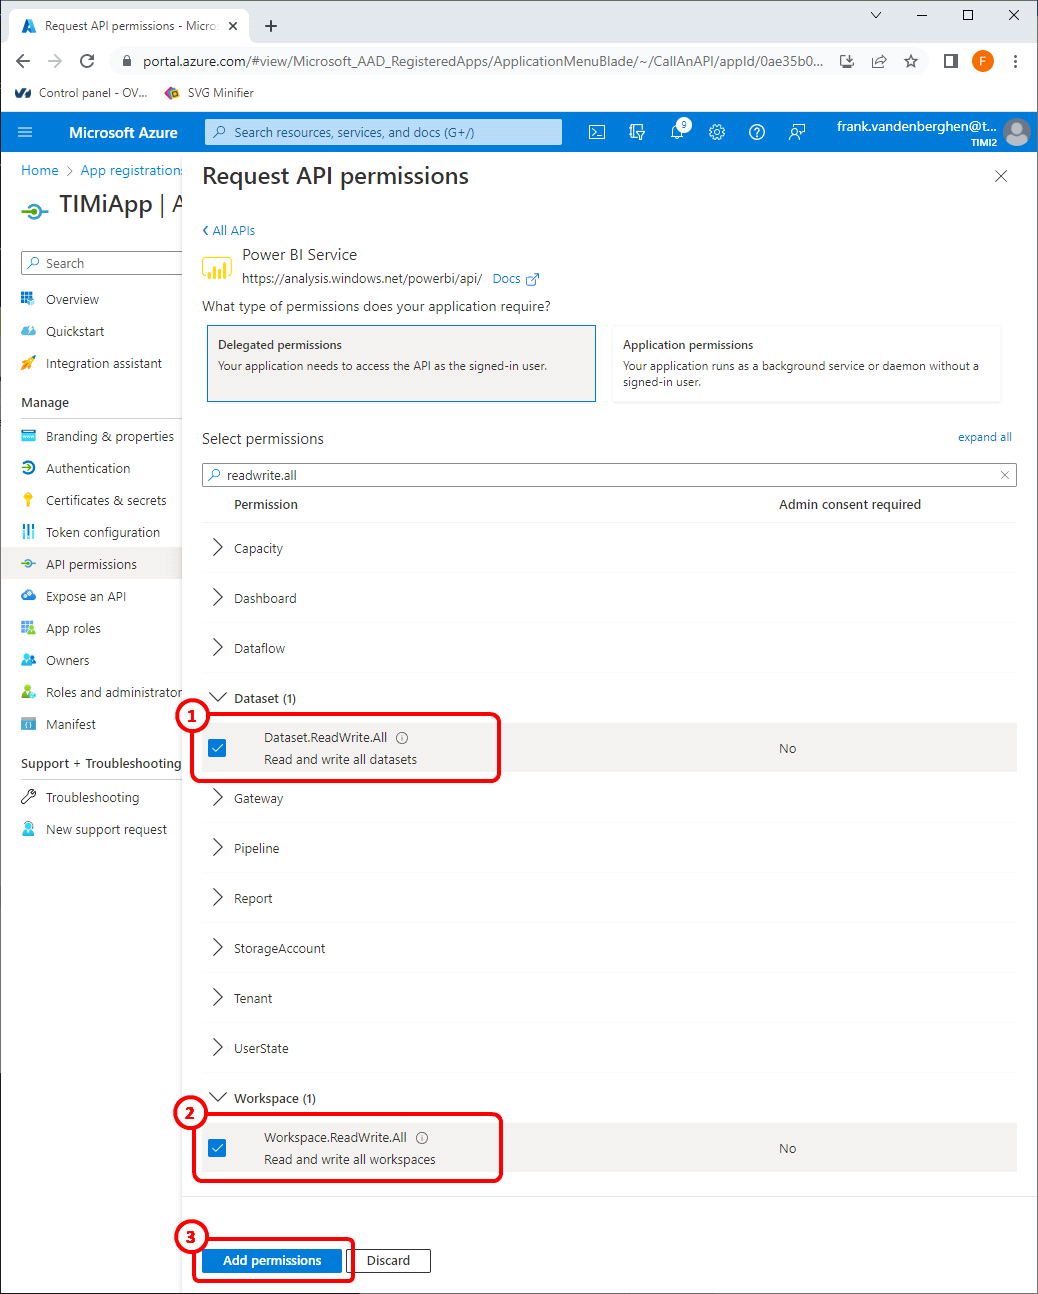
16.4 Click the ![]() button
button ![]() .
.
17.Grant permission to manage the Contacts of the users (Do not follow the section 17 if you don’t intend to use the AzureAddContact Action)
17.1 Click (again) on the ![]() button
button
17.2 Click on “Microsoft Graph”:
17.3. Click on the “Delegated Permissions” button: ![]()

17.4 Write “contact” in the search box here: ![]()
..and tick the checkboxes named “Contact.ReadWrite” here ![]()
17.5 Click the ![]() button
button ![]()
18.Grant permission to list the users inside your Organization (Do not follow the section 18 if you don’t intend to use the special operation “List Users” (Parameter P6) from the AzureAddContact Action). This step requires admin. consent.
18.1 Click (again) on the ![]() button
button
18.2 Click on “Microsoft Graph”:
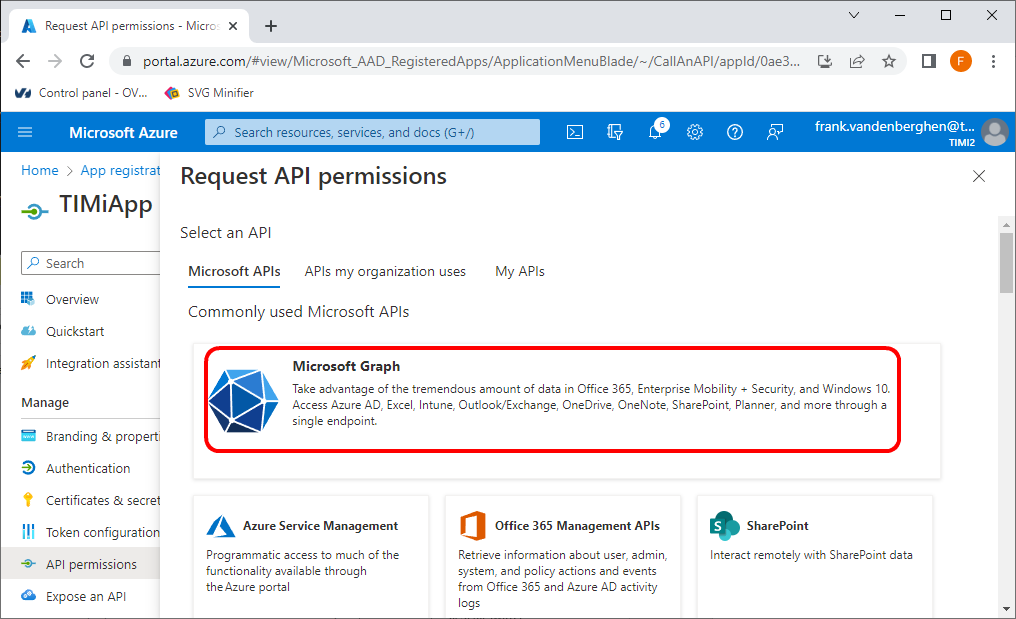
18.3 Click on the “Delegated Permissions” button: ![]()
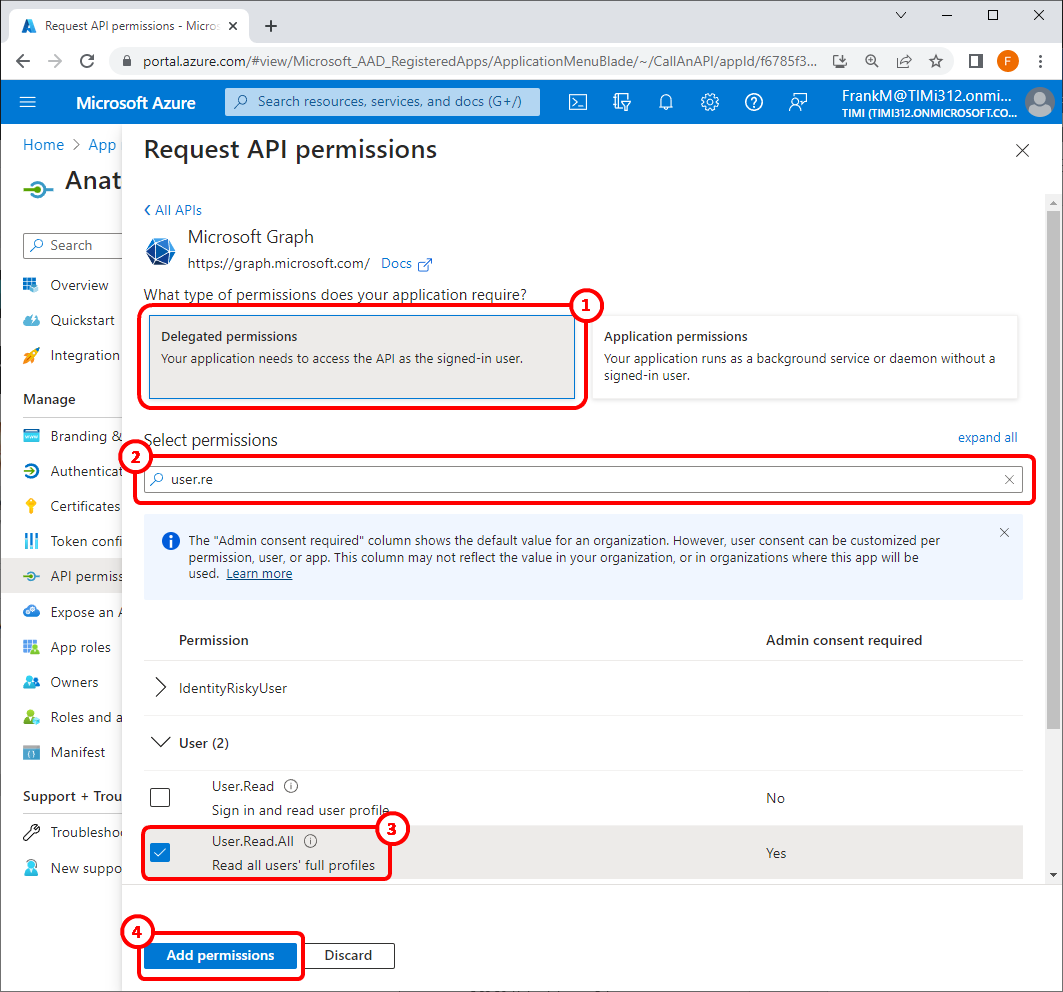
18.4 Write “user.read” in the search box here: ![]()
..and tick the checkboxes named “User.Read.All” here ![]()
18.5 Click the ![]() button
button ![]()
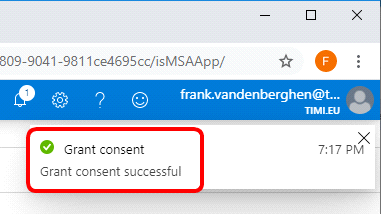
18.6 Click on the “Grant admin consent for…” button:

18.7. You should see “Grant consent succesful” in the top left corner of your browser:
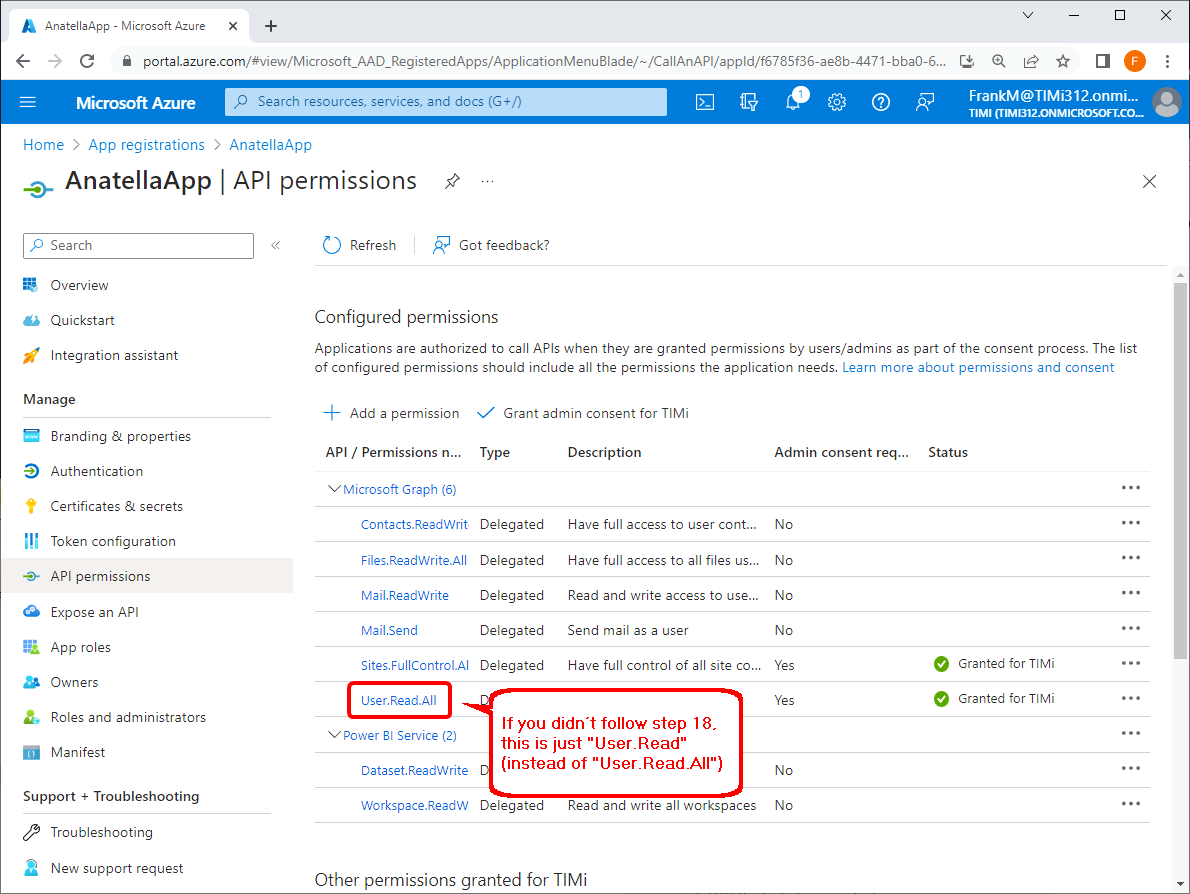
19.If you enabled all permissions, you should now see:
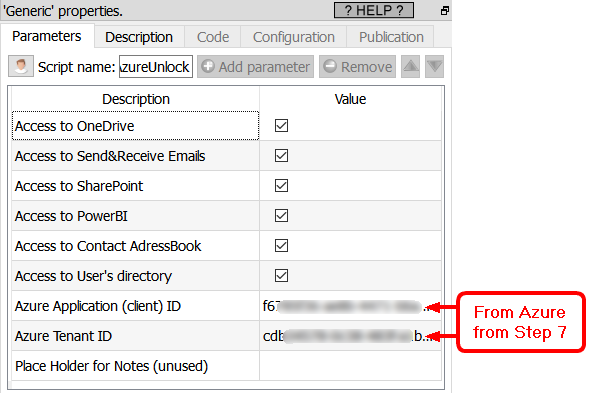
20.Go back inside Anatella. Enter the parameters P1 and P2 (i.e. your “Application (client) ID” and your “Tenant ID” obtained during the step 7 of this procedure) inside the ![]() AzureUnlock action. Just in case: you can click on the
AzureUnlock action. Just in case: you can click on the ![]() button on the top of the left panel to see again these two parameters:
button on the top of the left panel to see again these two parameters:
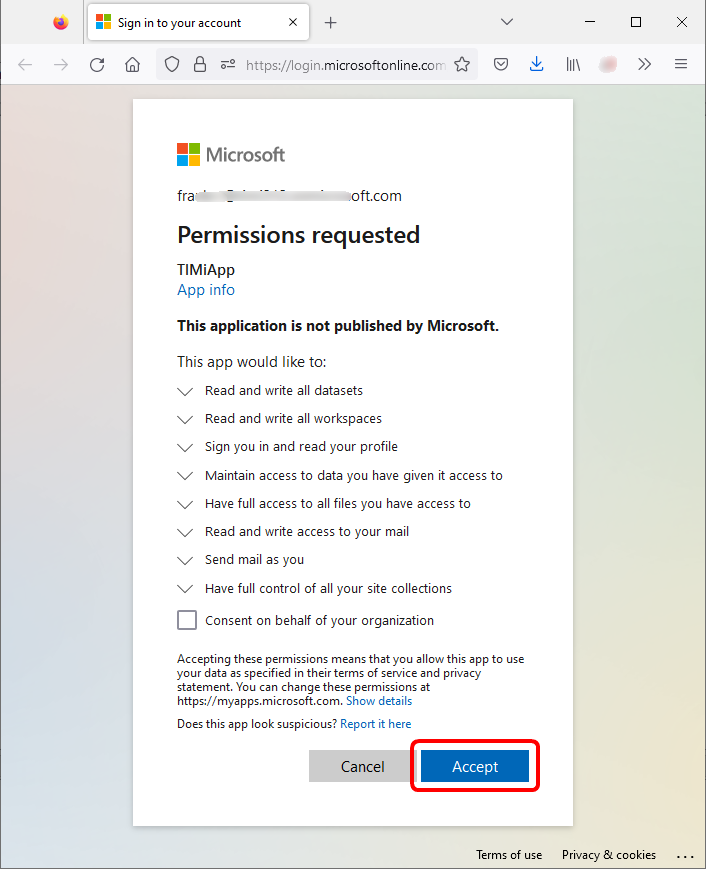
21.Run the ![]() AzureUnlock action. An internet browser opens. Sign-in into the account that possesses the OneDrive/Email/SharePoint/PowerBI that you want to access. Click on “Accept”:
AzureUnlock action. An internet browser opens. Sign-in into the account that possesses the OneDrive/Email/SharePoint/PowerBI that you want to access. Click on “Accept”:
22.You finally get your “Anatella Secret Token”:
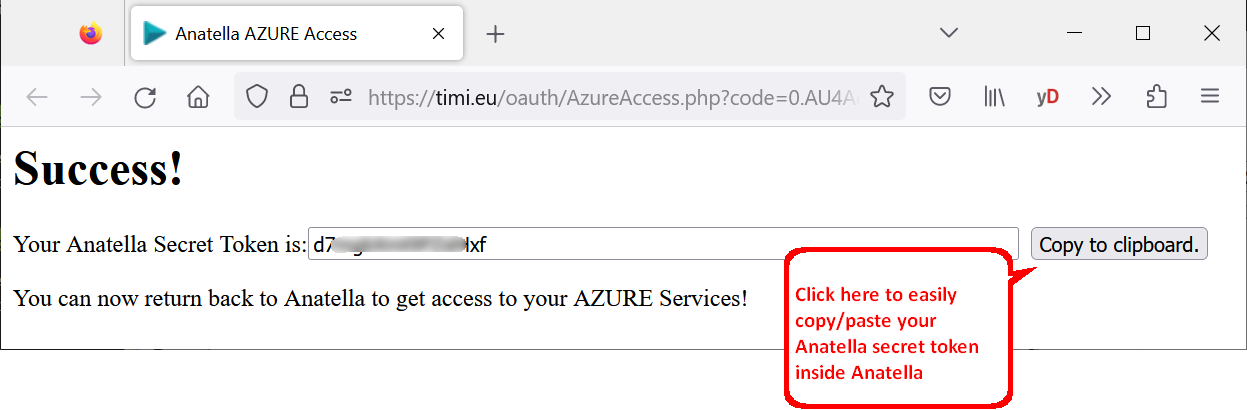
![]()
Don’t stop directly once you have your Anatella Secret Token!
I strongly advise you to also secure your Azure account by following the procedure given inside the next section 5.23.27.1.!
![]()
Sometime, instead of the “Success !” page (that you see here just above), you get:
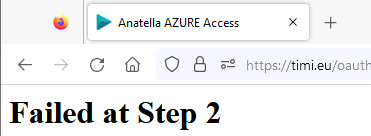
…followed by a bunch of garbage codes.
Don’t worry: That’s just Azure that is a little bit slow. Your new application settings need a little bit of time to propagate. Just wait a few seconds and run again the ![]() AzureUnlock action and, at some point, it will give you the required “Anatella Secret Token”.
AzureUnlock action and, at some point, it will give you the required “Anatella Secret Token”.