The “Oracle Instant Client ODBC” driver is very quick to install. The connection from Anatella to Oracle is usually setup in a few minutes.
Follow these steps:
1.Unzip the zip file containing the driver:
oSelect the 64-bit ODBC driver if you plan to use the 64-bit Anatella.
oSelect the 32-bit ODBC driver if you plan to use the 32-bit Anatella.
For your convenience, you can go here to download the latest Oracle ODBC drivers:
http://download.timi.eu/ODBC/ODBC_drivers_Oracle/
2.Important: Don’t click now on the “odbc_install.exe” executable that’s inside the ZIP file (otherwise the installation of the “instant client” will fail): First and before, you have to move the extracted content of the zip file to the final destination folder: Typically, you’ll have:
On a 64-bit system for a 64-bit ODBC driver: Copy the files into “C:\Program Files” ![]()
On a 64-bit system for a 32-bit ODBC driver: Copy the files into “C:\Program Files (x86)”
On a 32-bit system for a 32-bit ODBC driver: Copy the files into “C:\Program Files”
For example, on my 64-bit system (and 64-bit ODBC driver), I will have the following files:
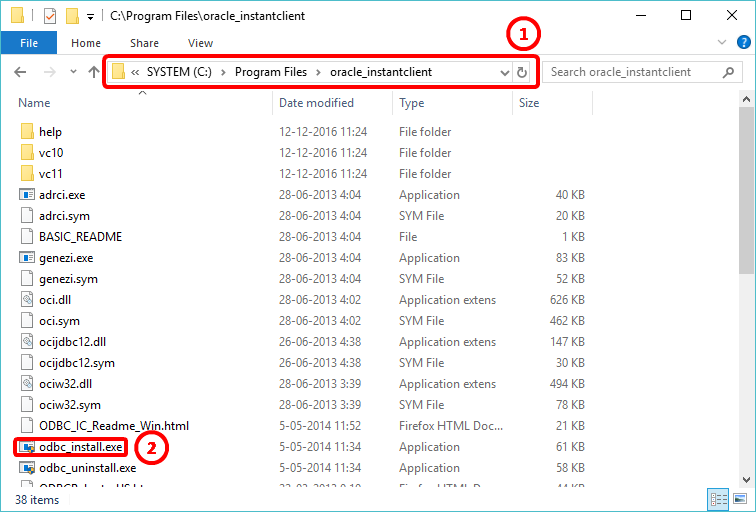
Now, you can double-click on the “odbc_install.exe” executable here: ![]()
If you didn’t move the files in the final location before running the “odbc_install.exe” executable, you’ll have to uninstall everything and restart from step 1.
3.For the ODBC driver to work properly, the easiest way is to ask you DBA for the “TNSNAMES.ORA” file that contains all the connections parameters to oracle. Once you have this file, you must copy it inside the directory stored inside the DOS environment variable “TNS_ADMIN”. If the environment variable variable “TNS_ADMIN” is not set (and this is the default for the “Instant Client”), you’ll have to set it up yourself.
To setup the environment variable “TNS_ADMIN”:
•Open the control panel, select system, select Advanced system settings: the “system properties" window opens.
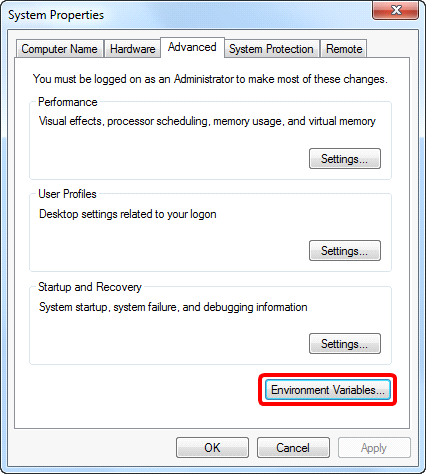
•Go to the "Advanced" tab and click the "Environment Variables" button:
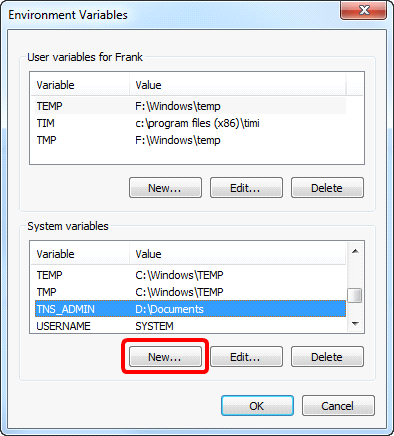
•The “Environment Variables” Windows open: click on the “New” button:
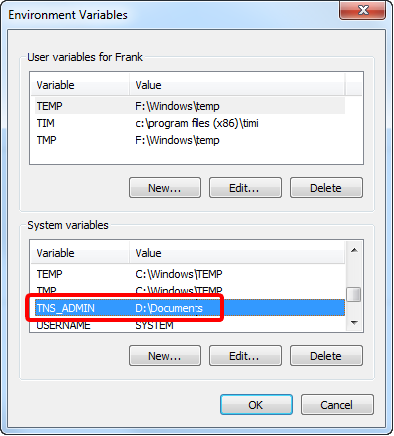
•Define the value of the “TNS_ADMIN” environmental variable (in the example above, it’s “D:\Documents”):
•At this point, you need to log-off/log-in so that MS-Windows takes into account the new value of the “TNS_ADMIN” environmental variable. If you don’t log-off/log-in (or even better: reboot the computer), the ODBC drivers won’t work. This is the most common cause of failure when using the Oracle ODBC drivers.
•Copy the “TNSNAMES.ORA” file inside the proper directory (in the example above, it’s “D:\Documents”)
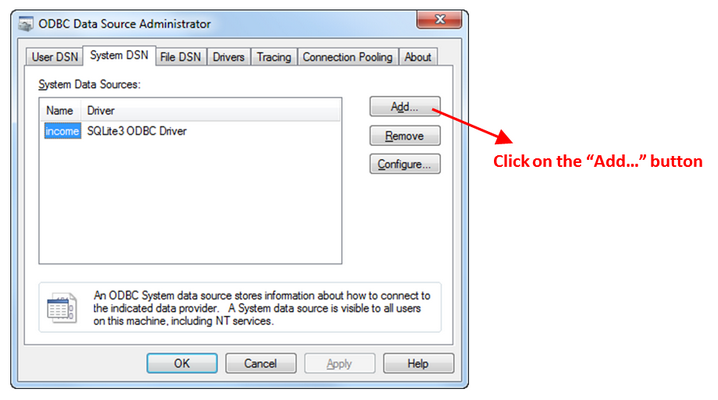
4.Test the ODBC driver: Run the “Microsoft ODBC Data Source Administrator”: To open this Window: See section 5.1.6.1. (“Type 1 ODBC Connection”). You should now see:
… select “Oracle in instantclient_64bit”: ![]()
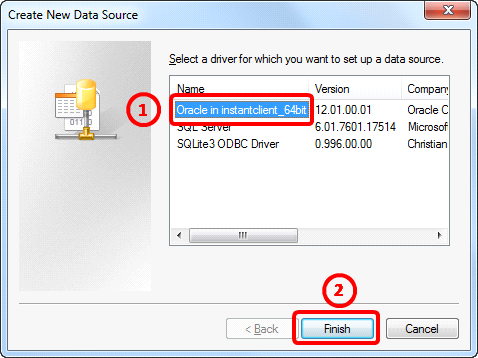
… and click the “Finish” button.![]()
![]()
At this point, if you see this window:
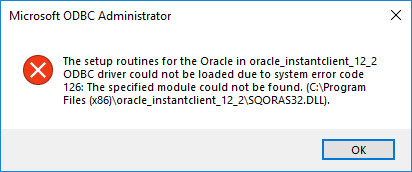
…this means that you need to install the “Visual Studio 2013 Redistributables”.
The installation “Setup” files for the “Visual Studio 2013 Redistributables” are in the same location as the Oracle drivers:
http://download.timi.eu/ODBC/ODBC_drivers_Oracle/
You should now see:
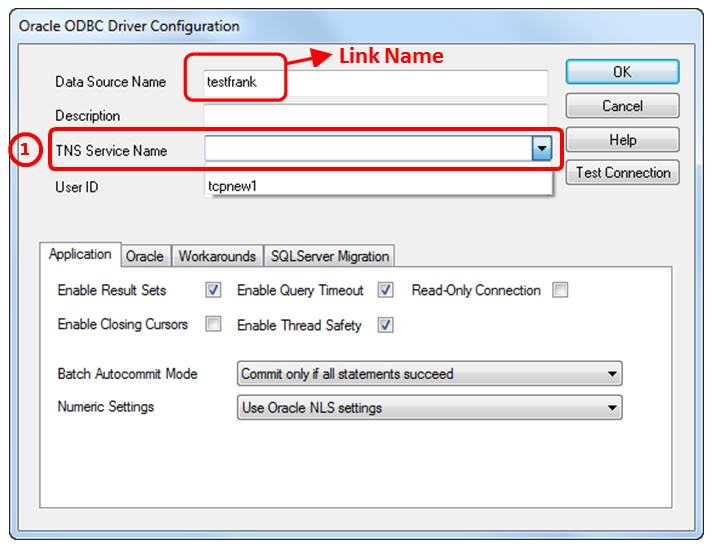
In particular, if the “TNSNAMES.ORA” file has been properly installed, you’ll see the list of available connections to Oracle on the drop-down combo menu here: ![]() . If you don’t see anything, you might need to log-off/log-in (so that the MS-Windows takes into account the new value of the “TNS_ADMIN” environmental variable).
. If you don’t see anything, you might need to log-off/log-in (so that the MS-Windows takes into account the new value of the “TNS_ADMIN” environmental variable).
You can setup the connection and click the “Test connection” to see if everything works properly.
![]()
The “test connection” button returns the “connection successful” message even if the “TNS Service Name” parameter is improperly set (This is a really disturbing behvavior). If you get the following message inside Anatella:
SQL_Error::SQL Error State:HY000, Native Error Code: 3110, ODBC
Error: [Oracle][ODBC][Ora]ORA-12560: TNS:protocol adapter error
…then you need to go back to the “Oracle ODBC Driver Configuration” window and change the “TNS Service Name” to a valid value.
![]()
To improve the performance of the Oracle ODBC driver, you should increase the “Fetch Buffer Size” parameter of the ODBC Driver to 2 000 000 bytes or more (instead of the default value of 64 000 bytes):
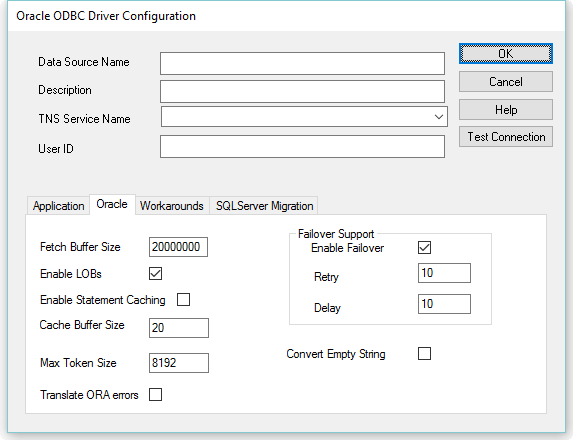
The above parameter is particularly important when the Oracle Database is located on a very distant server compared to the machine running Anatella.
Here is a typical set of parameters used to setup an ODBC Connection String (for a “Type 2 ODBC Connection”) for accessing the content of an Oracle database:
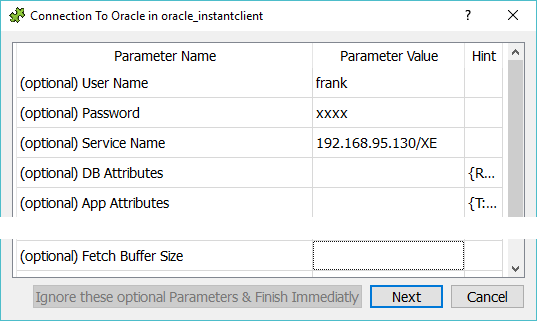
At the end, you should get a connection string that is similar to:
DRIVER={Oracle in oracle_instantclient};UID=frank;PWD=xxx;DBQ=192.168.95.130/XE;FBS=2000000
You can right-click with your mouse here to manually edit the Connection-String (e.g. to add some missing part):

Let’s assume that you are now using the Oracle ODBC connection inside Anatella (e.g. you are running a ![]() readODBC Action): If you receive an error message about an “inconsistent architecture” when running the Action, it means that you are trying to access a 32-bit Oracle Server using a 64-bit ODBC driver (or vice-versa). This is a well-known limitation of the “basic” drivers distributed by Oracle: The “basic” 32-bit ODBC drivers from Oracle can only connect to a 32-bit Oracle Database Server (and the 64-bit ODBC drivers can only connect to a 64-bit Oracle Database Server). There are several solutions to bypass this limitation that originates from Oracle (i.e. other databases do not have this limitation).
readODBC Action): If you receive an error message about an “inconsistent architecture” when running the Action, it means that you are trying to access a 32-bit Oracle Server using a 64-bit ODBC driver (or vice-versa). This is a well-known limitation of the “basic” drivers distributed by Oracle: The “basic” 32-bit ODBC drivers from Oracle can only connect to a 32-bit Oracle Database Server (and the 64-bit ODBC drivers can only connect to a 64-bit Oracle Database Server). There are several solutions to bypass this limitation that originates from Oracle (i.e. other databases do not have this limitation).
Let’s now assume that you have a 32-bit Oracle Database Server (thus only the 32-bit ODBC driver will work) and you want to use Anatella 64-bit for most of your processing.
To bypass the “inconsistent architecture” limitation of the default Oracle ODBC drivers:
•You can install on the same PC, at the same time, both the “Anatella 32-bit” and the “Anatella 64-bit”. This means that you can still use the fastest “Anatella 64-bit” to do all your data transformations and only use the Anatella 32-bit to extract the required data from Oracle (i.e. you save every extracted tables inside some .gel_anatella files that you can use later with the normal Anatella 64-bit). You’ll find mode informations on how to install simultaneously the “Anatella 32-bit” and the “Anatella 64-bit” on the same PC inside the section 10.11.
•Use the Oracle OCI driver (see section 5.2.26.) or the Oracle OleDB driver (see section 5.2.3.): These 2 drivers do not have the limitation of the ODBC driver.
•Use an ODBC-ODBC bridge. Here is a classical scenario: You can use an ODBC-ODBC bridge to run the 32-bit ODBC driver inside the “Anatella 64-bit”.
Several vendors are selling ODBC-ODBC bridges: For example:
http://www.easysoft.com/products/data_access/odbc_odbc_bridge
•Use another ODBC driver (not the default one provided by Oracle): For example:
https://www.progress.com/products/data-sources/oracle-odbc-jdbc-drivers