Before using the OVH Cloud Object storage Actions inside Anatella, you need to get the 4 parameters:
•User name (Parameter P4)
•Password (Parameter P5)
•Tenant Name (Parameter P6)
•Container URL (Parameter P3)
…from the OVH website. Here are the steps to get these 4 parameters:
1.Open the URL https://www.ovh.com/auth/ and “log-in” using your normal “Login” and “Password” for OVH:
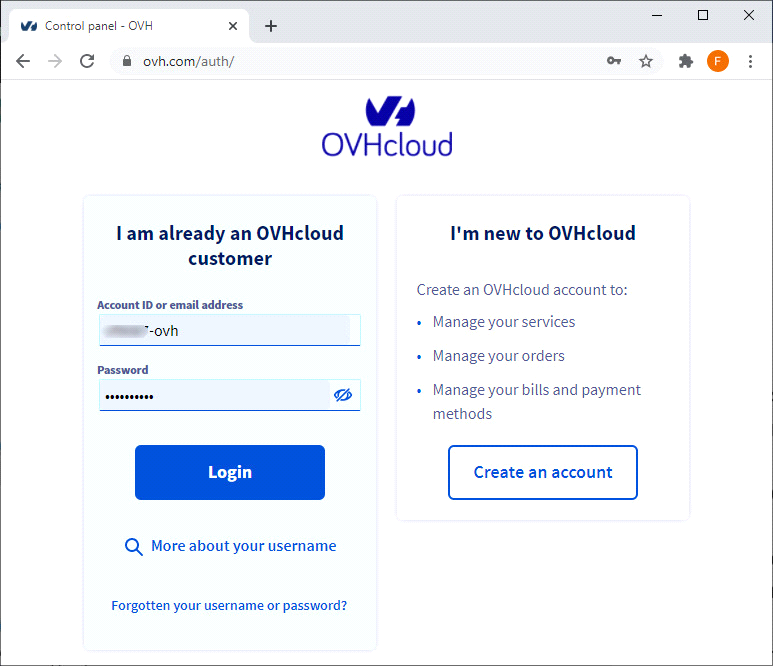
2.If this is the first time that you are using the OVH Cloud Object storage:
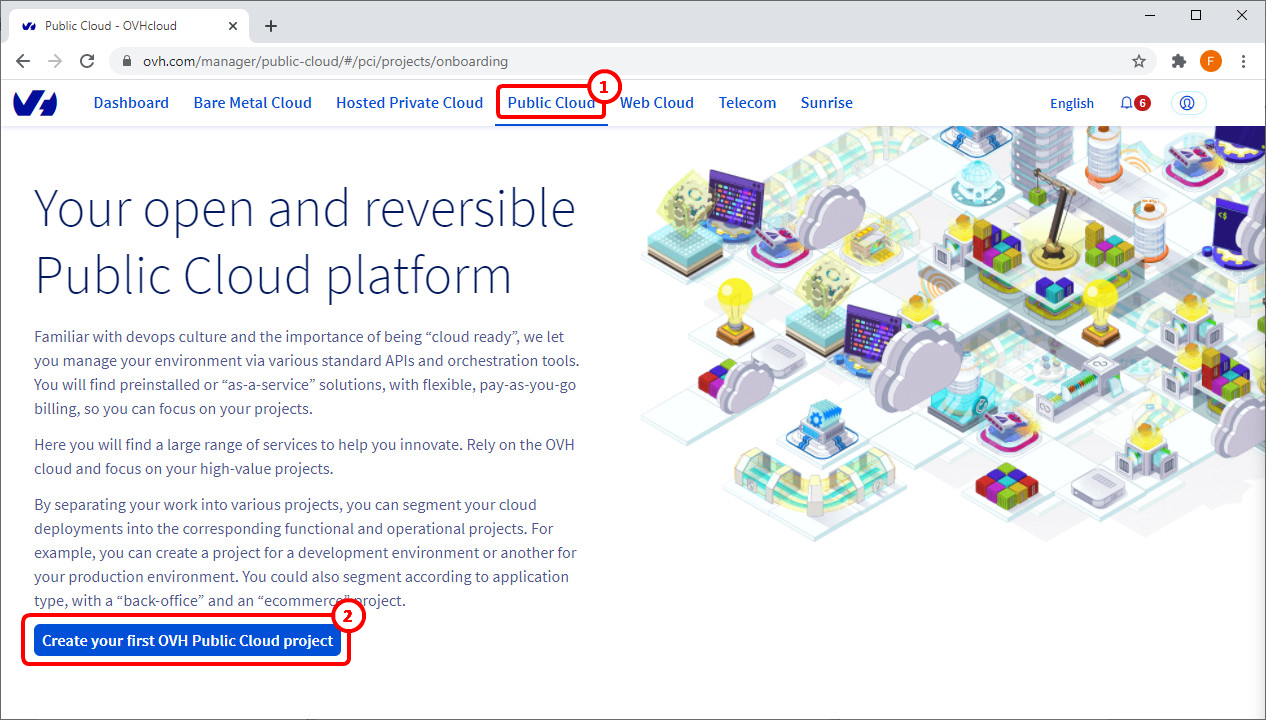
2.1 Create an OVH project
In the top menu, click on “Public Cloud” ![]() and then click on the “Create ..project” button:
and then click on the “Create ..project” button: ![]()
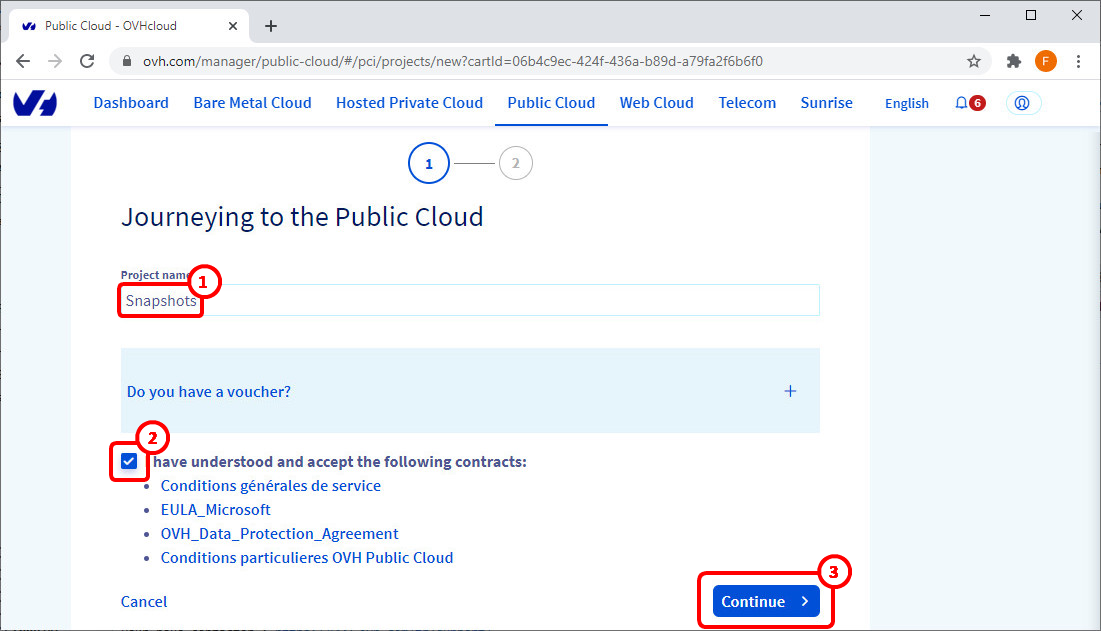
Enter a project name (in the screenshot below, we used “snapshots” ![]() but you can use any name), check the checkbox
but you can use any name), check the checkbox ![]() and click “Continue”:
and click “Continue”: ![]()
Confirm your payment method ![]() and click on the “Create my project” button:
and click on the “Create my project” button: ![]()
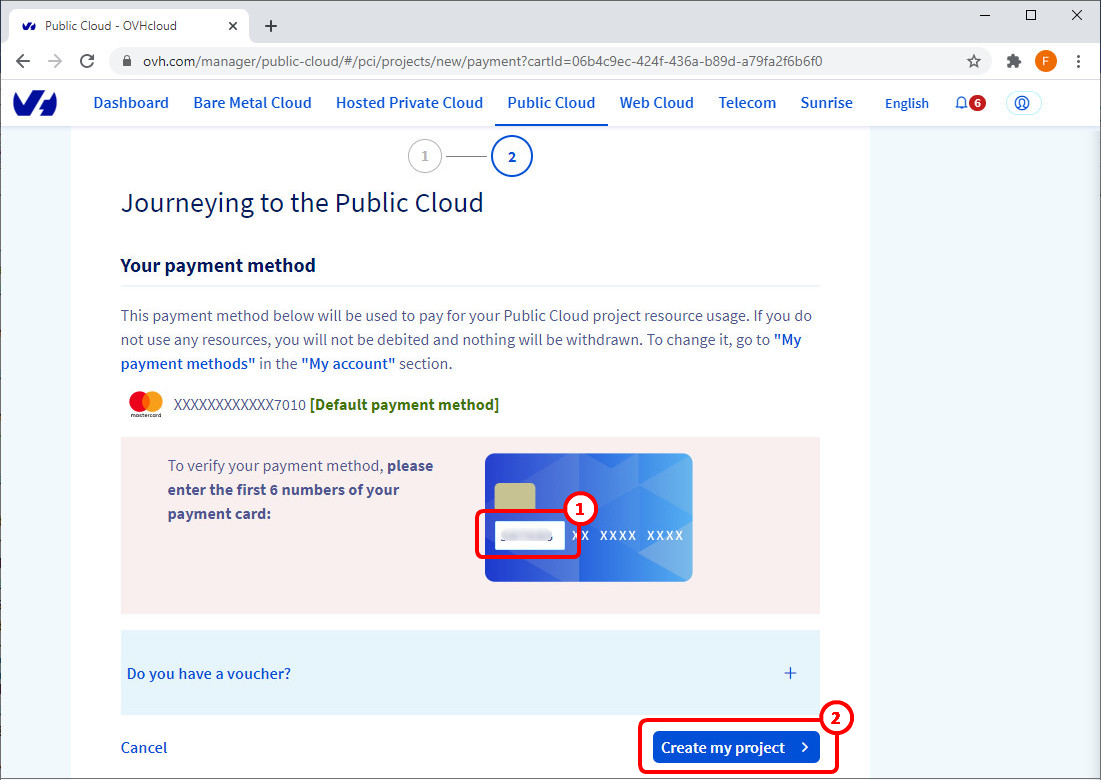
After a few seconds, your project is created.
2.2. Create a new user:
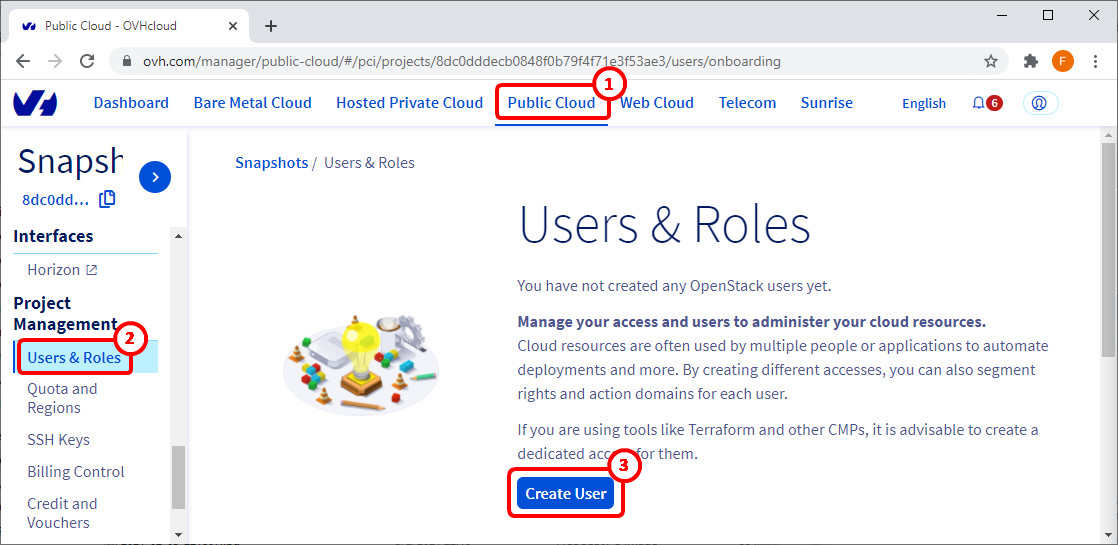
In the top menu, click on “Public Cloud” : ![]()
In the left menu, click on “Users & Roles”: ![]()
Click the “Create User” button: ![]()
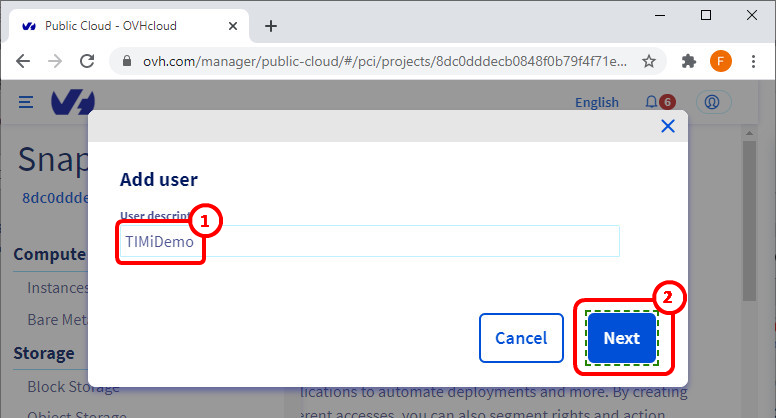
Give a name to the new user ![]() and click the “Next” button:
and click the “Next” button: ![]()
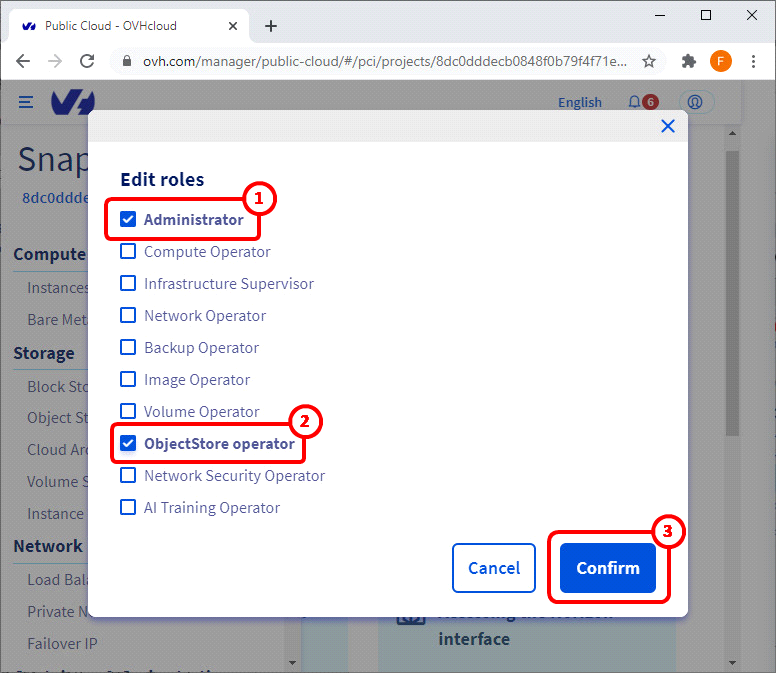
Give the “Administrator” role ![]() and “ObjectStore Operator” role
and “ObjectStore Operator” role ![]() to this new user and confirm:
to this new user and confirm: ![]()
You finally get your new user.
At this point, please note carefully the Anatella parameter P5 (password) ![]() and the Anatella parameter P4 (user name)
and the Anatella parameter P4 (user name) ![]() .
.
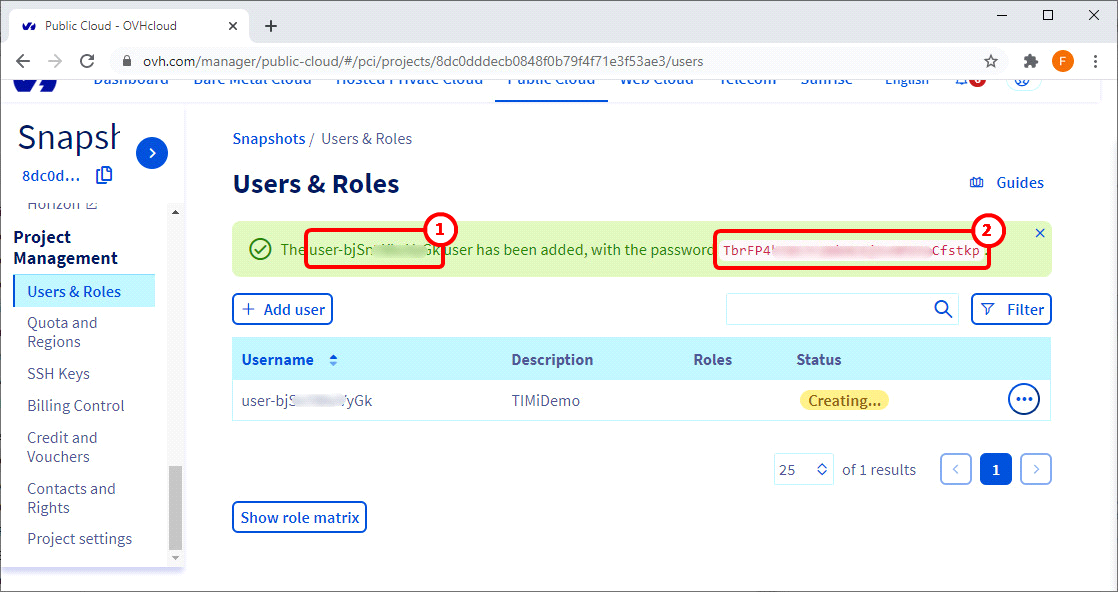
You should store very carefully the above password since there is no way to retrieve it later (you can generate a brand-new password but not retrieve an old one).
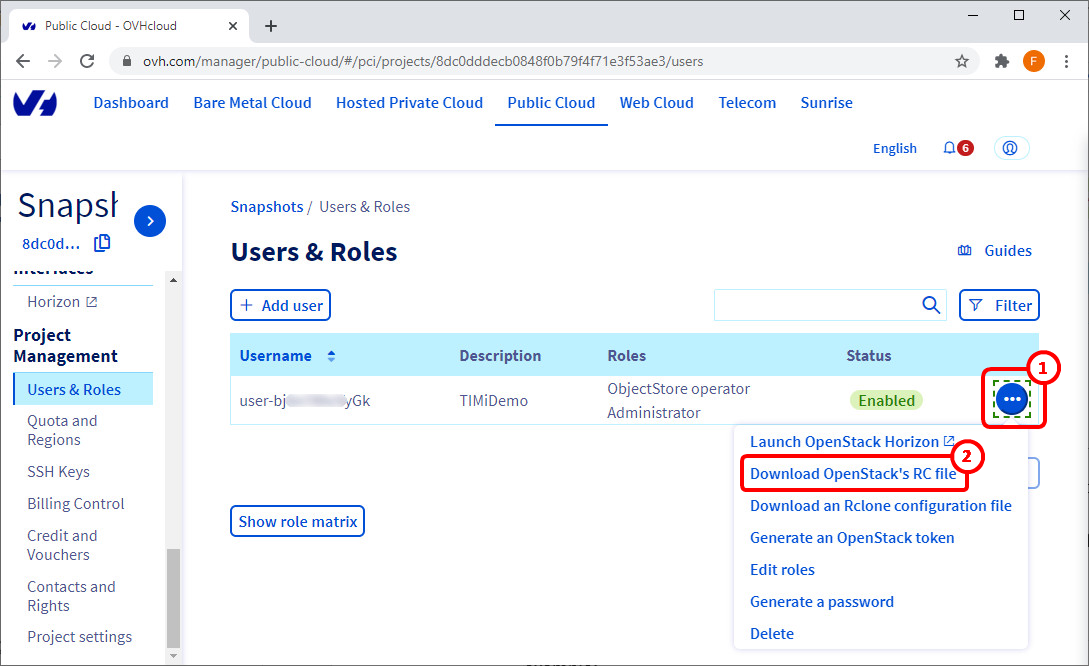
Click on the ![]() icon
icon ![]() and select “Download Openstack’s RC file”:
and select “Download Openstack’s RC file”: ![]()
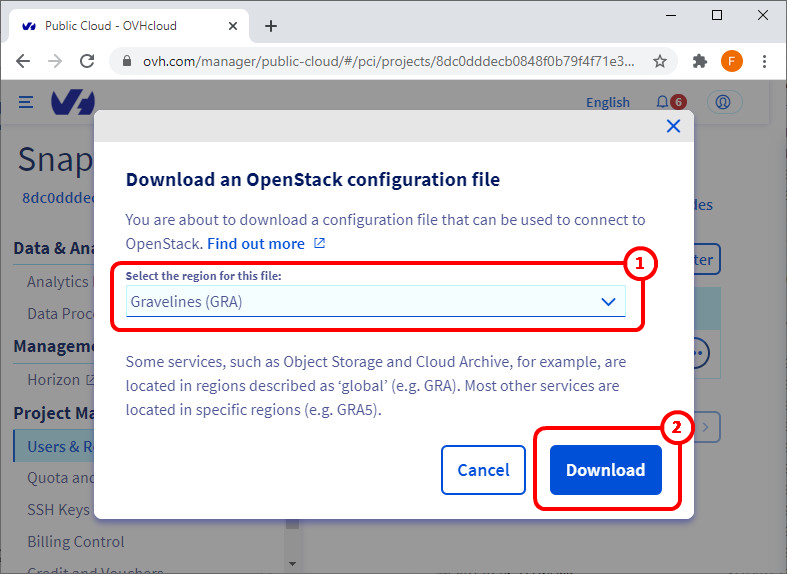
Select the Data Center that hosts your files ![]() and click the “Download” button:
and click the “Download” button: ![]()
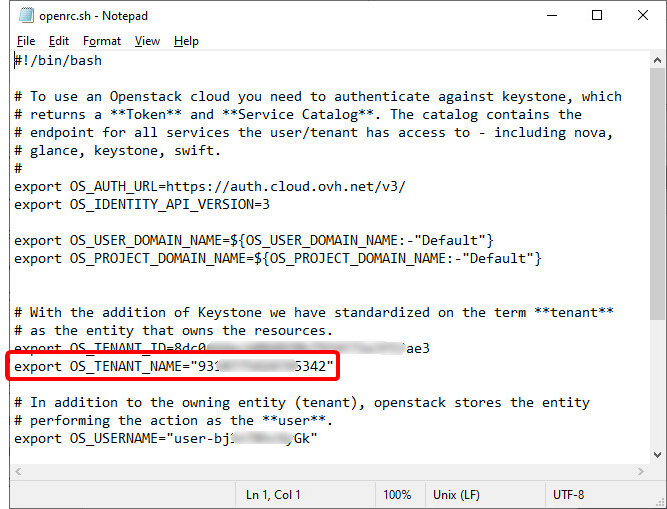
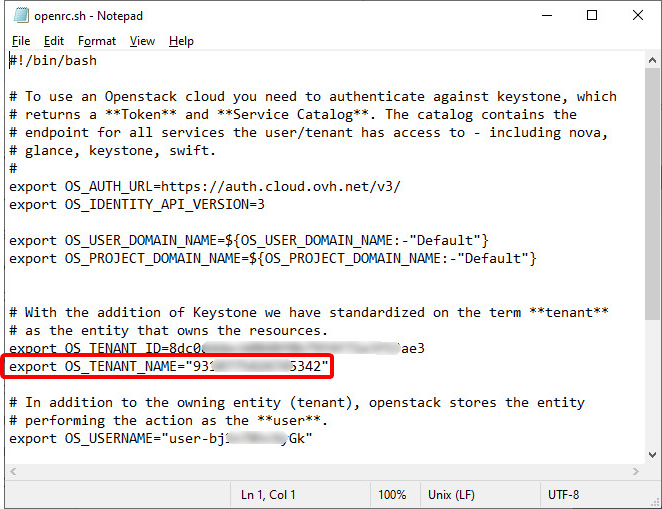
Open the downloaded file (“openrc.sh”) inside notepad.
The Anatella parameter P6 (tenant name) is visible here:
2.3. Create a new Container:
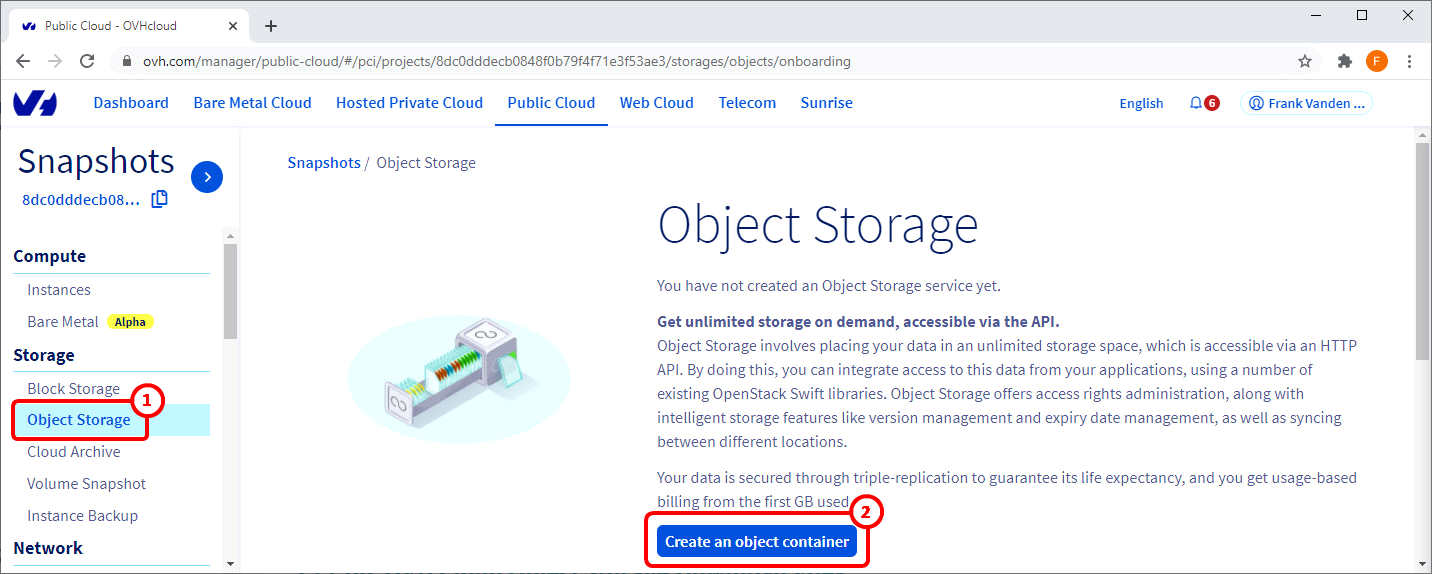
In the left menu, click on “Object Storage”: ![]()
Click on the “Create an object container” button: ![]()
Select the Data Center(“Region”) that will hold your files ![]() , Select the “type of container”
, Select the “type of container” ![]() , give a name to the container
, give a name to the container ![]() and, finally, click the “Create Container button”:
and, finally, click the “Create Container button”: ![]()
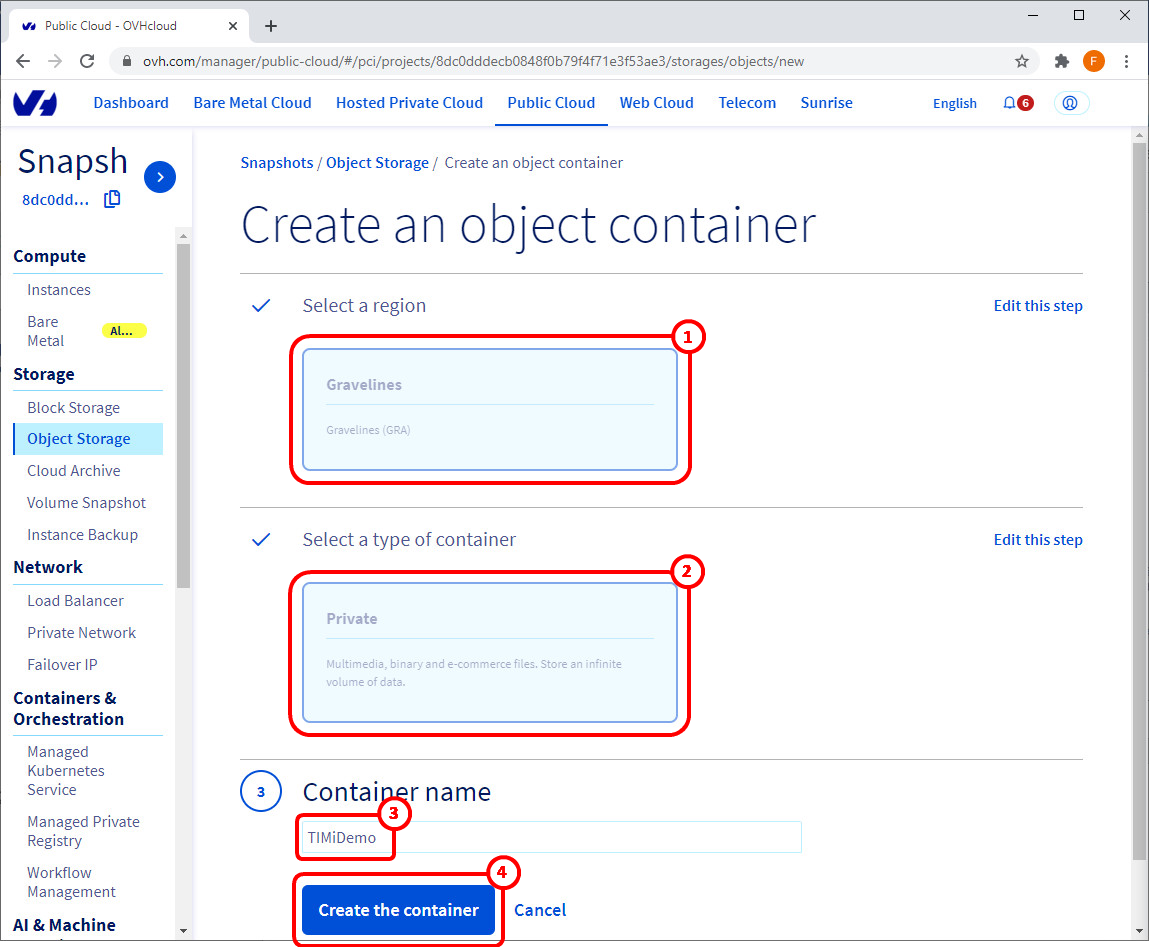
You have now a brand-new container.
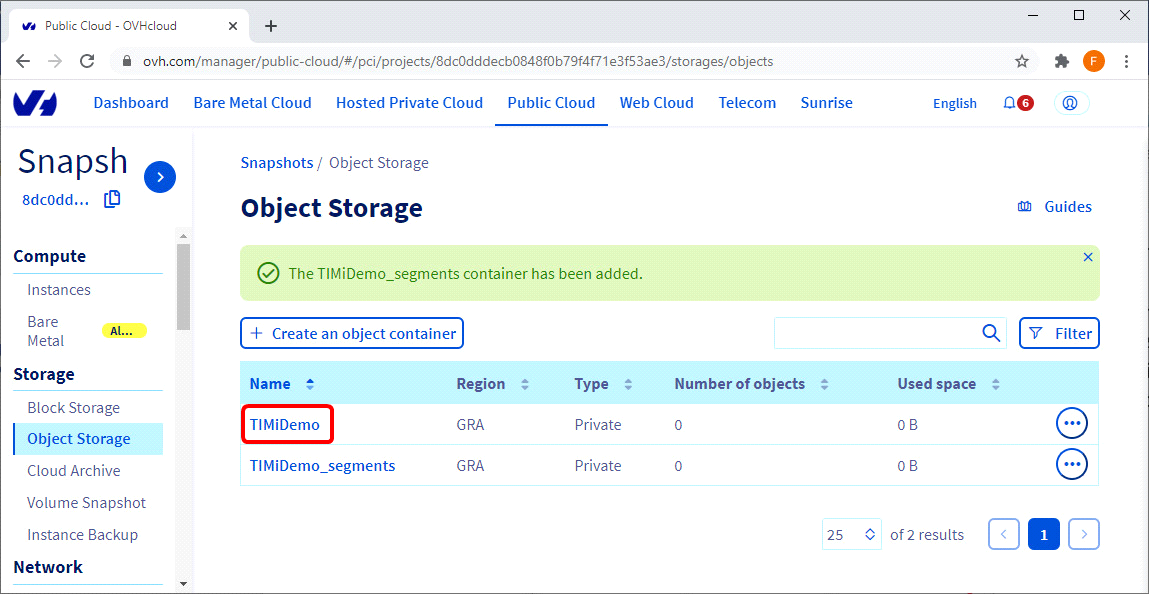
If you opted for the “Solution 2 (the more complex solution)” described in the previous section 5.22.59.1., you’ll need to create a second container whose name ends with “_segments”. We did exactly that (i.e. we created a second container) in the screenshot below. Click now on your (first) container:
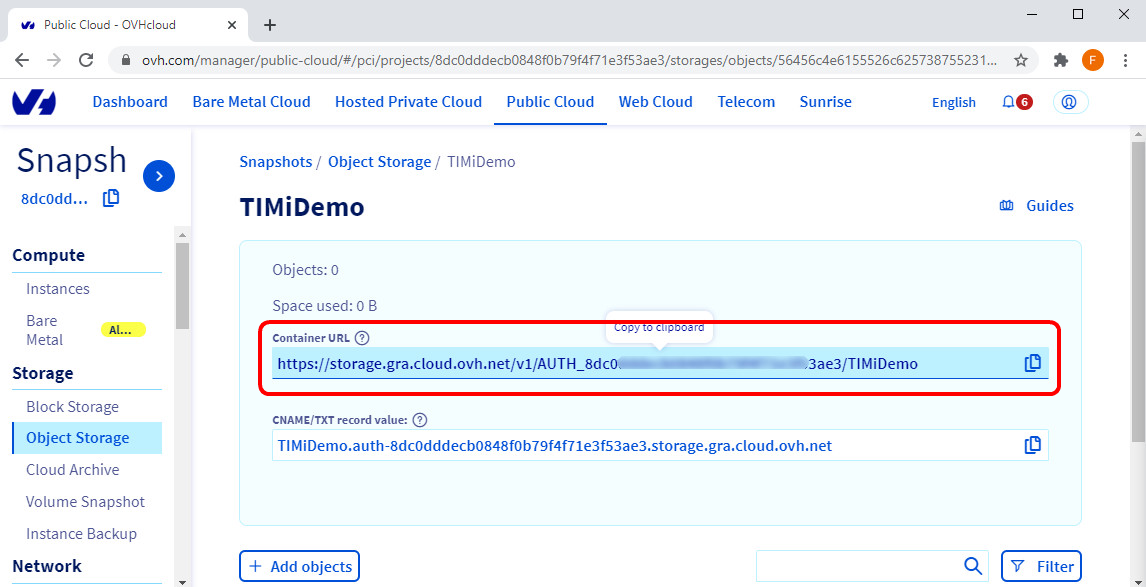
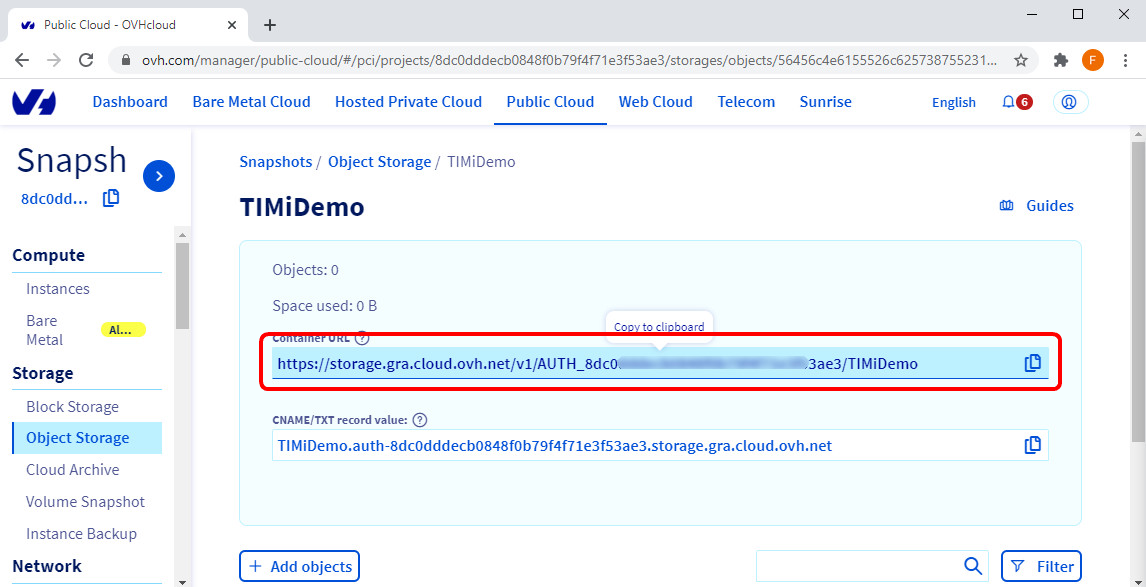
The Anatella parameter P3 (Container URL) is visible here:
You now have the 4 required parameters to connect to your OVH Cloud Object Storage.
3. You want to connect to an already existing OVH Cloud Object storage:
3.1. Get your credentials:
In the top menu, click on “Public Cloud” : ![]()
In the left menu, click on “Users & Roles”: ![]()
Click on the ![]() icon
icon ![]() and select “Download Openstack’s RC file”:
and select “Download Openstack’s RC file”: ![]()
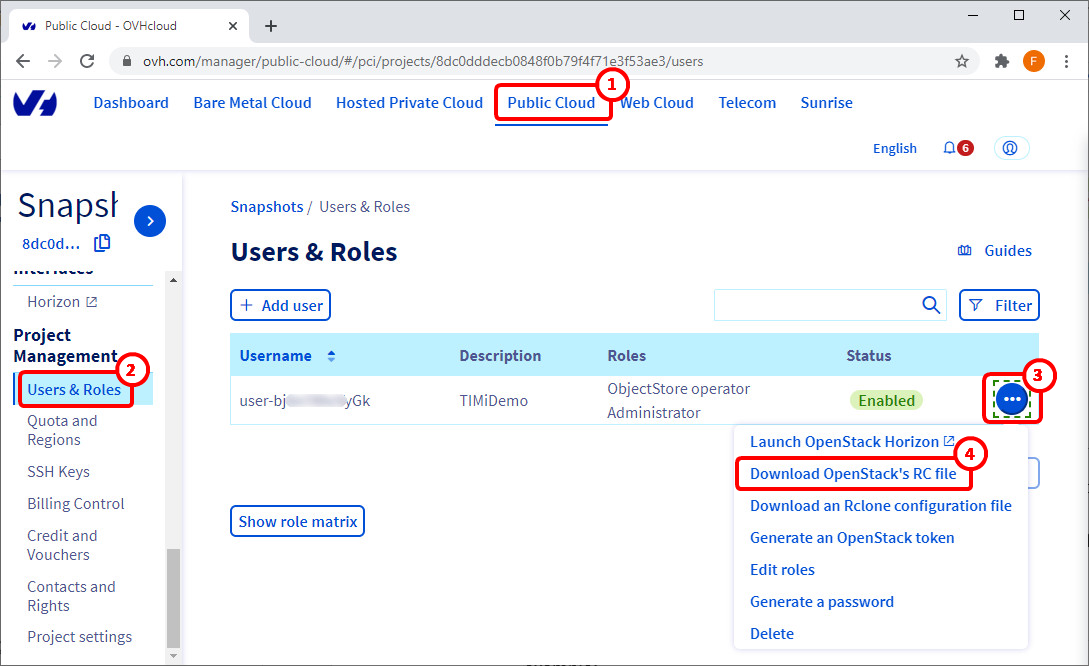
The Anatella parameter P4 (user name) is here:
If you lost your parameter P5 (password), you can create a new password here
Please make sure that you selected a user that can access the Object Storage (i.e. the “roles” of this user must contain “ObjectStore Operator”). Alternatively, create a brand-new user with the correct “roles”, following the procedure given in the point 2.2. here above.
Open the downloaded file (“openrc.sh”) inside notepad.
The Anatella parameter P6 (tenant name) is visible here:
3.2 Get the Container URL:
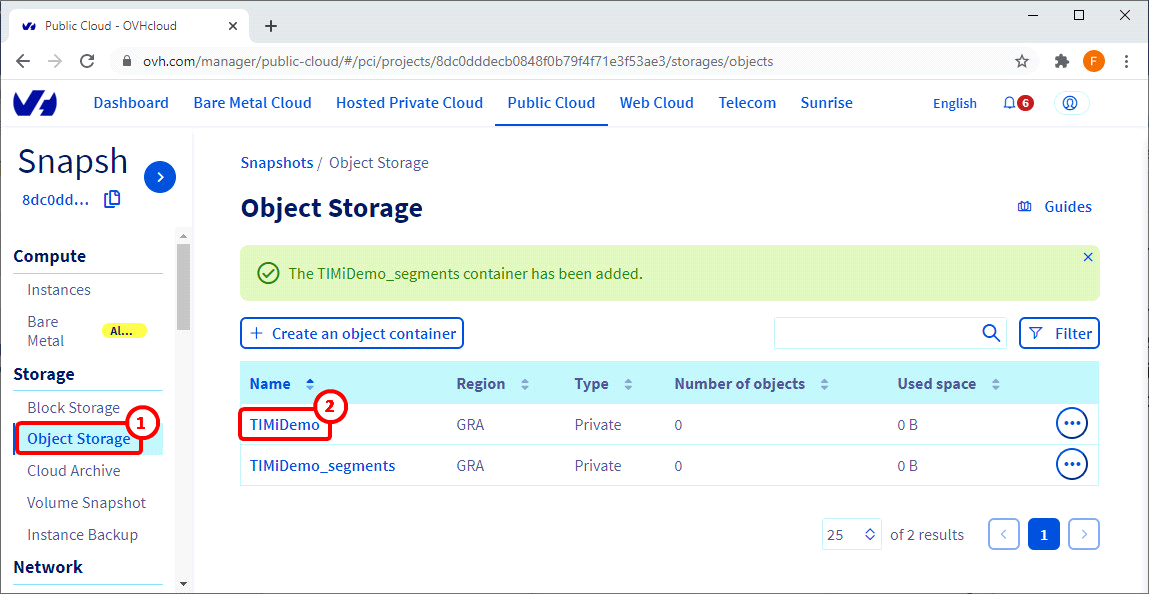
In the left menu, click on “Object Storage”: ![]()
Click on your (first) container: ![]()
The Anatella parameter P3 (Container URL) is visible here:
You now have the 4 required parameters to connect to your OVH Cloud Object Storage.