![]()
One pre-requisite to be able to run an Anatella graph inside Jenkins is to register your Anatella/TIMi licences as a “System-Wide” License: More precisely: You must follow the procedure given in section “7.4.4: Enter a Server-Wide Licence”.
Here, we’ll give instructions for the installation of Jenkins under Windows. The installation process under Linux is similar. A simplified Jenkins installation procedure is also documented using a youtube tutorial video available here: https://www.youtube.com/watch?v=MtuUpn2GskI
Follow these steps:
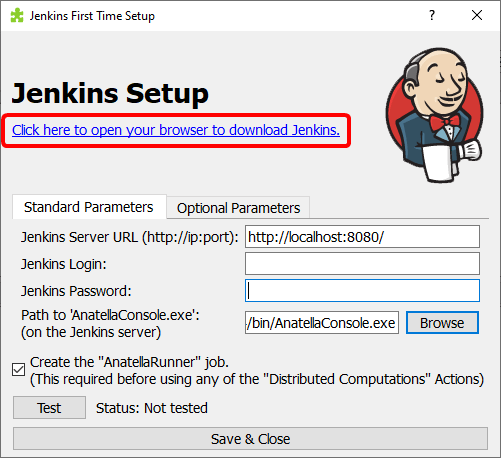
1.Inside Anatella, open the “Automation” drop-down menu and select “Configure Jenkins”:

2.Inside the Jenkins configuration screen, click on the blue URL link:
3.Your browser should now display the URL: http://download.timi.eu/Jenkins/
Download the 3 files: “jenkins.xml”, “jenkins_xxx.msi” and “jre_xxx.exe”:
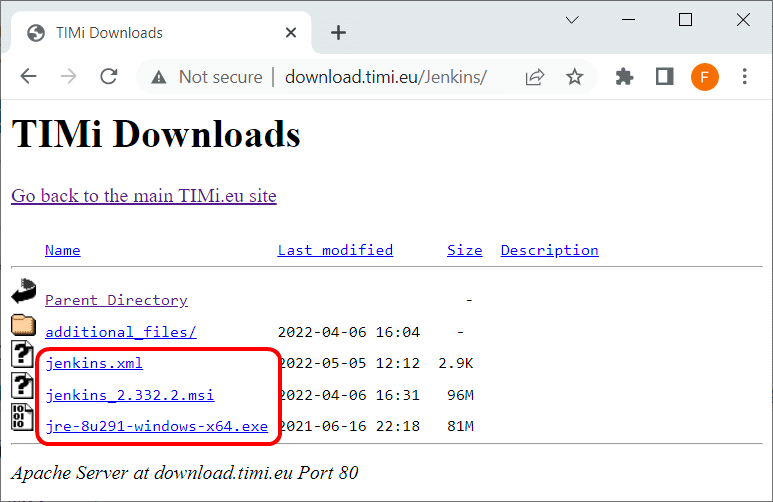
These files are placed there for your convenience.
You can also download them from their original location: These are:
•For the Jenkins installer (“Jenkins_xxx.msi”): https://www.jenkins.io/download/
•For the Java Virtual Machine (“jre_xxx.exe”):
…either from here: https://www.oracle.com/java/technologies/downloads/
…or from here: https://adoptium.net/temurin/releases/
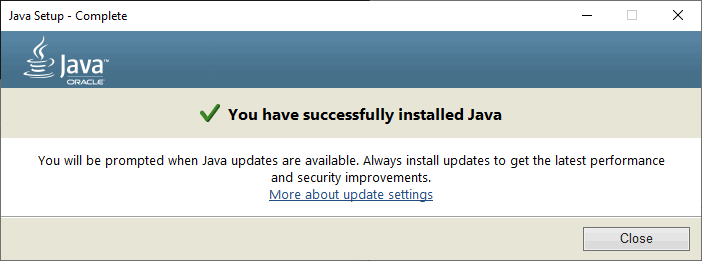
4.Install the “Java Virtual Machine”: Run the file “jre_xxx.exe”. Click the “Install” button and wait until completion of the install process. For exemple, you should see:
5.Run the file “jenkins_xxx.msi”, click the “Next” button and select the Jenkins installation directory. I usually choose: “C:\soft\Jenkins\” like that: ![]()

..and click “Next”. ![]()
6.On the next configuration screen, select the radio button “Run the service as LocalSystem (not recommended)” ![]() and click the “Next” button
and click the “Next” button![]() :
:
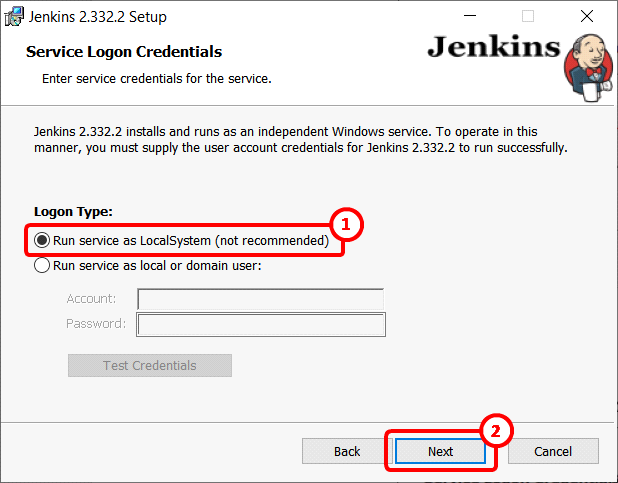
More Details: We really need to execute the Jenkins service “as a local or domain user” otherwise we’ll run into many troubles (see section 4.8.3.2. for a list of all the bad things that can happen when running the Jenkins service as the “LocalSystem” account). …But, unfortunately, the Jenkins installer has a bug that prevents us to select the better option (i.e. we cannot select “Run service as local or domain user”), so we select instead here the worse option (i.e. we selected “Run service as LocalSystem (not recommended)”) and we’ll perform a few extra operations (during step 11 of this installation procedure) to ensure that the Jenkins Service is still running “as local or domain user”.
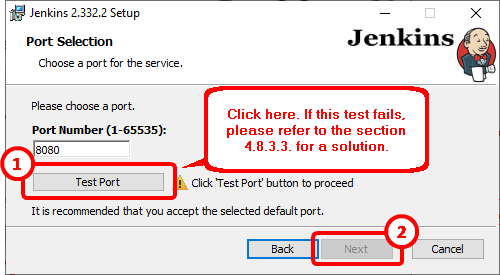
7.Click on the “Test Port” button ![]() , click on the “Next” button:
, click on the “Next” button: ![]()
Select the “Java Virtual Machine” that will be used to run Jenkins. By default, it’s:
C:\Program Files\Java\jre1.8.0_291\
…And click the “Next” Button:

You might get a warning message about installing “Java 11” instead of “Java 8”. Disregard this warning.
8.Click the “Next” button:

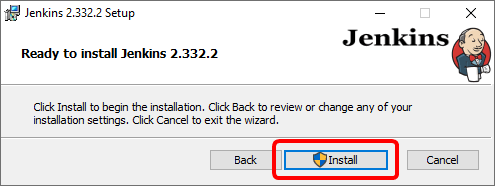
9.Click the “Install” button:
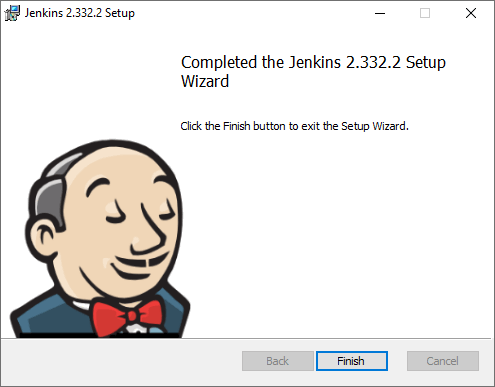
10.After a few minutes, you should see:
If you get a message about “impossible to start service”, you need to follow these two steps to open the “service manager” and manually start the “Jenkins” service:
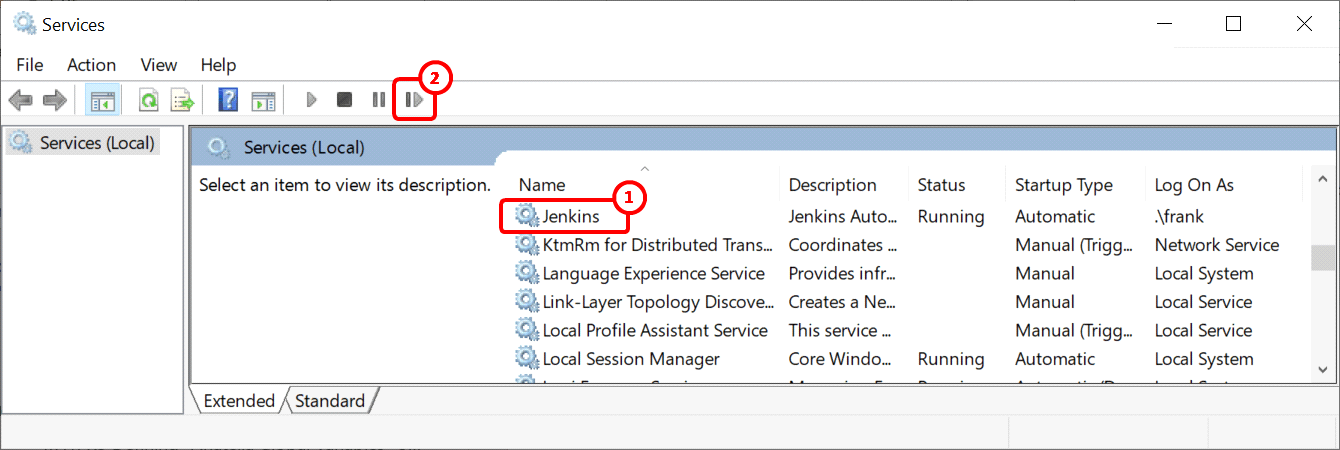
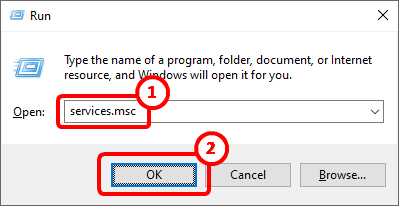
•Open the “Service” Manager: Press simultaneously the keys [WIN]+[R] on your keyboard to open the “Run” window. Then write “services.msc” ![]() and click the “OK” button
and click the “OK” button![]() :
:

•Inside the “Service” Manager window: select the “Jenkins” service ![]() and click the restart button
and click the restart button![]() :
:
If Jenkins still does not start, please refer to the section 4.8.3.3. to know how to diagnostic & fix the error.
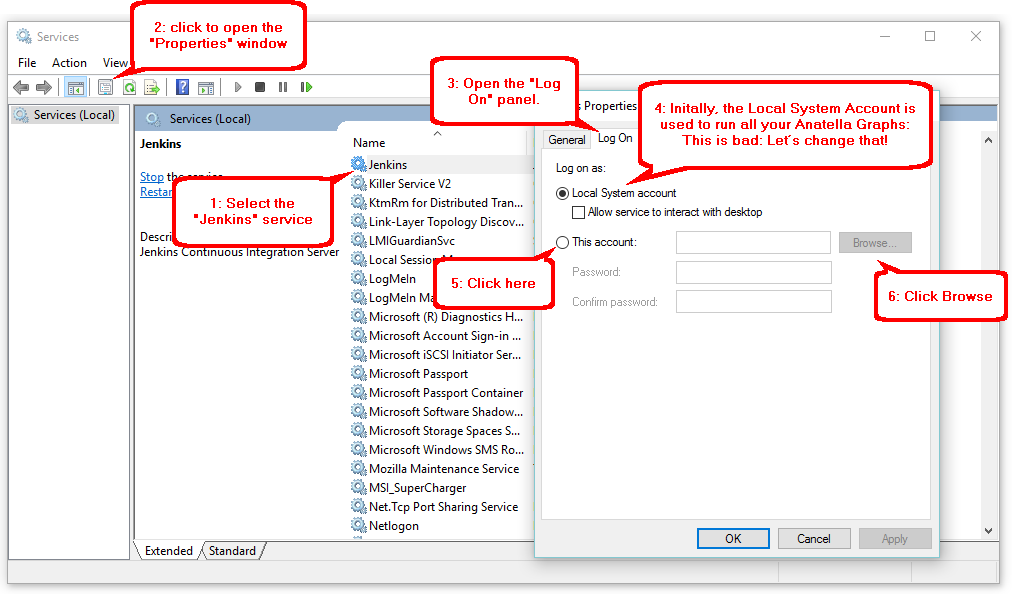
11.We really need to execute the Jenkins service “as a local or domain user” otherwise we’ll run into many troubles. Unfortunately, up to this point, the Jenkins service is running “as the LocalSystem account”. Let’s correct that!
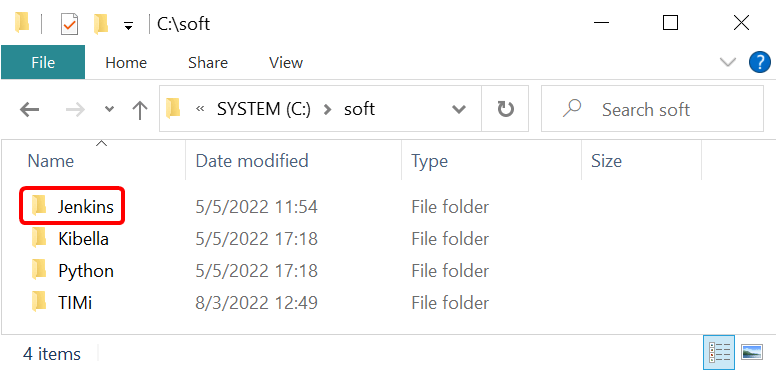
11.1.Navigate to the Jenkins installation directory (usually “c:\soft\jenkins”). By default, you don’t have the rights to see the content of the “jenkins” directory. To get these rights, the easiest way is to double-click the “Jenkins” directory inside the MS-File-Explorer windows:
Then you see:
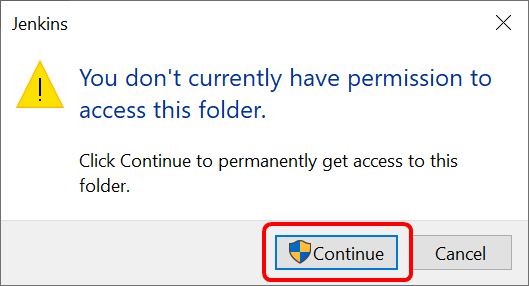
Just click on the “Continue” button:
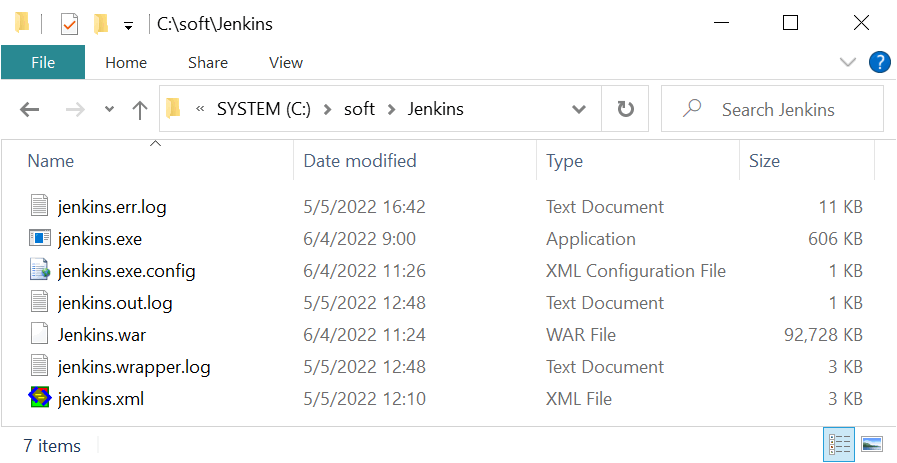
You should now see:
This step is important because your user MUST have the write access rights to the Jenkins directory (otherwise the Jenkins service won’t start because it needs to be able to write LOG files inside this directory). If you installed Jenkins inside “c:\program files”, you need to change the user access rights of the “c:\program files\jenkins” directory to allow your user to write inside this directory.
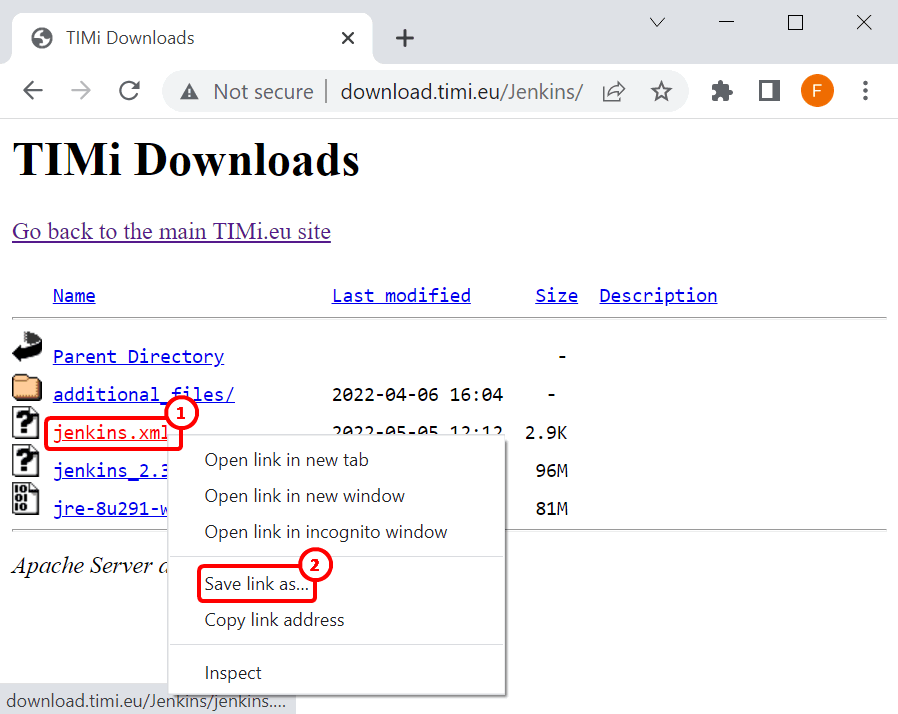
11.2.Replace the file “Jenkins.xml” inside the Jenkins installation directory with the one downloaded from: http://download.timi.eu/Jenkins/ . You should already have downloaded this file (during the step 3 of this installation procedure). If you don’t have it yet, right-click the “jenkins.xml” link ![]() and select “Save link as…”
and select “Save link as…” ![]() :
:
![]()
The difference between this new “Jenkins.xml” and the original “Jenkins.xml” is: We just replaced all occurrences of “%ProgramData%” with “%LocalAppData%” everywhere in the file (i.e. these three lines changed).
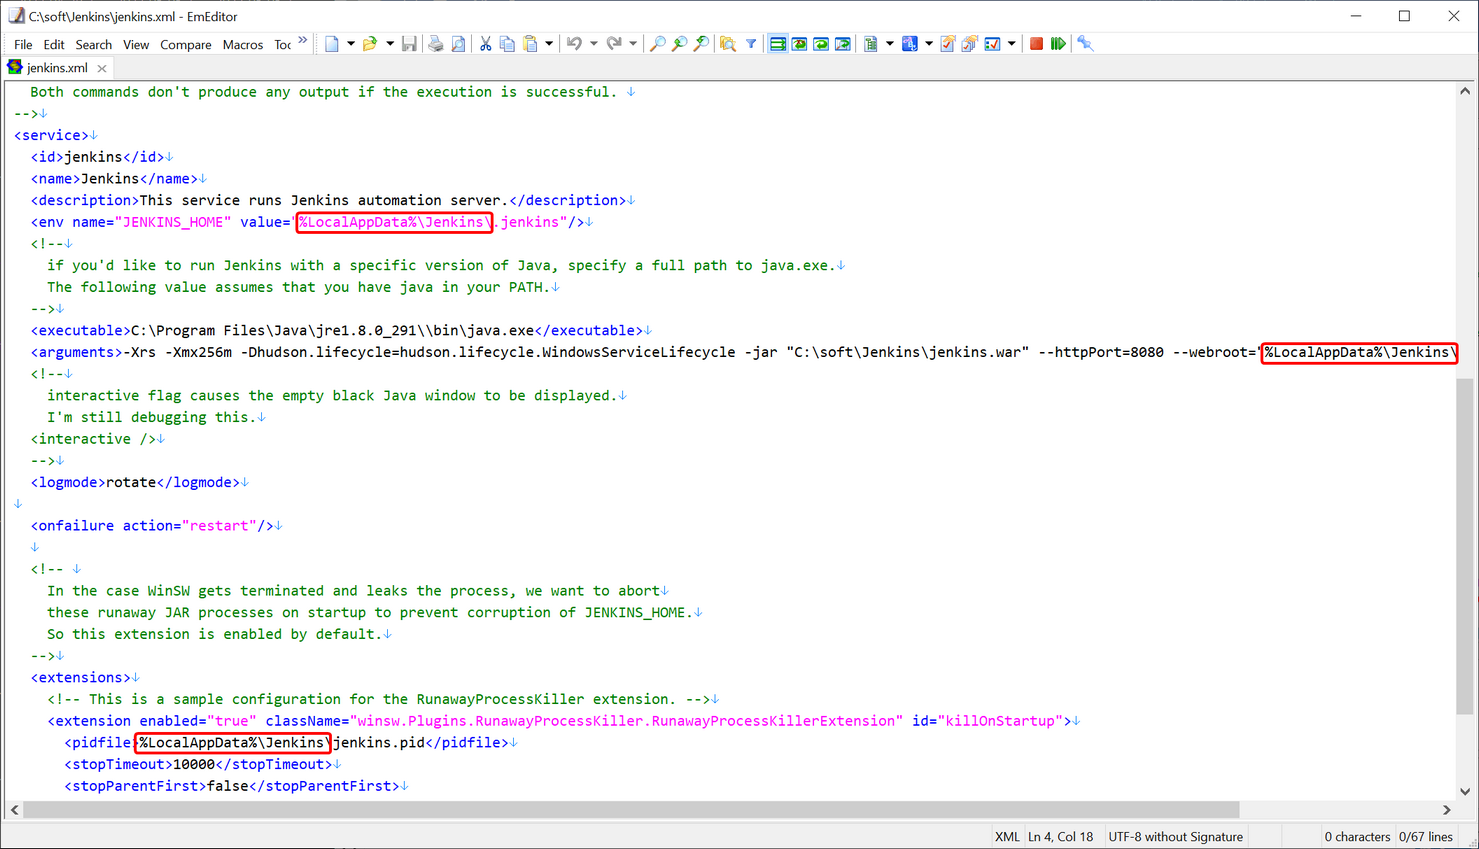
11.3.Jenkins is a tool coded in Java. Thus, to run Jenkins, we need a “Java Virtual Machine” (that we installed during the step 4 of this procedure). Please verify that this FilePath matches the location of a locally installed “Java Virtual Machine”:
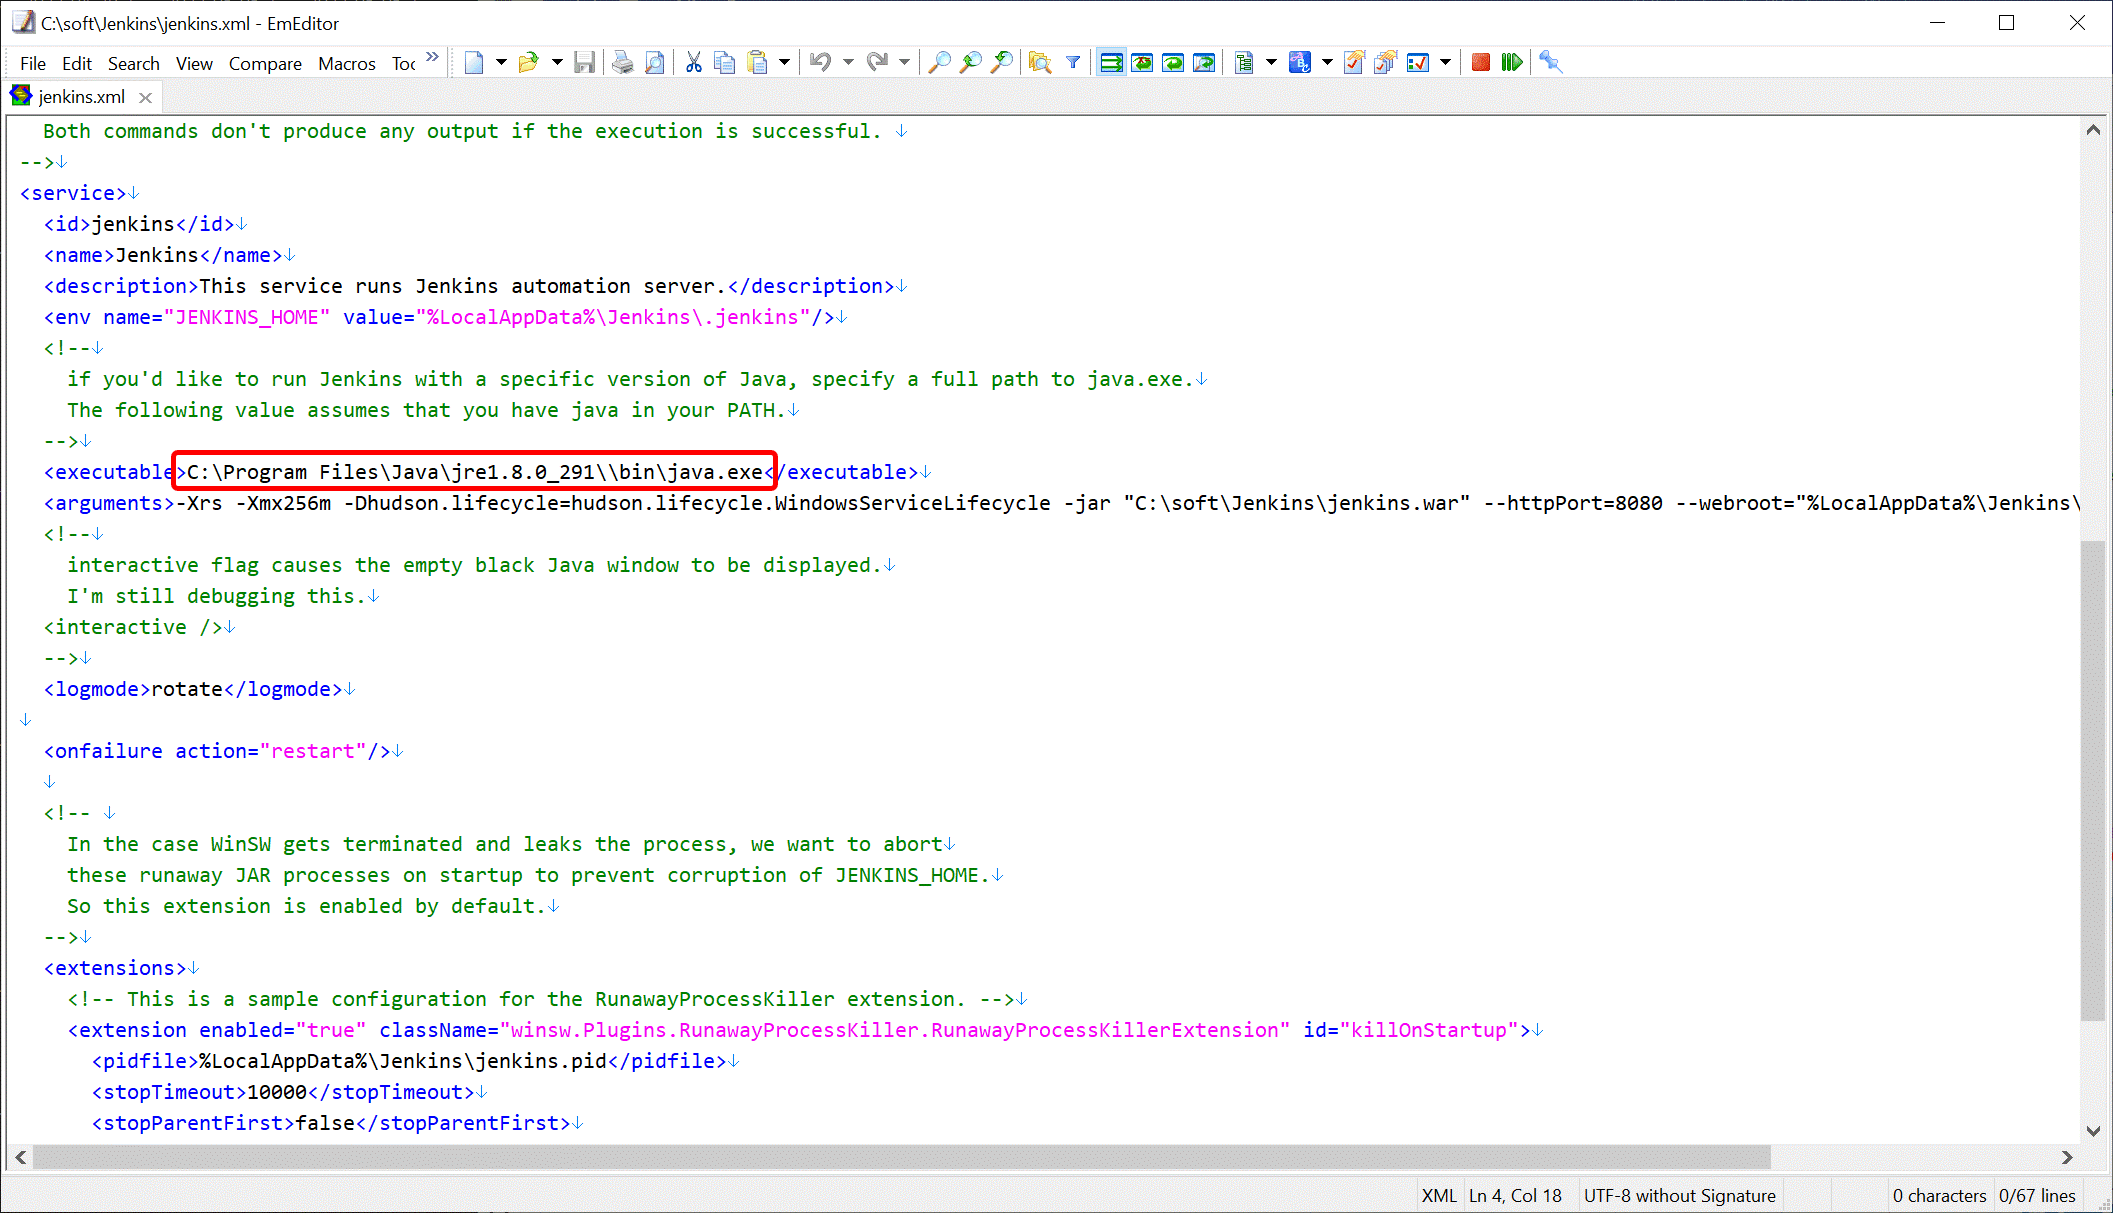
If that’s not the case (the FilePath is incorrect), you’ll get this error message: “The Jenkins service on Local Computer started and then stopped” when starting the Jenkins service.
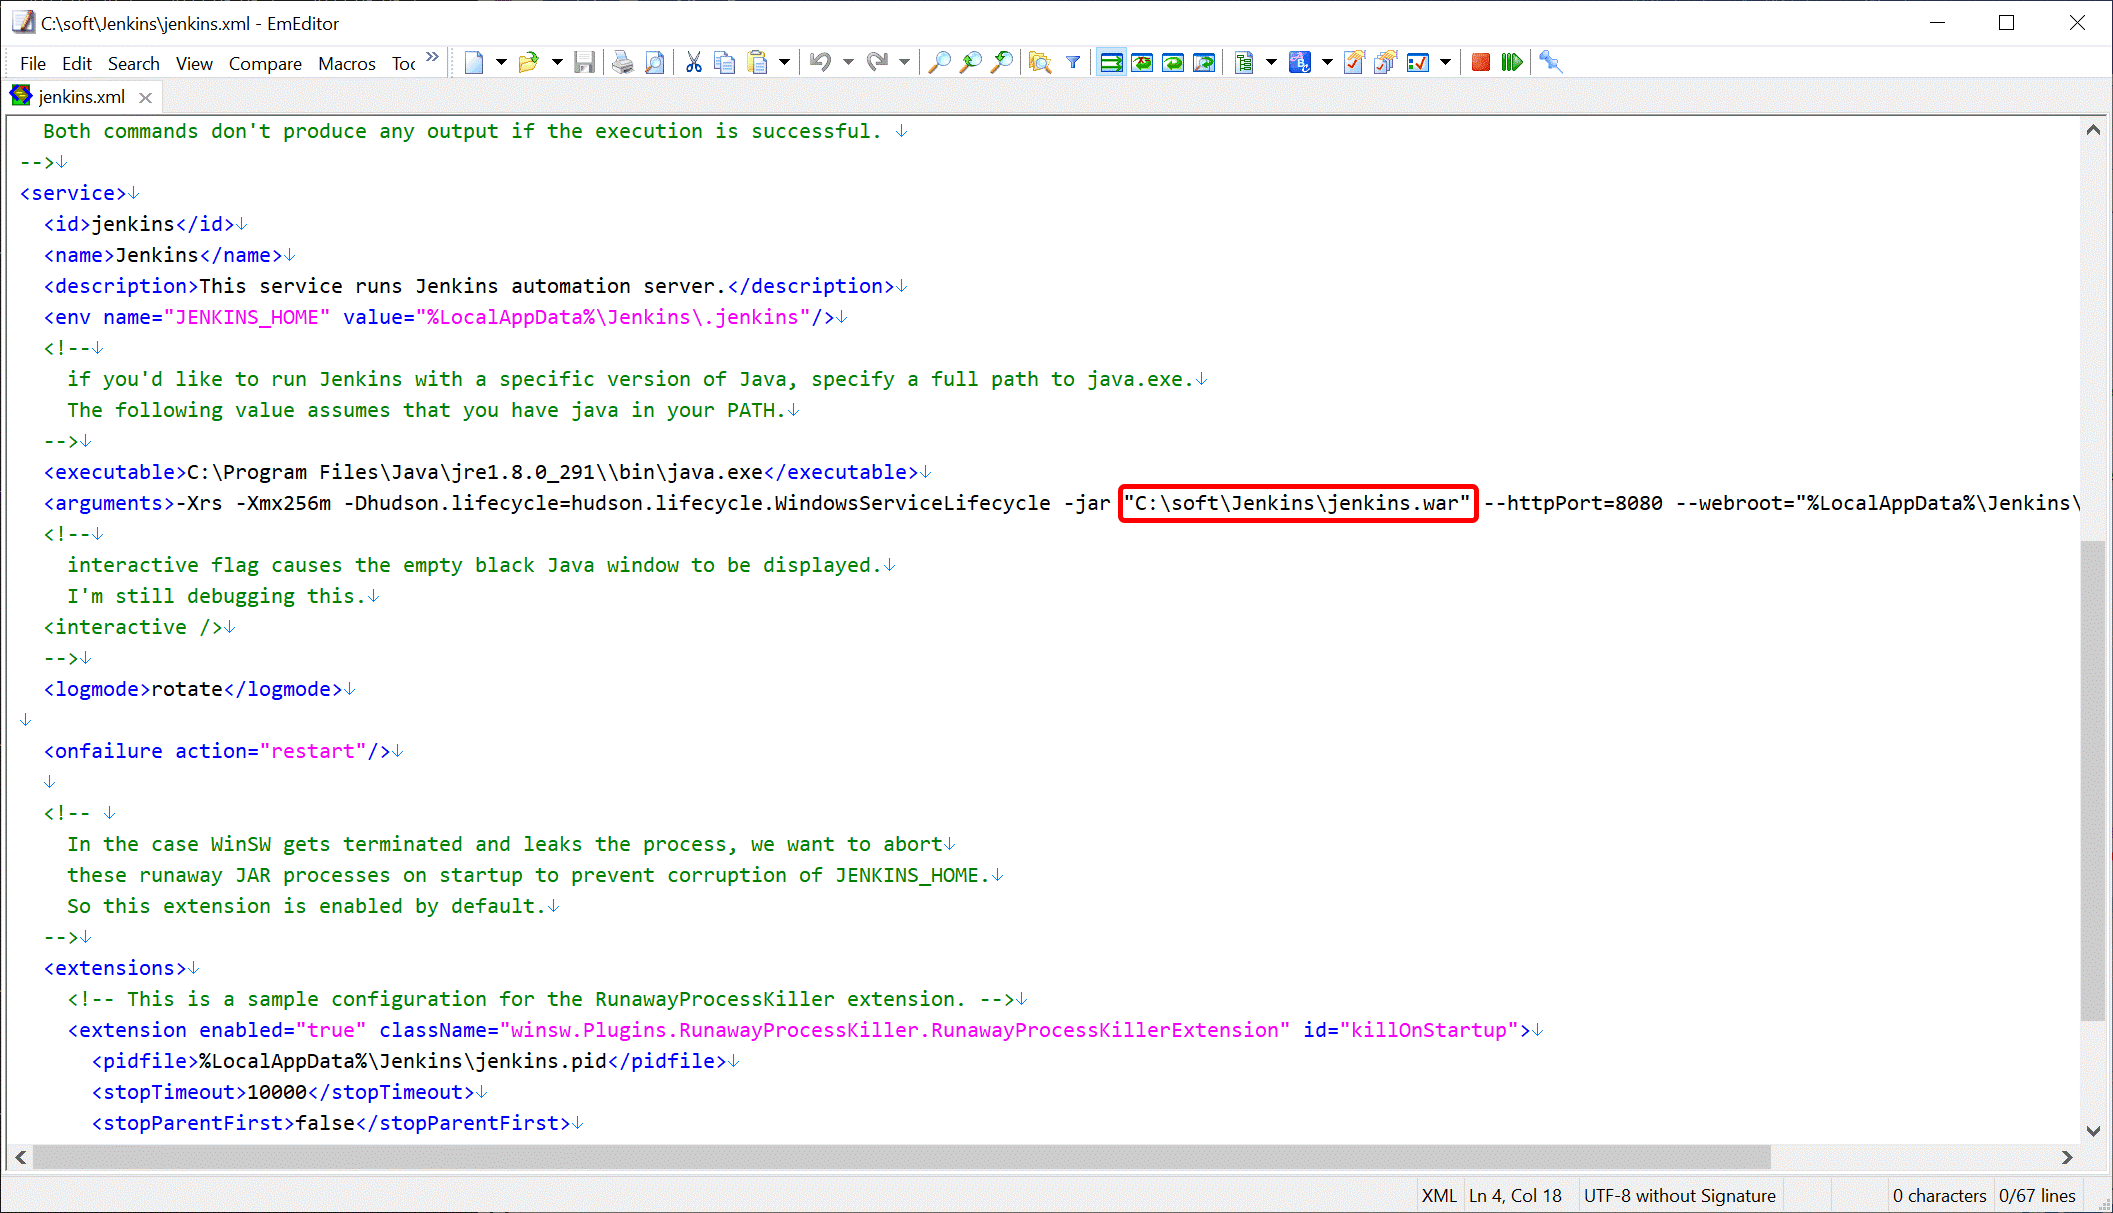
11.4.Please verify that this FilePath matches the location of your Jenkins installation directory:
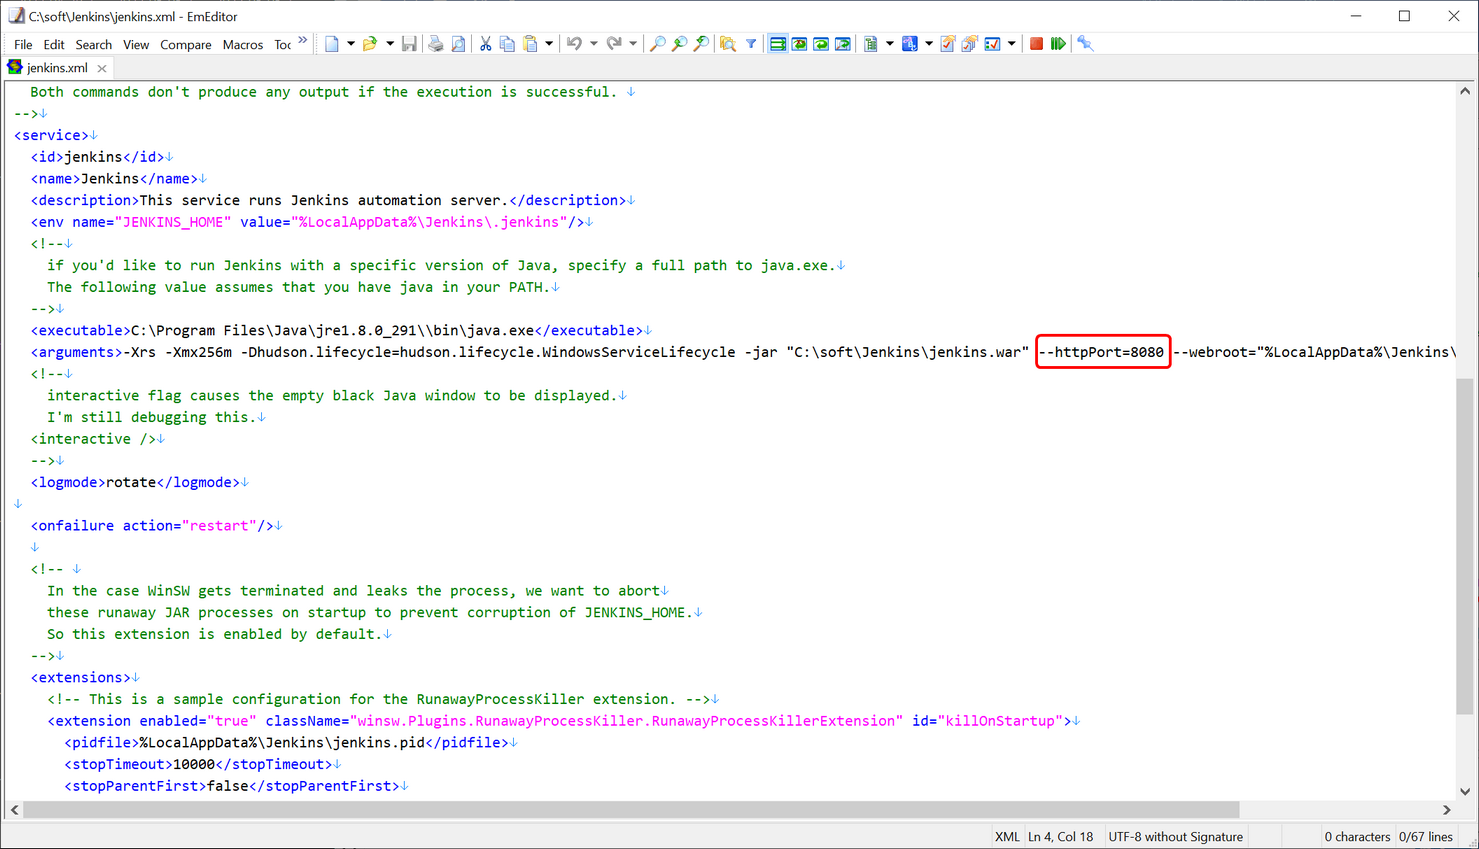
11.5.Optional: By default, Jenkins runs on port 8080. If you changed the value of the default port (during the step 8 of this procedure), you need to edit the “Jenkins.xml” (with “notepad”) and write the new port value here:
11.6.Open the “Service” Manager: Press simultaneously the keys [WIN]+[R] on your keyboard to open the “Run” window. Then write “services.msc” ![]() and click the “OK” button
and click the “OK” button ![]() :
:
11.7.Inside the “Service” Manager window: We setup the Jenkins service to run under your local user:
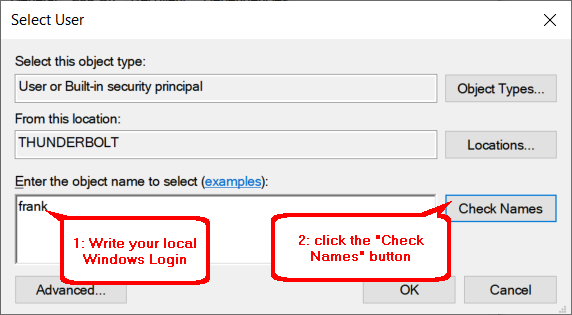
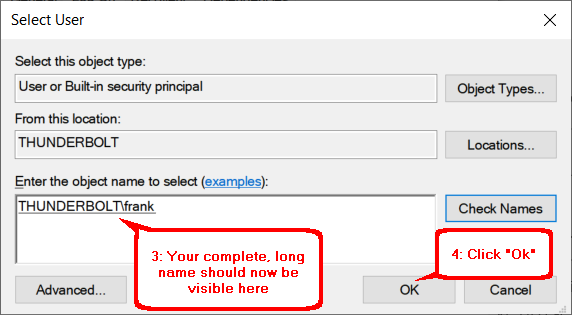
11.8.Let’s select your Local Windows account:
![]()
11.9.Enter your windows password (2 times) and press the “Ok” button:
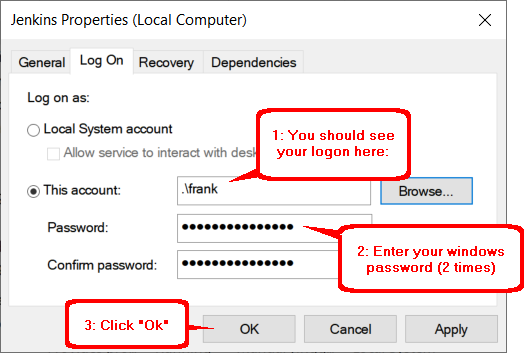
11.10.You should see:
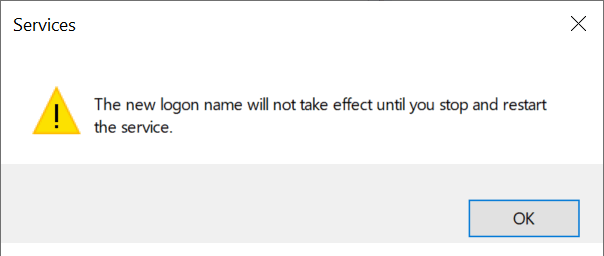
11.11.Restart the Jenkins service:

12.Open a browser and navigate to http://localhost:8080 (this is the default jenkins URL). You should see:
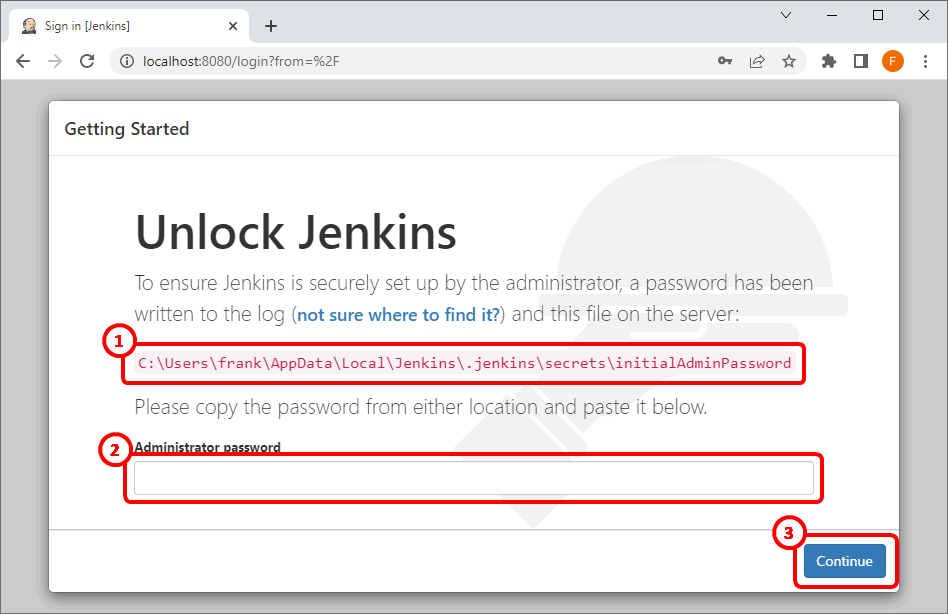
Open with “notepad” the file located here: ![]() ..and copy the content of this file here
..and copy the content of this file here ![]() :
:
Click the “Continue” button ![]() .
.
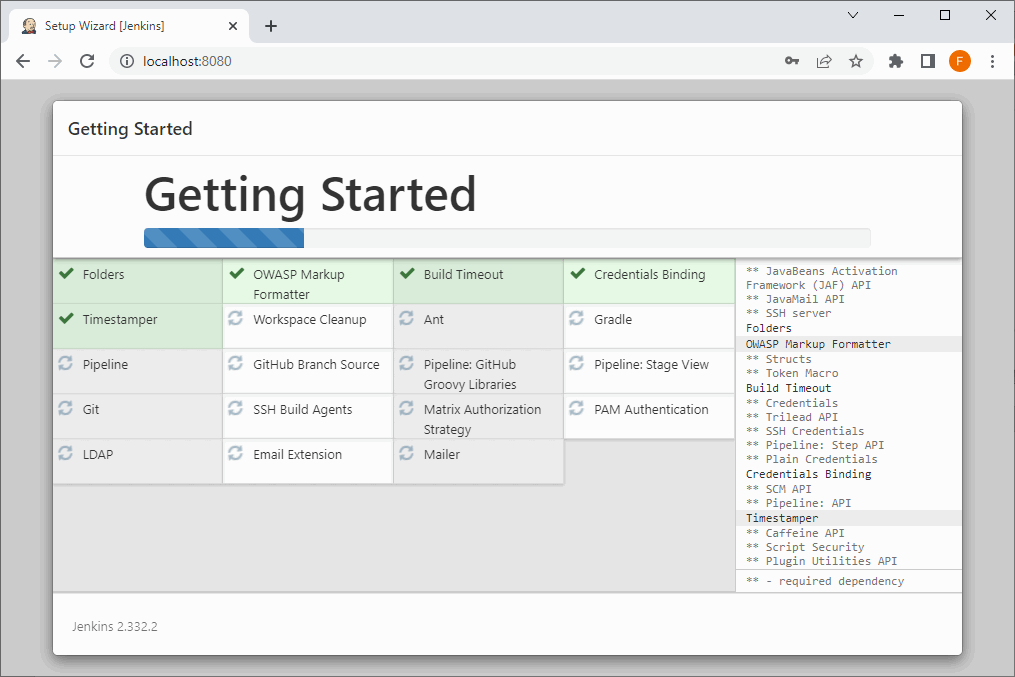
13.Click the “Install suggested plugins” button (you’ll still be able to install more plugins later):
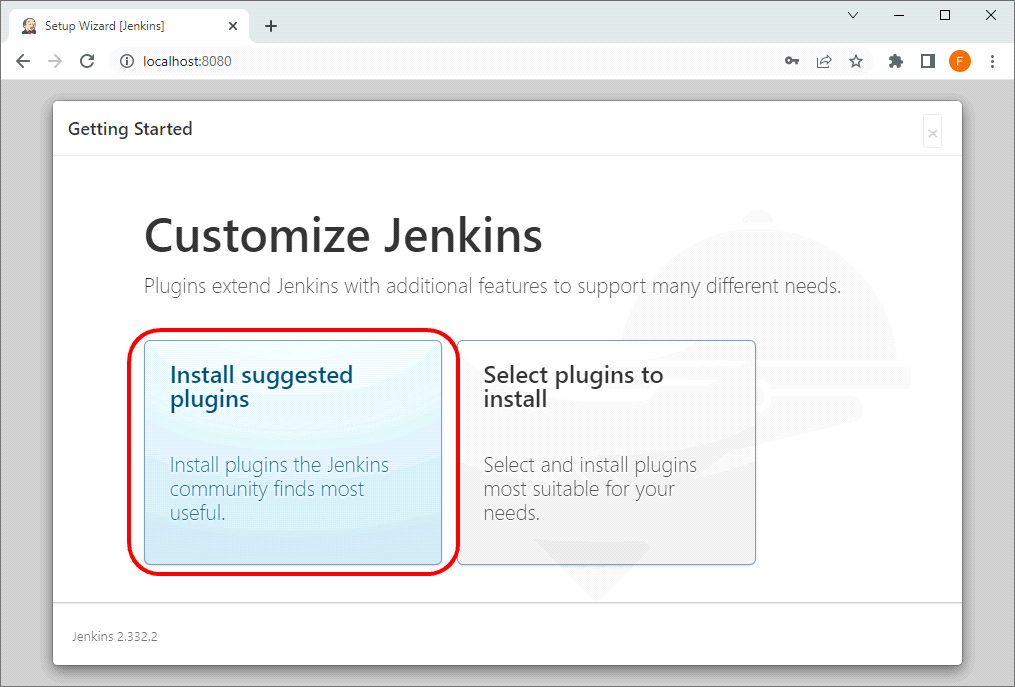
14.Please wait until the default Jenkins plugins are downloaded&installed. This might take some time, depending on your internet connection speed. Do not worry if some plugins do not install directly because:
•you don’t need any of these optional plugins to use Jenkins with Anatella.
•you can always install any of them later.
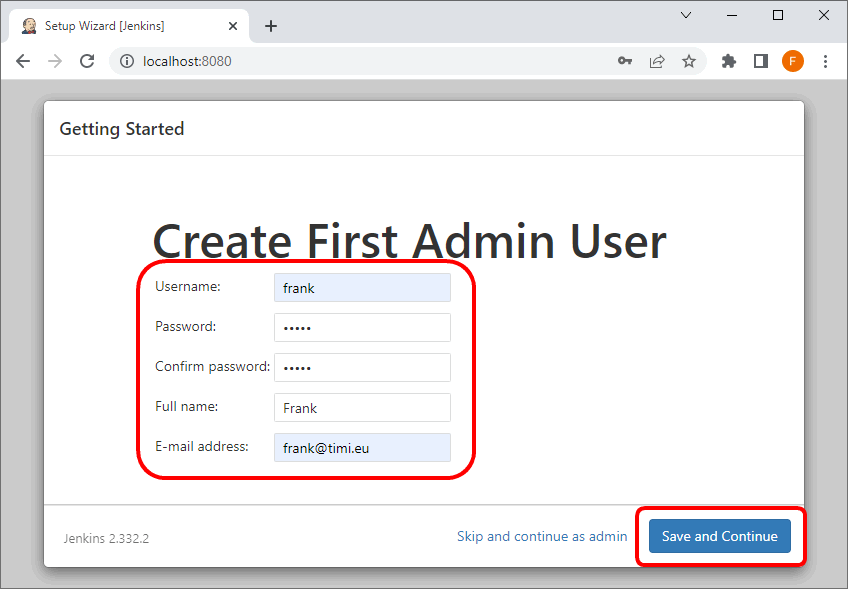
15.Create you first administrative user. You need to remember the login/password that you used here, on this step, because you’ll need to enter it again later inside Anatella during step 18. Click on the “Save and Continue” button:
16.You should now see:
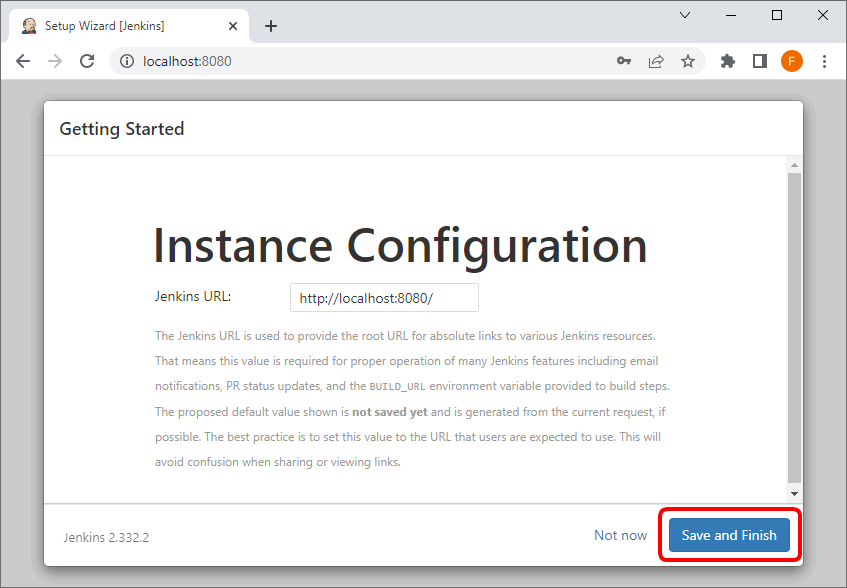
Click on the “Save and Finish” button.
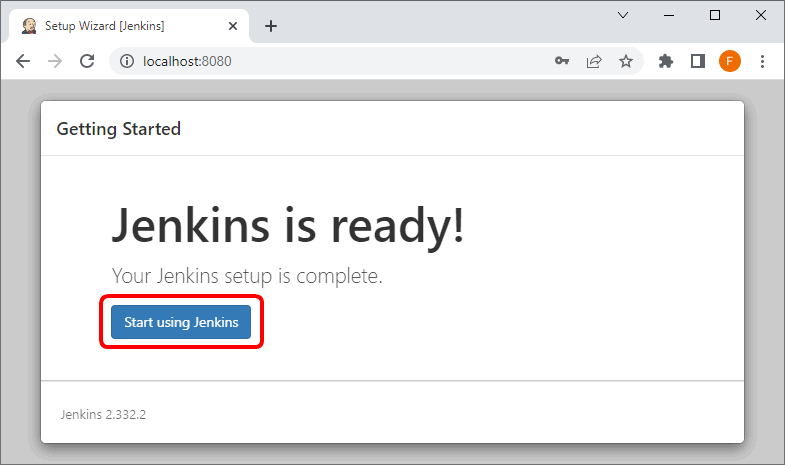
17.Click on the “Start using Jenkins” button:
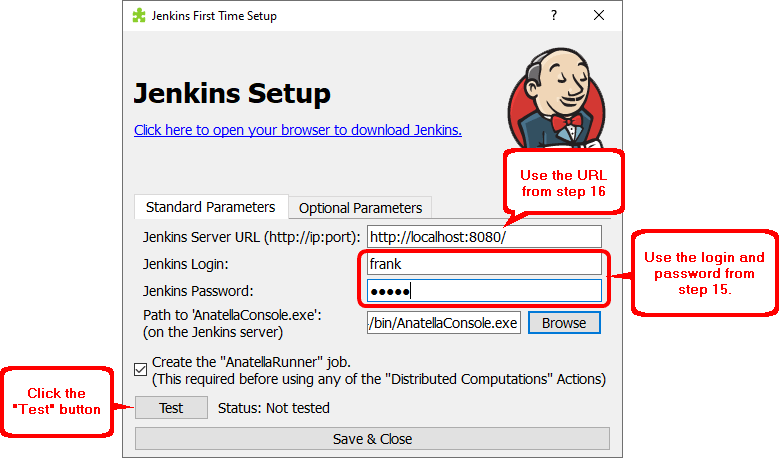
18.Inside Anatella, go back to the Jenkins configuration screen (i.e. open the “Automation” drop-down menu and select “Configure Jenkins” option). Enter in the Anatella window your Jenkins login and your Jenkins password that you used during step 15 and click the “Test” button:
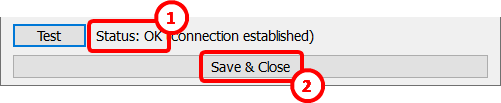
19.You should see “Status: OK” ![]() . Click the “Save & Close” button
. Click the “Save & Close” button ![]() .
.
20.Open a browser and naviguate to http://localhost:8080 (this is the default jenkins URL).
Alternatively, to navigate to your Jenkins URL, you can now press F9 inside Anatella or click here:

You should see:
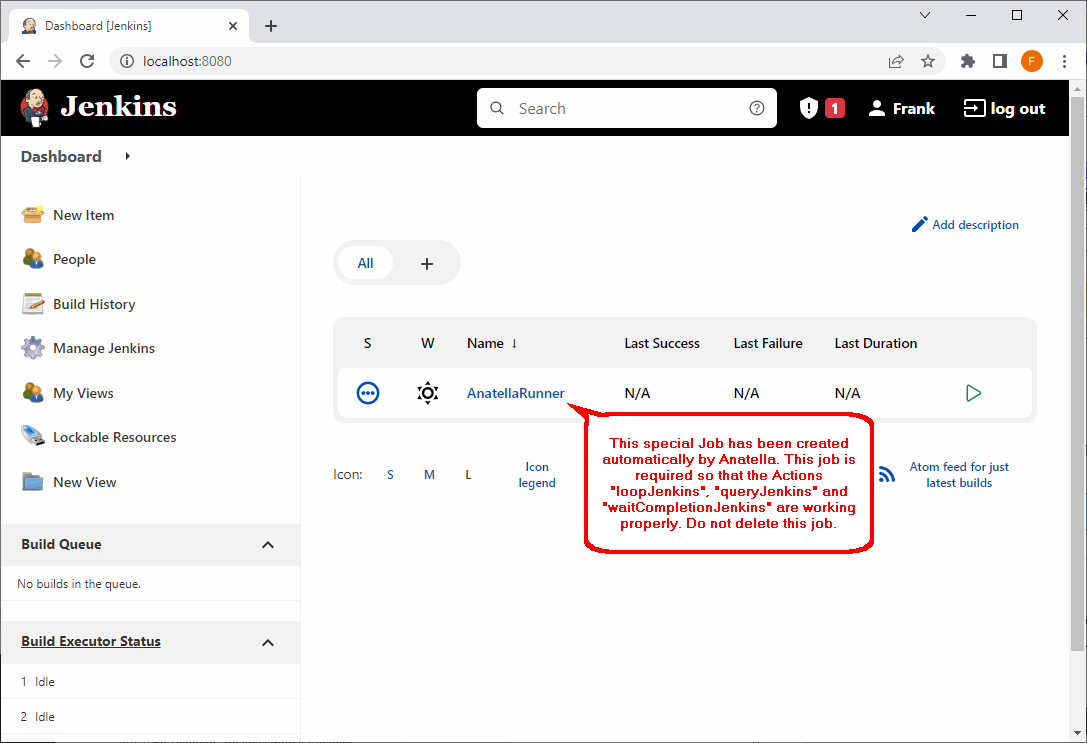
21.Jenkins is now properly configured to work with Anatella.
Congratulations!
22.Optional step 1/2: At this point, you might want to add a few optional Jenkins plugins that might be of interest to you. To do so:
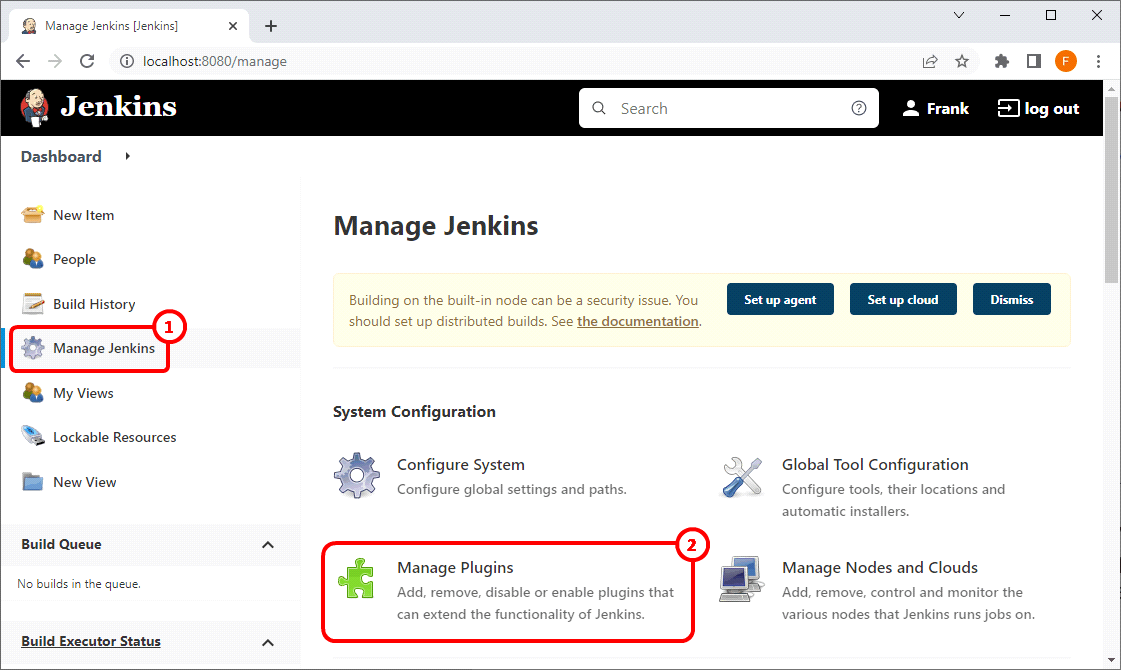
22.1.Open your Jenkins URL in your browser, usually it’s http://localhost:8080
22.2.Click on “Manage Jenkins” ![]() , then click on “Manage plugins”
, then click on “Manage plugins” ![]() :
:
22.3.Click on “Available” ![]() and enter (for example) “build triggers” in the search field here
and enter (for example) “build triggers” in the search field here ![]() :
:
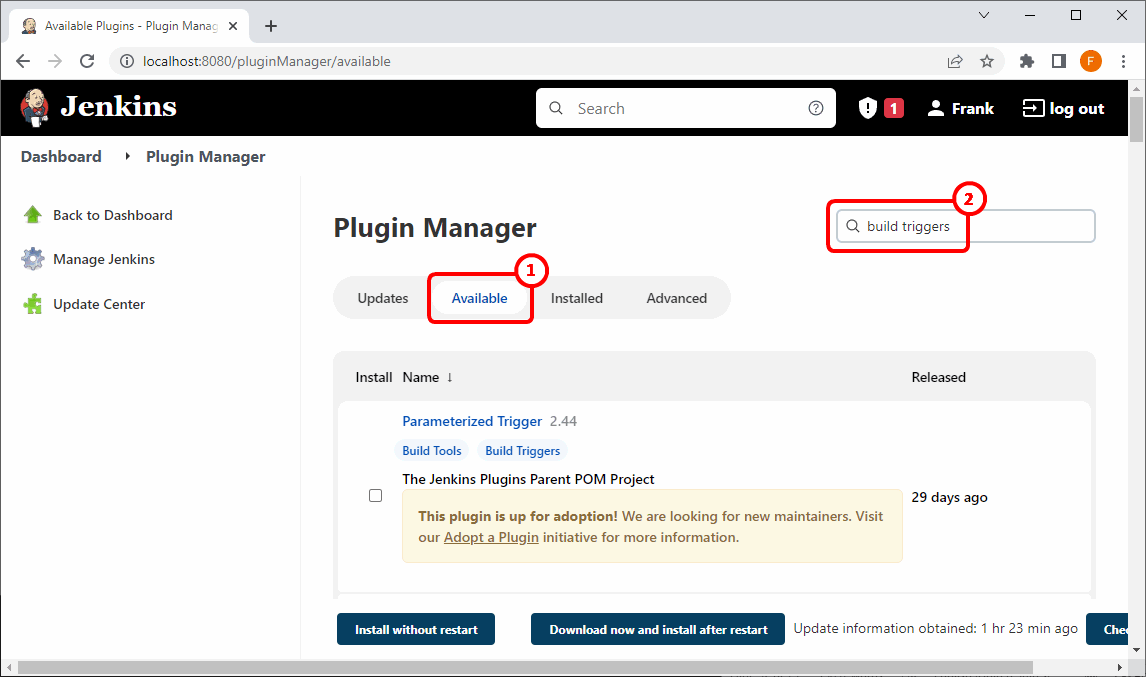
22.4.Here are the names of a few plugins that might interest you:
|
Plugin name |
Plugin function |
|
Generic Webhook Trigger |
Can receive any HTTP request, extract any values from JSON or XML and trigger a job with those values available as variables. Works with GitHub, GitLab, Bitbucket, Jira and many more. |
|
Naginator |
Reschedules failed jobs. |
|
Filesystem Trigger |
makes it possible to monitor changes of a file or a set of files in a folder. |
|
URLTrigger |
makes it possible to poll changes of URLs. |
|
Poll Mailbox Trigger |
to poll an email inbox, and trigger jobs based on new emails. |
|
Files Found Trigger |
Schedules a job when certain files exist. |
23.Optional Step 2/2: “Custom Jenkins Initialization Scripts”
It happens very often that an Anatella graph must read some data files stored on a remote “central” File Server (typically these data files are stored on a “network” drive that is named “X:” or “Z:”). This situation must be handled in a special way when executing such an Anatella-Graph inside Jenkins.
How are created (i.e. “mounted” in technical terms) the network drives? Usually, there exists a customized “ad-hoc” script (written by your IT department) that are “mounting” all the required network drives when you log-in on your computer. This initialization script might typically perform many different tasks, such as:
•It mounts various network drives on your computer (using the “net use” command).
•It initializes different Environmental Variables
•It configures different parameters inside various ODBC/OleDB drivers (such as the character encoding of the ODBC drivers).
•etc.
The Anatella graphs that are executed by Jenkins are each running inside their own “clean” windows session. When Jenkins creates a new “clean” session (to run a new graph), it does not execute any of the “custom initialization scripts” written by your IT department. As a consequence, this means that the network drives (i.e. the drives named “X:” or “Z:”) are not (directly) available. Since some important network drives are missing, it’s very likely that Anatella won’t be able to execute successfully the required data-transformation-graphs.
Hopefully, there is a solution to all these difficulties: i.e. We can define our own “custom initialization scripts” that are executed by Jenkins before running any Anatella graph inside Jenkins. In the simplest situation, you know exactly the content of the “custom initialization scripts” written by your IT department and you can simply copy/paste this script inside the “Jenkins Initialization Script Window” that is accessible here:
23.1.Inside Anatella, go back to the Jenkins configuration screen (i.e. open the “Automation” drop-down menu and select “Configure Jenkins” option) and click on the second panel that is named “Optional Parameters”:
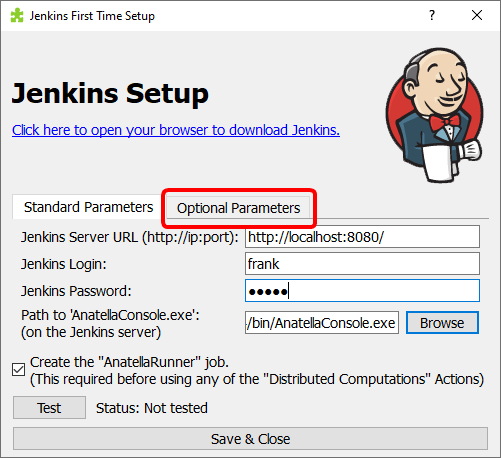
23.2.Enter all the “custom initialization scripts” (e.g. all the commands required to “mount” the network drives) here:

In many situations, the “custom initialization scripts” written by your IT department will be overly complex and it might just be a better idea to use a much simpler “Custom Jenkins Initialization Scripts” that is composed of just a few lines with some “net use” commands such as these ones:
net use Z: \\My_File_Server\public /Y
…or:
net use Z: \\My_File_Server\public <password> /user:<login> /Y
For example, the above command “mounts” the drive “Z:” using your login so that this drive is accessible for Anatella inside Jenkins.