Icon: ![]()
Function: TeradataWriter
Property window:
|
|
|
|
|
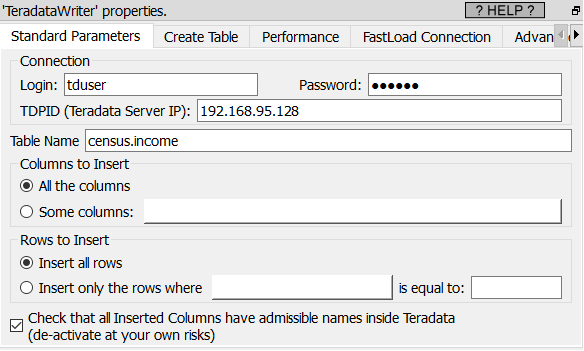
Short description:
Export Tables to Teradata at high speed.
Long Description:
The ![]() Upsert Action (to insert rows into a database) is barely usable with Teradata because it’s extremely slow. So, if you want to INSERT rows into Teradata, the best & fastest option is the
Upsert Action (to insert rows into a database) is barely usable with Teradata because it’s extremely slow. So, if you want to INSERT rows into Teradata, the best & fastest option is the ![]() TeradataWriter Action. Behing the scene, the
TeradataWriter Action. Behing the scene, the ![]() TeradataWriter Action communicates with Teradata using the “FastLoad” Teradata utility. The “FastLoad” Teradata utility has some limitations:
TeradataWriter Action communicates with Teradata using the “FastLoad” Teradata utility. The “FastLoad” Teradata utility has some limitations:
•The “FastLoad” tool can only INSERT rows into an empty table.
•The “destination” table cannot have any INDEX.
If your destination table is non-empty or contains an INDEX, you can still use the ![]() TeradataWriter Action to INSERT rows at high speed into Teradata: More precisely, in such situation you’ll use the
TeradataWriter Action to INSERT rows at high speed into Teradata: More precisely, in such situation you’ll use the ![]() TeradataWriter Action to INSERT rows into an empty intermediary table (without any INDEX) and thereafter copy the content of the intermediary table into the “final, destination” table using the following SQL command: “INSERT INTO <Final_Destination_Table> SELECT * FROM <Intermediary Table>”. You’ll find more details about this procedure in the paragraph named “FAST INSERT: Solution 2” from section 5.27.4.1.
TeradataWriter Action to INSERT rows into an empty intermediary table (without any INDEX) and thereafter copy the content of the intermediary table into the “final, destination” table using the following SQL command: “INSERT INTO <Final_Destination_Table> SELECT * FROM <Intermediary Table>”. You’ll find more details about this procedure in the paragraph named “FAST INSERT: Solution 2” from section 5.27.4.1.
![]()
The “Fastload” tool might seem too restrictive because it does not allow us to add rows into a non-empty table or into a table that has an INDEX: i.e. In such situations, “Fastload” is forcing us to use an intermediary table.
The reality is that we are anyway forced to use an intermediary table for other reasons than the limitation imposed by the “fastload” tool. These other reasons are:
* The INSERT operations inside a table with an INDEX are too slow (and a way to by-pass that very slow speed is to use an intermediary table: See the section 5.27.4.1 for more information about this subject).
* An intermediary table is required to have an INSERT procedure that is guaranteed to have no duplicated or lost rows when uploading rows inside a database (even in the case of a computer crash or power-off in the middle of the upload): See the section 10.10.4.2. for more information about this subject.
Since the limitations imposed by “fastload” are already imposed to us for other reasons, it means that, actually, “fastload” is not so restrictive after all and, 99% of the time, it’s the best/fastest tool to use to INSERT rows into Teradata.
![]()
To guarantee the highest speed possible, the communication between Anatella and the “FastLoad” tool is 100% “in-memory” (in RAM memory): i.e. Anatella writes rows into an “in-memory” window and the “FastLoad” tool directly reads back these rows from memory to inject them at high speed into Teradata. No data is ever written on the hard drive (i.e. Anatella uses a high efficiency INMOD routine to exchange data with “FastLoad”).
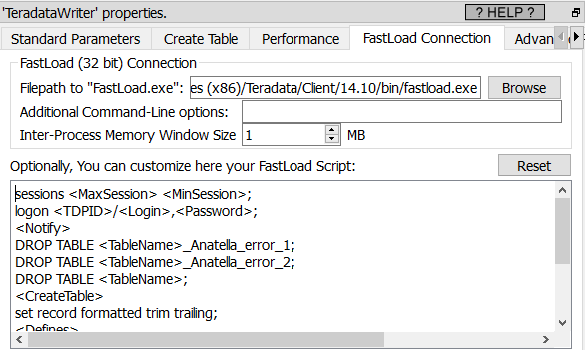
Before using the ![]() TeradataWriter Action for the first time, you must define the location of your “FastLoad.exe” executable. This is only required one time: i.e. the first time that you use the
TeradataWriter Action for the first time, you must define the location of your “FastLoad.exe” executable. This is only required one time: i.e. the first time that you use the ![]() TeradataWriter Action on your machine: Open the parameter window of the
TeradataWriter Action on your machine: Open the parameter window of the ![]() TeradataWriter Action, go to the “FastLoad Connection” panel, click the “Browse” button:
TeradataWriter Action, go to the “FastLoad Connection” panel, click the “Browse” button:
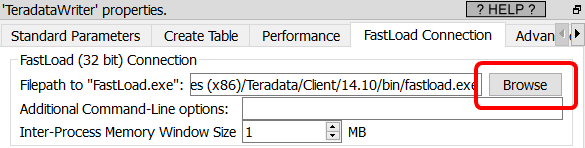
and locate the “fastload.exe” executable.
![]()
The “FastLoad” tool executes asynchroneously meaning that, at the same time Anatella is computing new rows, the “FastLoad” tool is sending to Teradata the rows that it already received (that are already stored in its internal buffer). This guarantees a maximum throughput because, if the data flow coming from Anatella is briefly reduced (e.g. because of a temporary higher load on the CPU), the “FastLoad” tool is still able to continue to send to Teradata at maximum speed (without any slow down) all the rows that are currently in its internal buffer.
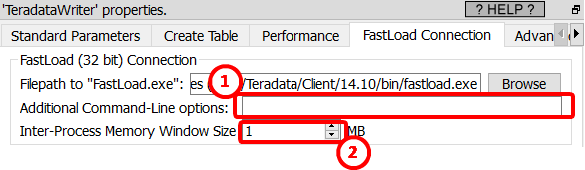
This asynchronous mechanism (that uses an “internal buffer” that guarantees maximum throughput) is not part of the default distribution of “FastLoad”: It’s only available inside Anatella. The size of this “internal buffer” is defined here: ![]()
:
![]()
All the Text data sent to “Fastload” is in Unicode UTF-8: i.e. we run “fastload.exe” with the command-line parameters: “-i UTF8 -c UTF8” to force UTF-8 encoding. Optionally, you can add more user-defined command-line parameters here: ![]()
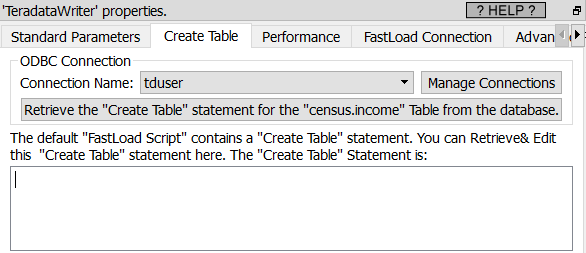
When the “FastLoad” procedure fails in the middle of a “data upload” procedure, The Teradata engine completely locks the destination table and no access (reading or writing) to the “destination” table is possible anymore. The only solution to “unlock” the “destination” table is to DROP the table (and then, just after, re-CREATE it). Only once the “destination” table is “unlocked”, you can write into it again. Fortunately for us, it is possible to directly execute inside the “FastLoad” tool a DROP statement and a CREATE TABLE statement before running any INSERT, so that we have the guarantee that the “destination” table will never be locked when we start INSERTing data into it. Thus, to have the guarantee that the destination table is always “unlocked”, the default procedure used inside the ![]() TeradataWriter Action is always to start by executing a DROP statement and thereafter a CREATE TABLE statement (before any INSERT statement). This is why, inside the second panel of the the
TeradataWriter Action is always to start by executing a DROP statement and thereafter a CREATE TABLE statement (before any INSERT statement). This is why, inside the second panel of the the ![]() TeradataWriter Action, you must write the CREATE TABLE statement required to create your “destination” table. Hopefully, Anatella is helping you to write this CREATE TABLE statement: i.e. the procedure to easily get the CREATE TABLE statement is the following:
TeradataWriter Action, you must write the CREATE TABLE statement required to create your “destination” table. Hopefully, Anatella is helping you to write this CREATE TABLE statement: i.e. the procedure to easily get the CREATE TABLE statement is the following:
•Optional Step: Use the ![]() CreateTable Action to automatically generate the CREATE TABLE statement: see section 5.27.5. for more information about this subject. To summarize:
CreateTable Action to automatically generate the CREATE TABLE statement: see section 5.27.5. for more information about this subject. To summarize:
oConnect your “source” Table to a ![]() CreateTable Action: For example:
CreateTable Action: For example:

oOpen the parameter window of the ![]() CreateTable Action and enter a Table Name:
CreateTable Action and enter a Table Name: ![]()
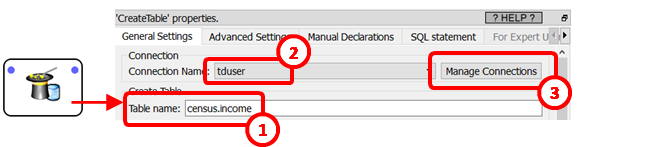
oSetup your ODBC connection to Teradata: if there is already an ODBC connection available, you just have to select from here: ![]() . Otherwise, click on the “Manage Connections” button to create a new ODBC connection to Teradata:
. Otherwise, click on the “Manage Connections” button to create a new ODBC connection to Teradata:![]() .
.
See the sections 5.1.6. and 5.1.6.3. for more information about configuring an ODBC connection between Teradata and Anatella. Once we have finished configuring the ![]() TeradataWriter (i.e. once we get the CREATE STABLE statement), the ODBC connection is not required anymore.
TeradataWriter (i.e. once we get the CREATE STABLE statement), the ODBC connection is not required anymore.
oClick the “Dry-Run” button inside the “SQL Statement” Panel (and wait a little):
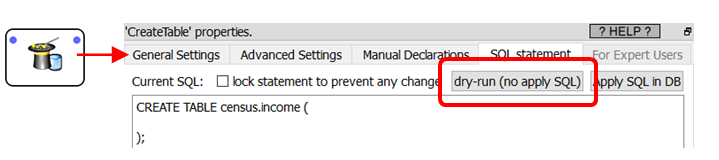
oYou should now see a CREATE TABLE statement here: ![]() . Validate this SQL statement: Click the “Apply SQL” button: .
. Validate this SQL statement: Click the “Apply SQL” button: .

This should create your table inside your database. Fix any error in the sql CREATE TABLE statement until Teradata accept to create the desired table.
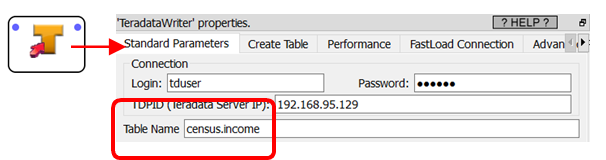
•Open the parameter window of the ![]() TeradataWriter Action and enter here the same Table Name that we just used while working with the
TeradataWriter Action and enter here the same Table Name that we just used while working with the ![]() CreateTable Action:
CreateTable Action:
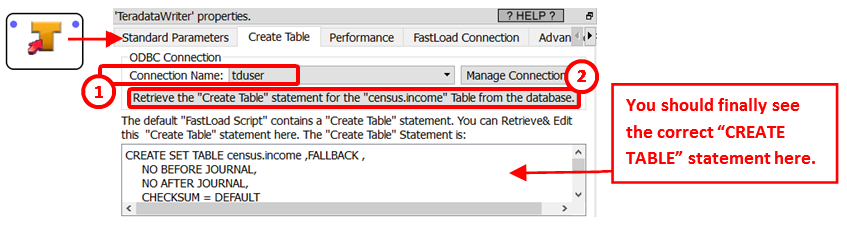
•Open the “Create Table” panel of the ![]() TeradataWriter Action and select the correct ODBC connection here:
TeradataWriter Action and select the correct ODBC connection here: ![]() … and click the “Retrieve CREATE TABLE statement” button:
… and click the “Retrieve CREATE TABLE statement” button: ![]()
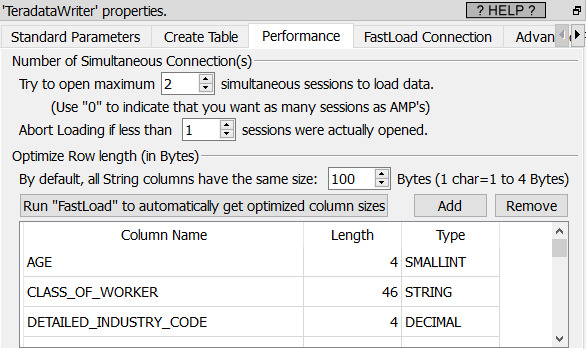
The “FastLoad” tool is sending “data blocks” to Teradata using the computer network. Each “data block” contains several rows to INSERT. Each row is composed of several columns. All the columns have a fixed, user-defined size (i.e. Anatella presents its data to “Fastload” using the “Formatted Data” structure). By default, the size allocated for each cell of a column of the “String/Unknown” type is 100 bytes (i.e. from 25 to 100 characters): This “default” size is defined here:
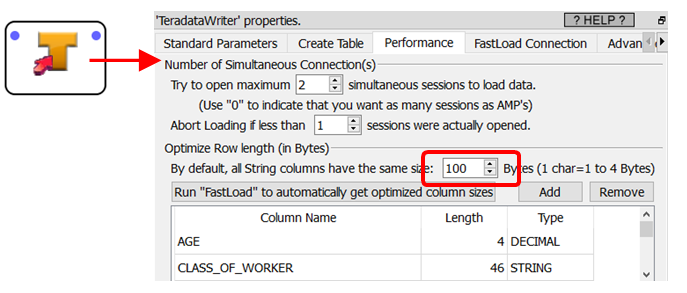
You can “overwrite” this default value, for some specific columns. For example, we defined here: ![]() that we’ll use 46 bytes (instead of the default value of 100 bytes) to store the column “CLASS_OF_WORKER”.
that we’ll use 46 bytes (instead of the default value of 100 bytes) to store the column “CLASS_OF_WORKER”.
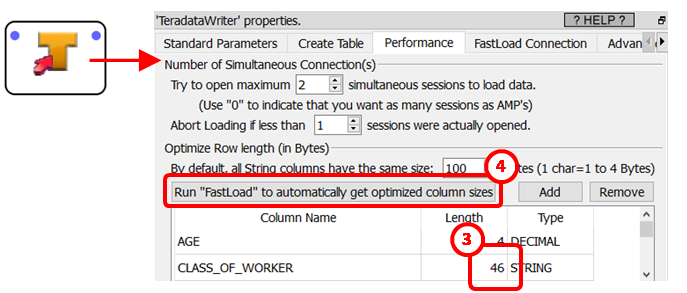
For performance reasons, you should always use a storage space as little as possible to store all your columns (because this directly translates to less traffic on the computer network and thus higher throughtput on the computer network and, ultimately, higher INSERT speed into Teradata). To help you optimize the storage space of each column, there exists a specific “FastLoad” command (named “HELP TABLE”) that tells you how much bytes each column is using inside Teradata. To automatically retrieve the results of the “HELP TABLE” command, click here: ![]()
![]()
The button named “Run FastLoad to automatically get optimized column size” is actually executing the following FastLoad script:
logon <TDPID>/<Login>,<Password>; help table <TableName>; show; logoff; |
This means that this button will only work as expected if you entered previously your TableName, Login, TDPID and Password:
To get a higher INSERT speed into Teradata, Anatella optimizes (minimizes) the storage of each column by considering:
(1)the Type and Length of each column inside Teradata
(2)the type of each column inside Anatella
Here are some examples:
•A column that was declared inside Teradata as an INTEGER with 1 to to 4 digits (i.e. a column that was declared inside the CREATE TABLE statement as “DEC(4)”) may contain integer numbers from -9999 to 9999. Thus, Anatella will inject this column into “fastload.exe” using only 2 bytes per cell (because 2 bytes can contain all ingerer numbers from -32768 to 32767).
•A column that was declared inside Teradata as a high-precision Floating point number (i.e. declared as “FLOAT(53)”) and stored inside Anatella as text will be converted to binary representation before being injected into “FastLoad” (because, then, it only uses only 8 bytes of storage).
Error Handling
There exist many reasons why one row could not be inserted into Teradata. Anatella tries to detect in advance all the rows that will “fail”: These “failing” rows are NOT sent to “FastLoad”. Furthermore, these “failing” rows receives a special STATUS as output of the ![]() TeradataWriter Action.
TeradataWriter Action.
![]()
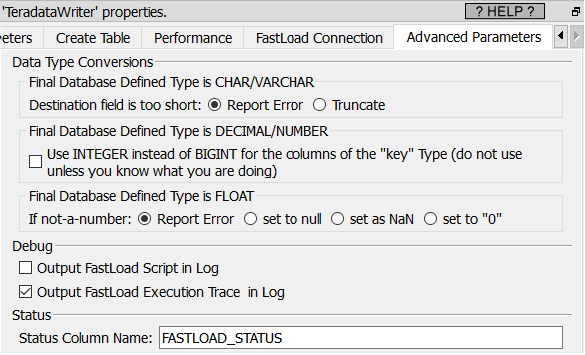
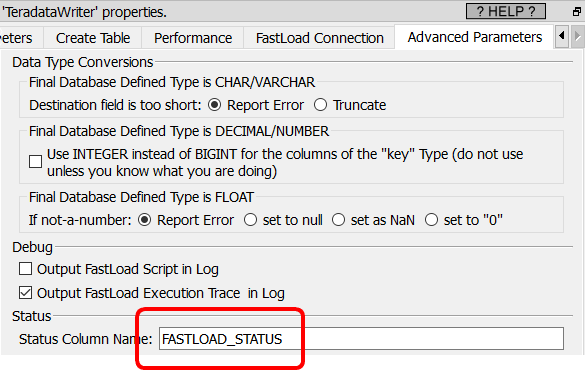
You can select the name of the output column containing the STATUS of each row here:
The Satus codes visible inside the status output column of the ![]() TeradataWriter Action are:
TeradataWriter Action are:
Status Code |
Comment |
0 |
No error detected: Teradata should insert this row inside the destination table. |
1 |
No error detected: The row was simply “skipped” because of this option:
|
2 |
The source string has too many characters for the declared width of the destination column |
3 |
The source number has too many digits for the declared width of the destination column |
4 |
The source column contains non-numbers characters (but it was declared as a DECIMAL/NUMBER inside Teradata) |
5 |
The source number is too big (x > 231) for the declared type (INTEGER) inside Teradata |
6 |
The source number is too big (x > 127) for the declared type (BYTEINT) inside Teradata |
7 |
The source number is too big (x > 32767) for the declared type (SMALLINT) inside Teradata |
8 |
The source column is not a floating-point number (but it was declared as FLOAT inside Teradata) |
There might still be a small quantity of rows, out of all the rows that were sent to Teradata, that were not properly INSERTed into the destination table. At the end of the “FastLoad” procedure, Teradata initializes 2 tables that contains more information about the rows that were not INSERTed. By default, these two tables are named “<TableName>_Anatella_error_1” and “<TableName>_Anatella_error_2”. Thus, after each “FastLoad” procedure, to have a complete look at all the possible errors, you should look at:
•…the Rows with a STATUS code that is above 1 (as output of the ![]() TeradataWriter Action).
TeradataWriter Action).
•…the two tables named “<TableName>_Anatella_error_1” and “<TableName>_Anatella_error_2” inside Teradata (e.g. using the ![]() readODB action, execute the following SQL statement: “SELECT * FROM “<TableName>_Anatella_error_1”)
readODB action, execute the following SQL statement: “SELECT * FROM “<TableName>_Anatella_error_1”)
Customizing the FastLoad script.
The “default” FastLoad script can handle almost all situations. Nevertheless, you can still tweak the FastLoad script template here, just in case:
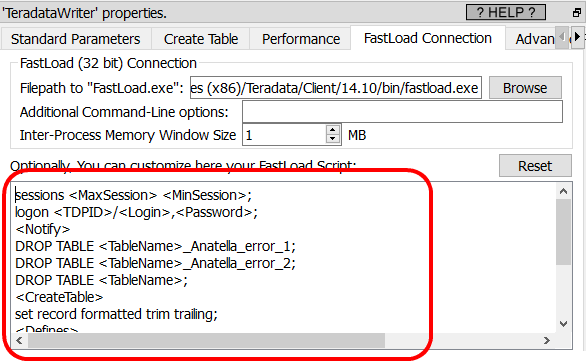
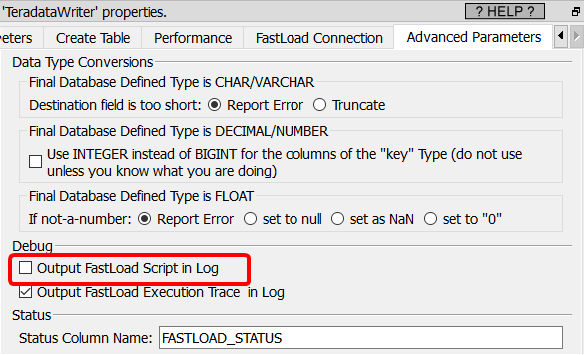
To help you to create your own fastload script, you can start from the script that is auto-generated by Anatella at each run: To see this script, click here:
Debugging Various FastLoad Errors
When “FastLoad” is working, it’s very fast. When it’s not working, it usually means that it’s “stuck” somewhere waiting for a specific user-input. If nothing moves after a few seconds, it usually means that “FastLoad” is exhibiting an unexpected behavior (that is not handled by the default “FastLoad” template). To understand why “FastLoad” got “stuck”, we need to look at the content of the console where “FastLoad” was executed: To do so:
1.Click here:
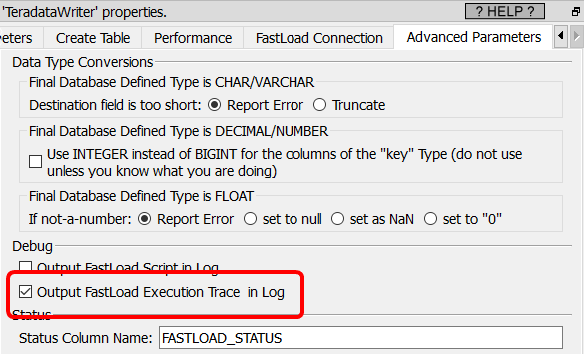
2.Run the ![]() TeradataWriter Action normally.
TeradataWriter Action normally.
3.Wait a little until you see that nothing moves anymore.
4.Click the ![]() button on the Anatella toolbar: This has two effects:
button on the Anatella toolbar: This has two effects:
oIt stops the “FastLoad” process.
oIt displays the whole execution trace inside the Log Window.
Unfortunately, you cannot see the “FastLoad” execution trace before clicking the ![]() button on the Anatella toolbar.
button on the Anatella toolbar.