Icon: ![]()
Function: GoogleUnlock
Property window:
Short description:
Unlock access to Google services.
Long Description:
You need to get some Google credentials (i.e. you need to get from Google these 3 parameters: your “Client ID”, your “Client Secret” and your “Refresh Token”) before using any of the following Actions:
GDrive:
•List the files on a GDrive (section 5.23.12)
•Download files from a GDrive (section 5.23.13)
•Upload files to a GDrive (section 5.23.14)
•Delete files stored in a GDrive (section 5.23.15)
Cloud Storage
•List the files on a Google Cloud Storage (section 5.23.16)
•Download files from a Google Cloud Storage (section 5.23.17)
•Upload files to a Google Cloud Storage (section 5.23.18)
•List all your Google Cloud Storage Buckets (section 5.23.19)
•Delete files from a Google Cloud Storage (section 5.23.20)
Big Query
•Execute a SQL query on Big Query (section 5.23.21)
•Upload CSV files to Big Query (section 5.23.22)
Google Analytics (section 5.23.23)
Google Speech-to-Text (section 5.23.48)
![]()
To get your Google credentials you don’t need to pay anything to Google. You can get all your credentials for free: i.e. You get your “Client ID” (obtained at step 9.7), your “Client Secret” (obtained at step 9.7) and your “Refresh Token” (obtained at step 9.11) for free.
The procedure described in this section allows you to get your Google credentials (i.e. to get a “Client ID”, a “Client Secret” and a “Refresh Token”) that will unlock *ALL* Google services: GDrive, Google Cloud Storage, Google Big Query and Google Speech-to-Text. For security reasons, you might want to get some credentials that are more limited (e.g. that only give you access to “GDrive”, and not “Cloud Storage”). If you want some credentials that are:
•…limited to “Google Analytics” only:
oSkip the points 4, 5 and 6 in the procedure below.
oOn point 8.4, select only the following scopes:
▪../auth/analytics.readonly
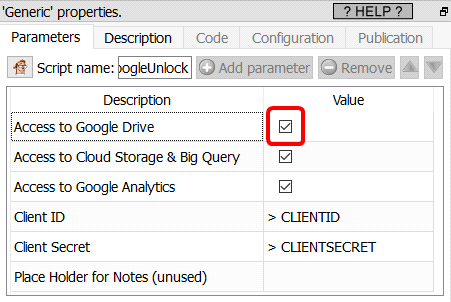
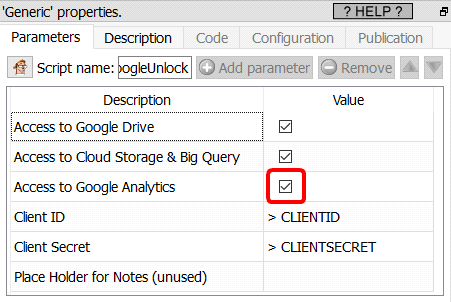
oOn point 9.7, enable (i.e. check) the option “Access to Google Analytics”:
•…limited to “GDrive” only:
oSkip the points 5,6 and 7 in the procedure below.
oOn point 8.4, select only the following scopes:
▪../auth/drive.metadata
(change file-related metadata in your Google Drive)
▪../auth/drive
(See, Download and Upload files from/to your Google Drive)
oOn point 9.7, enable (i.e. check) the option “Access to GoogleDrive”:
•…limited to “Cloud Storage, Big Query and Speech-to-Te” only:
oSkip the point 4 and 7 in the procedure below.
oOn point 8.4, select only the following scope:
▪../auth/cloud-platform
oOn point 9.7, enable (i.e. check) the option “Access to Cloud Storage and Big Query”:

The procedure to get you Google Credentials (i.e. to get a “Client ID”, a “Client Secret” and a “Refresh Token”) is the following:
1.First, a word of caution:
You will need your “Client ID”, “Client Secret” and “Refresh Token” to use (nearly) all the Google Services actions inside Anatella.
There are no ways to copy/paste back these 3 informations from one Anatella action to another (this is, of course, “by design”).
So, you should keep yourself these 3 informations in a secure place, if you intend to re-use them later.
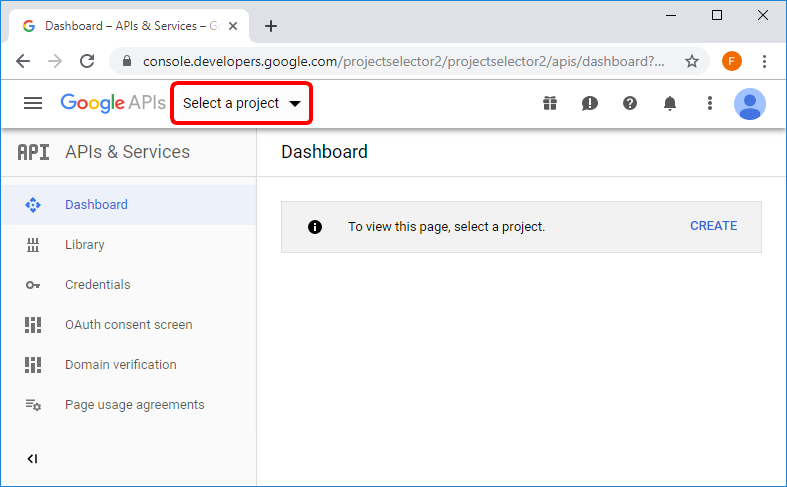
2.Open in your web browser the “Google Developper Console”: Go to the URL:
https://console.developers.google.com
..and sign-in into your Google account.
3.Create a new Project.
3.1. Click on the “Select a Project” drop-down menu:
3.2. Click on the “New Project” button:
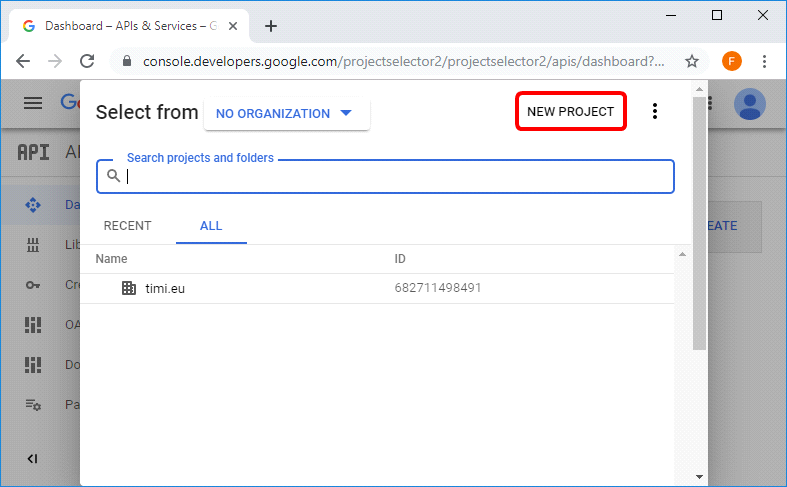
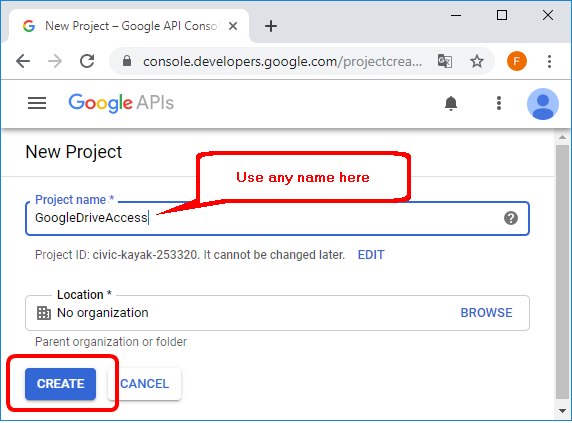
3.3. Write a project name (you can use whatever name you want) and click on the “Create” button:
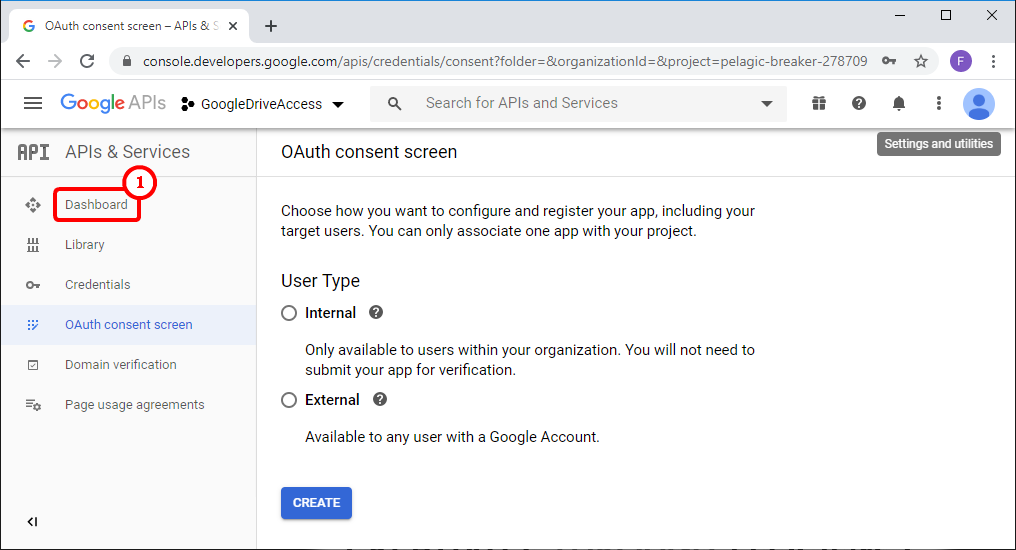
3.4. You should now see this page inviting you to configure your OAuth consent screen:
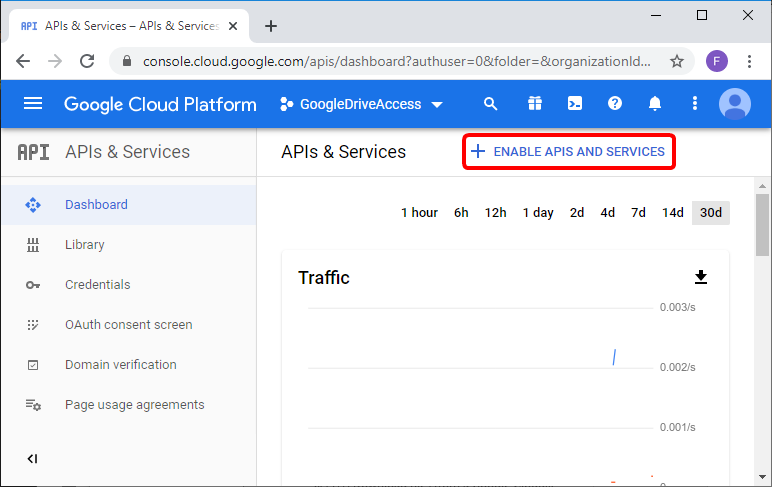
We will not configure the OAuth consent screen now because we first need to enable different google API and services beforehand. To do so, click on the “Dashboard” button: ![]()
4. We will now enable the “Google Drive API”
This API is required to be able to use the “Google Drive” Actions: These actions are:
▪List the files on a GDrive (section 5.23.12)
▪Download files from a GDrive (section 5.23.13)
▪Upload files to a GDrive (section 5.23.14)
▪Delete files stored in a GDrive (section 5.23.15)
4.1. Click on the “Enable APIS and Service” button:
You arrive on this page:

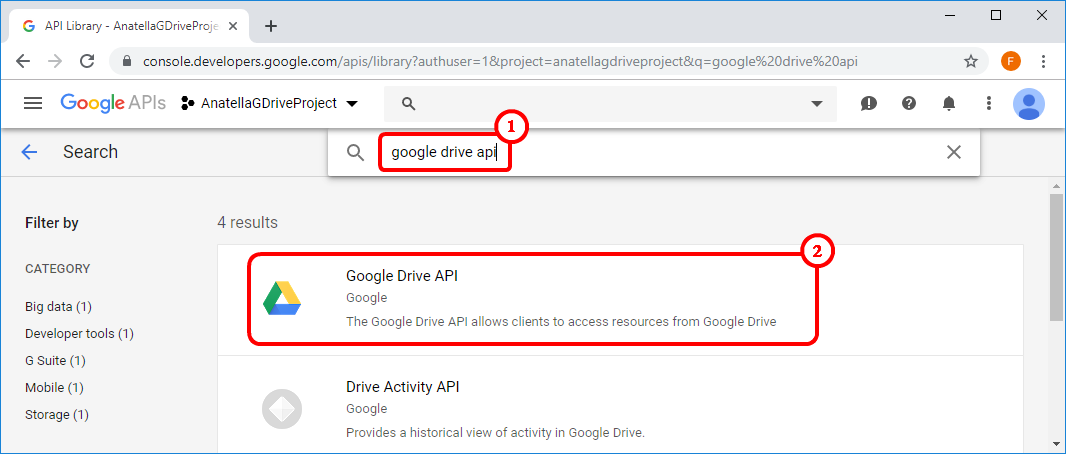
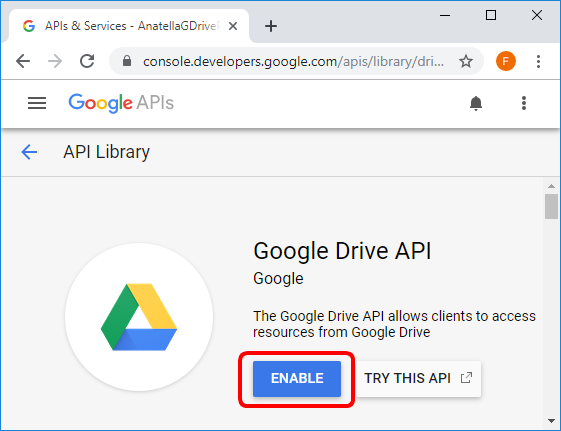
4.2. Search for the “Google Drive API” ![]() and click on the first item found:
and click on the first item found:![]()
4.3. Click the “Enable” button:
4.4. We are back on the Project Selection screen but the Google Drive logo is now visible here: ![]() (and we don’t want that). Click on the “APIs and Services” text here:
(and we don’t want that). Click on the “APIs and Services” text here: ![]()

5.We will now Enable the “Google Cloud Storage JSON API”.
This API is required to be able to use the “Google Cloud Storage” Actions: These actions are:
▪List the files on a Google Cloud Storage (section 5.23.16)
▪Download files from a Google Cloud Storage (section 5.23.17)
▪Upload files to a Google Cloud Storage (section 5.23.18)
▪List all your Google Cloud Storage Buckets (section 5.23.19)
▪Delete files from a Google Cloud Storage (section 5.23.20)
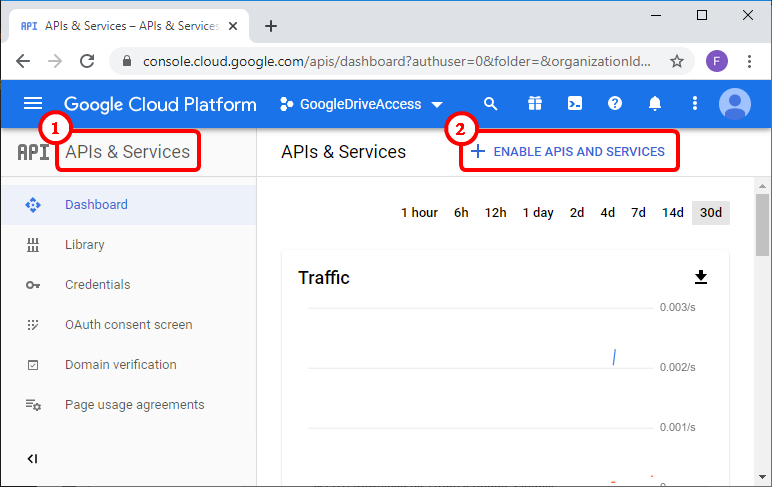
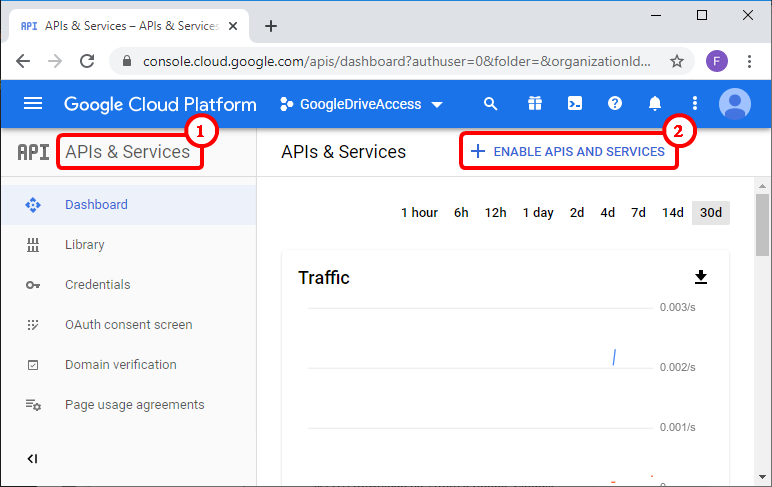
5.1. We are back on the Project Selection screen (and the GDrive logo is not visible anymore: it’s written “APIs & Services” instead: ![]() ). Click on the “Enable APIS and Service” button:
). Click on the “Enable APIS and Service” button: ![]()
You arrive on this page:

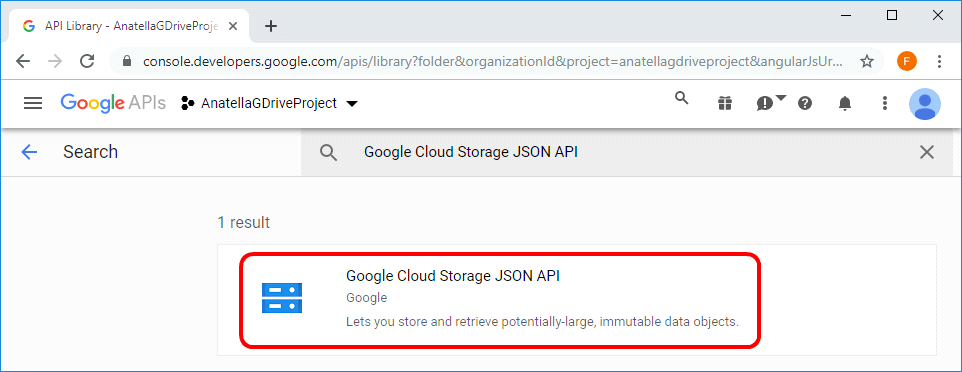
5.2. Search for the “Google Cloud Storage JSON API” and click on the first item found:
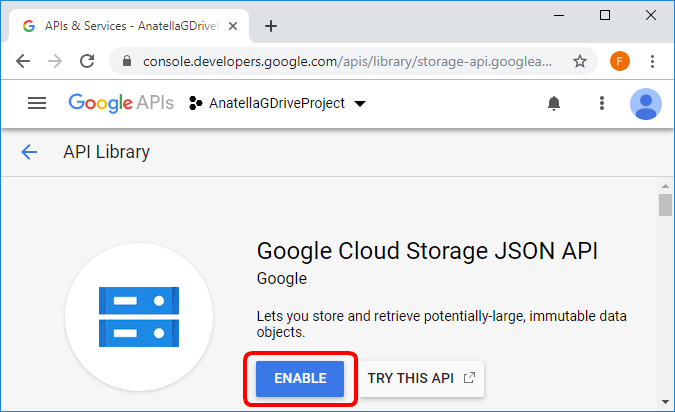
5.3. Click the “Enable” button:
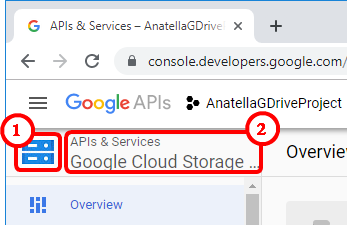
5.4. We are back on the Project Selection screen but the “Google Cloud Storage” logo is now visible here: ![]() (and we don’t want that). Click on the “APIs and Services” text here:
(and we don’t want that). Click on the “APIs and Services” text here: ![]()
6. We will now Enable the “BigQuery API”:
This API is required to be able to use all the “Google Big Query” Actions: These actions are:
▪Execute a SQL query on Big Query (section 5.23.21)
▪Upload CSV files to Big Query (section 5.23.22)
6.1. We are back on the Project Selection screen (and the “Google Cloud Storage” logo is not visible anymore: it’s written “APIs & Services” instead: ![]() ). Click on the “Enable APIS and Service” button:
). Click on the “Enable APIS and Service” button: ![]()
You arrive on this page:

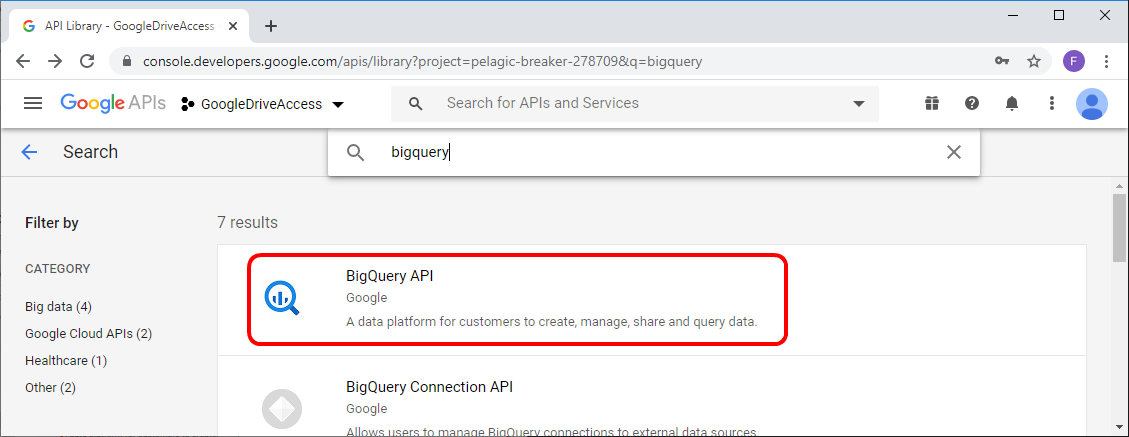
6.2. Search for the “BigQuery API” and click on the first item found:
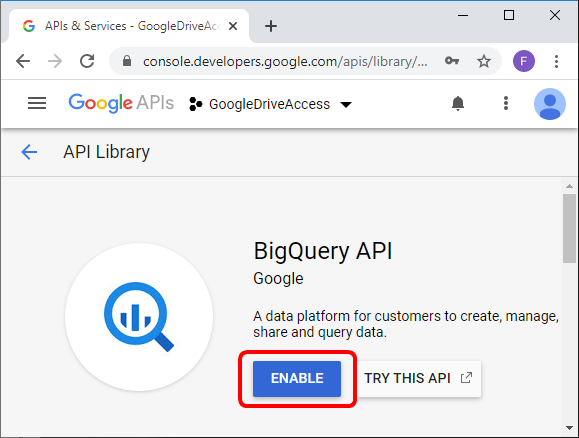
6.3. Click the “Enable” button:
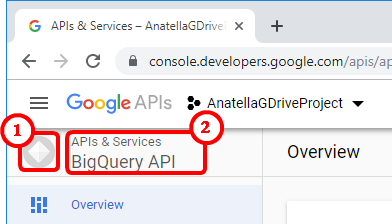
6.4. We are back on the Project Selection screen but the “Big Query API” logo is now visible here: ![]() (and we don’t want that). Click on the “APIs and Services” text here:
(and we don’t want that). Click on the “APIs and Services” text here: ![]()
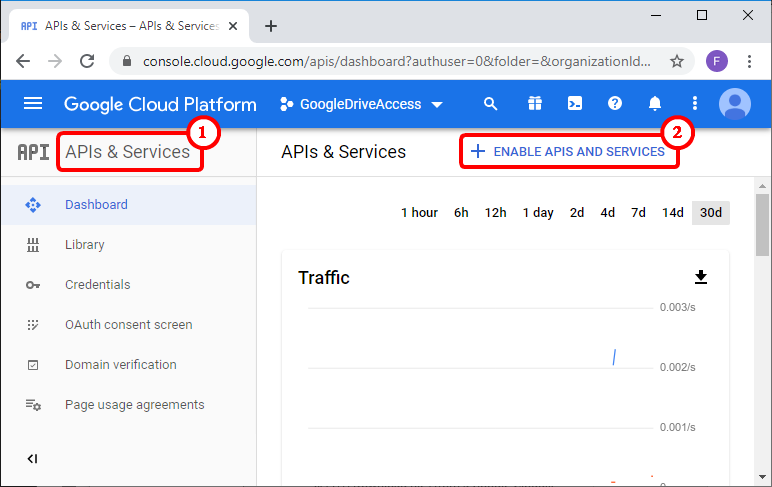
7.We will now Enable the “Google Analytics API”:
This API is required to be able to use the “Google Analytics” Action from section 5.23.23.
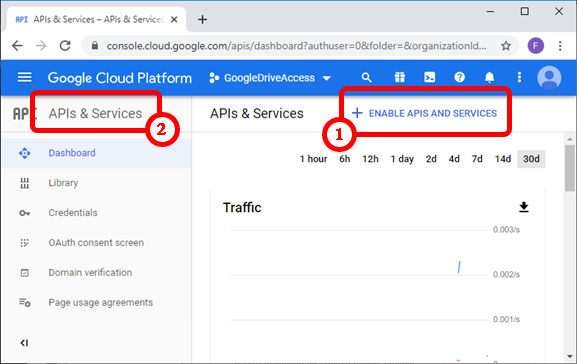
7.1. We are back on the Project Selection screen (and the “BigQuery API” logo is not visible anymore: it’s written “APIs & Services” instead: ![]() ). Click on the “Enable APIS and Service” button:
). Click on the “Enable APIS and Service” button: ![]()
You arrive on this page:

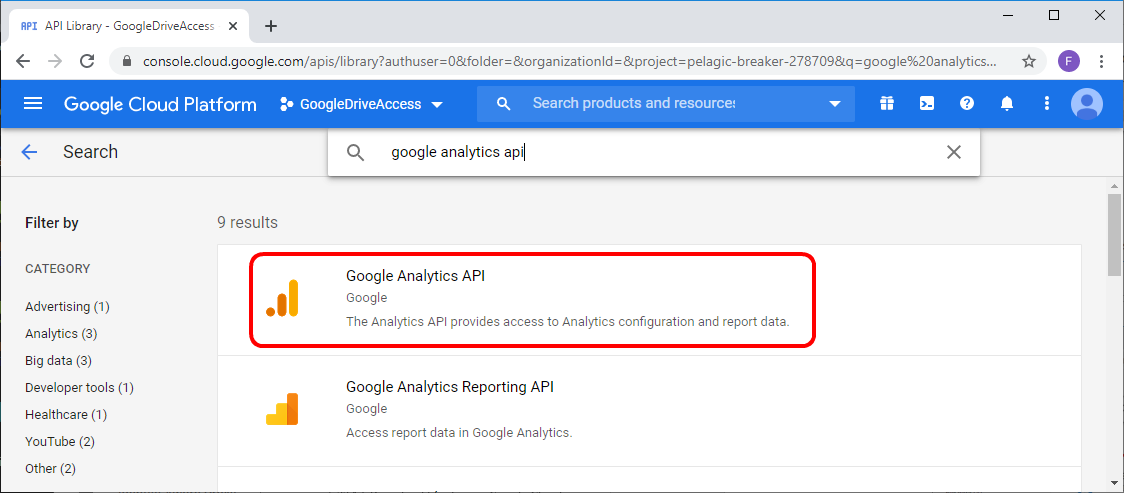
7.2. Search for the “google analytics api” and click on the first item found:
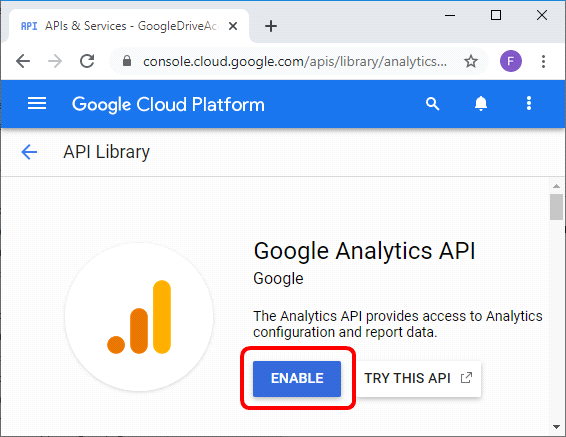
7.3. Click the “Enable” button:
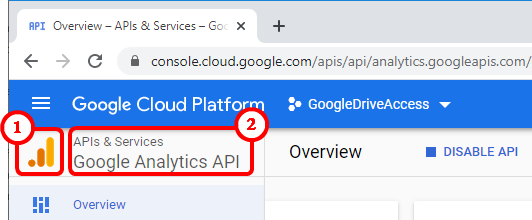
7.4. We are back on the Project Selection screen but the “Google Analytics API” logo is now visible here: ![]() (and we don’t want that). Click on the “APIs and Services” text here:
(and we don’t want that). Click on the “APIs and Services” text here: ![]()
8.We will now Enable the “Google Speech-to-Text API”: This API is required to be able to use the “Google Speech-to-Text” Action from section 5.23.48.
8.1. We are back on the Project Selection screen (and the “Google Analytics API” logo is not visible anymore: it’s written “APIs & Services” instead ![]() ). Click on the “Enable APIS and Service” button:
). Click on the “Enable APIS and Service” button: ![]()
You arrive on this page:

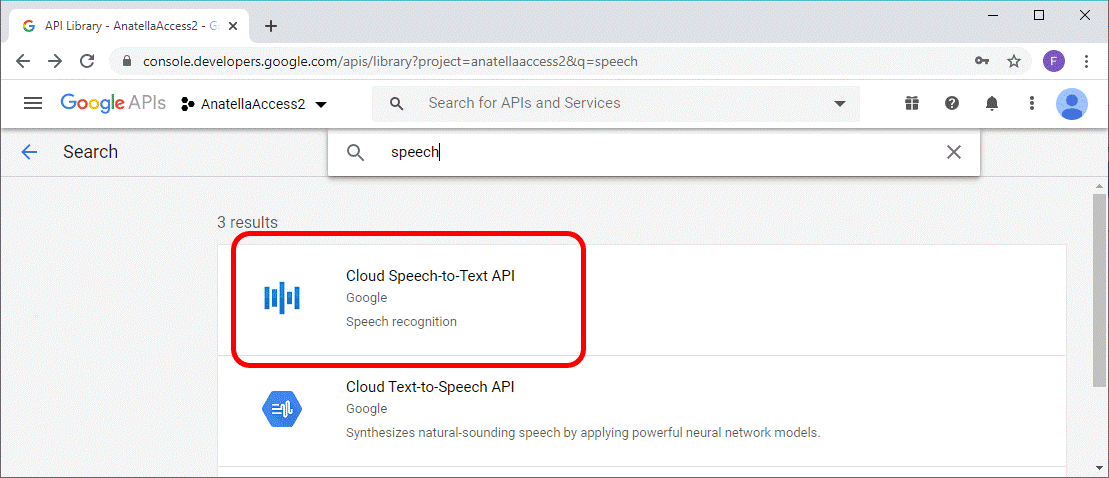
8.2 Search for the “google speech to text” and click on the first item found:
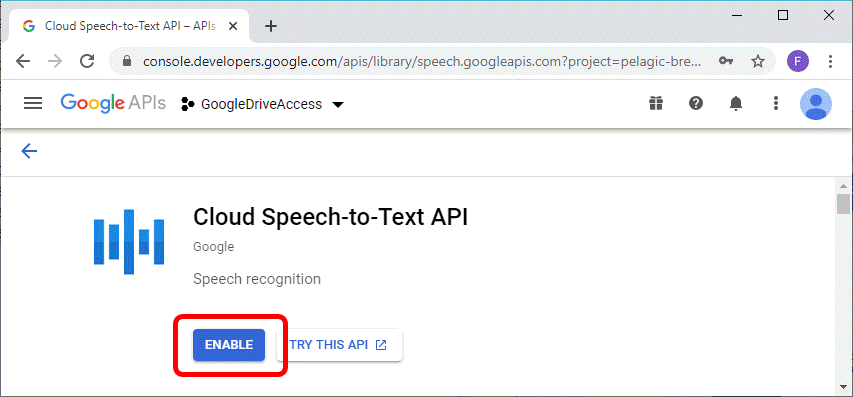
8.3 Click the “Enable” button:
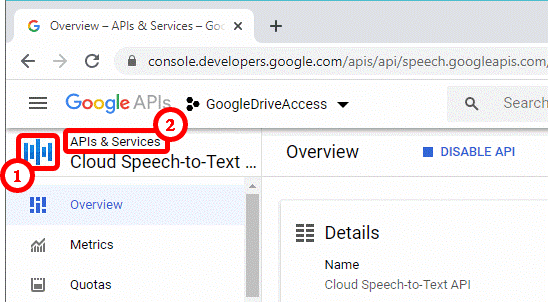
8.4 We are back on the Project Selection screen but the “Cloud Speech-to-Text” logo is now visible here: ![]() (and we don’t want that). Click on the “APIs and Services” text here:
(and we don’t want that). Click on the “APIs and Services” text here:![]()
9.Configure OAuth consent Screen
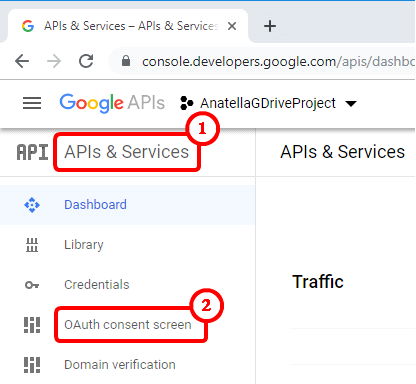
9.1. We are back on the Project Selection screen (and the “Google Analytics API” logo is not visible anymore: it’s written “APIs & Services” instead ![]() ). Click on the “OAuth consent screen” button:
). Click on the “OAuth consent screen” button: ![]()
9.2. On the next screen you must select “Internal” ![]() and click the “create” button:
and click the “create” button: ![]()
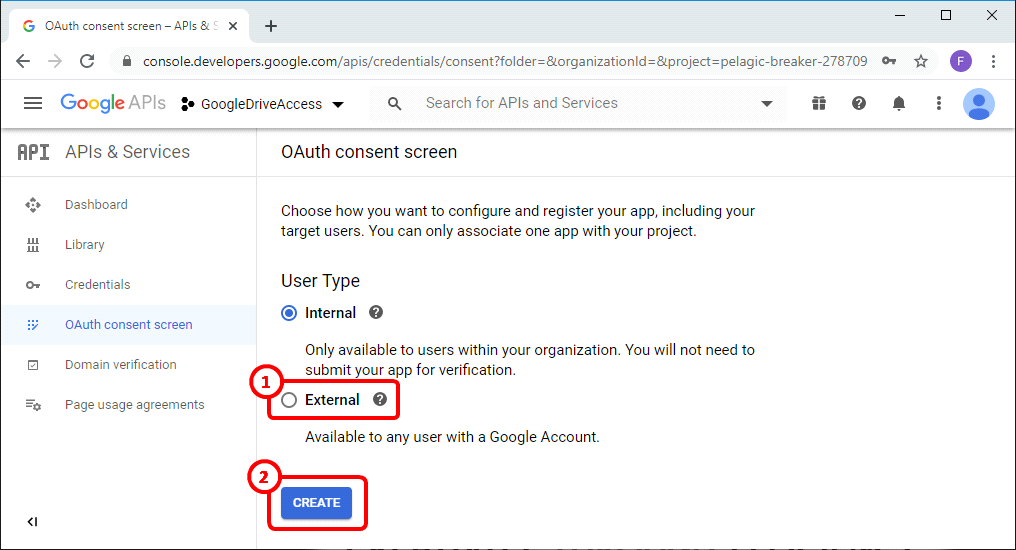
![]()
Here, it’s easier to select the “External” option. The only downside of the “External” option is that you are limited to 100 different credentials (but, hopefully, you need only ONE credential to automate everything with Anatella! � ). You can also have more than 100 credential but then you need to publish your application to the general audience (and that’s a little bit more work because you need to to make it validated by the google team).
The “Internal” option also works with Anatella but you’ll have more administrative work (i.e. Google will need to valide your app).
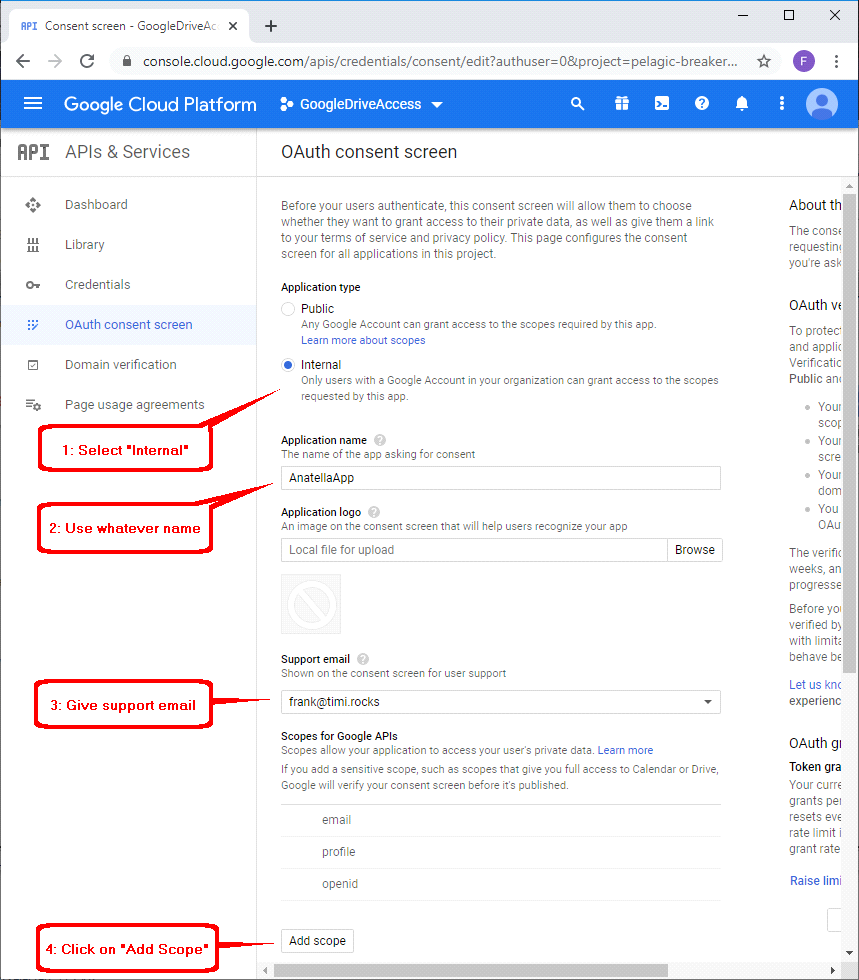
9.3. On the next screen, we’ll configure the “App Name” and the “Support Email”.
Once this is done, click on the “Add Scope” to configure the scope of your app:
9.4. Enable the following scopes:
![]()
On the next configuration screen, pay attention to the “Scopes”: For security reasons, you may want to limit the scopes to the minimum. For example, if you only intend to...
• ...use Google Analytics: Activate only the following scope:
../auth/analytics.readonly
• ...use GDrive: Activate only the following 2 scopes:
../auth/drive.metadata
../auth/drive
• ...use Google Storage or Big Query or Speech-to-Text: Activate only the following scope:
../auth/cloud-platform
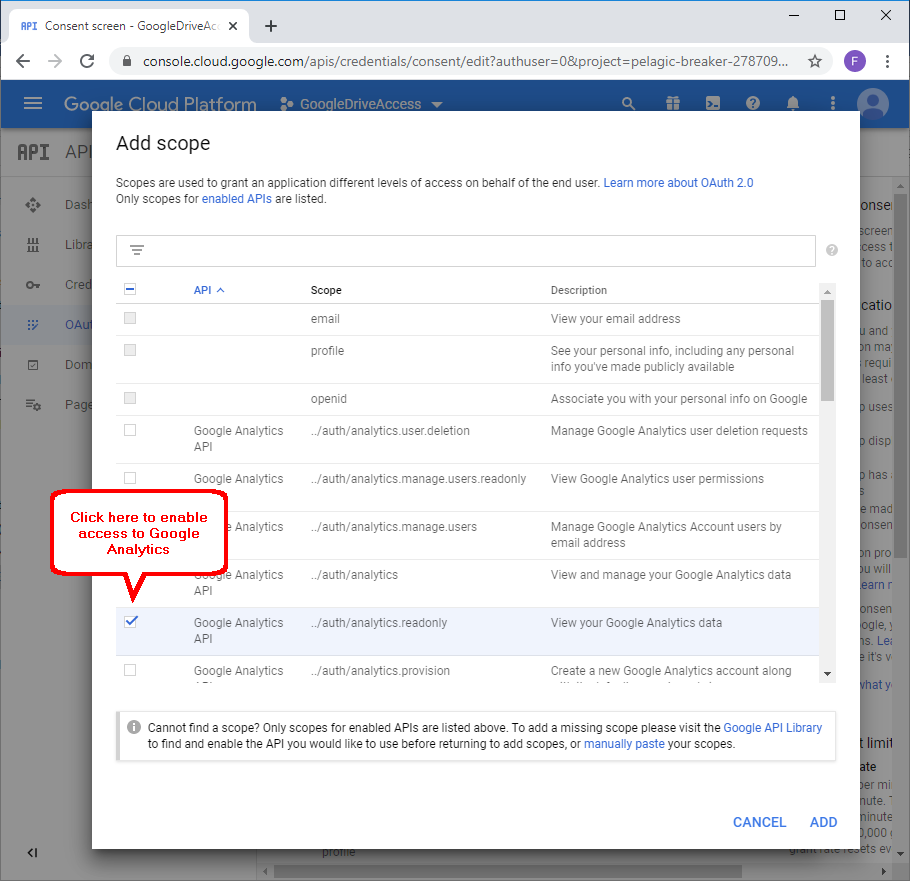
Scroll down a little:
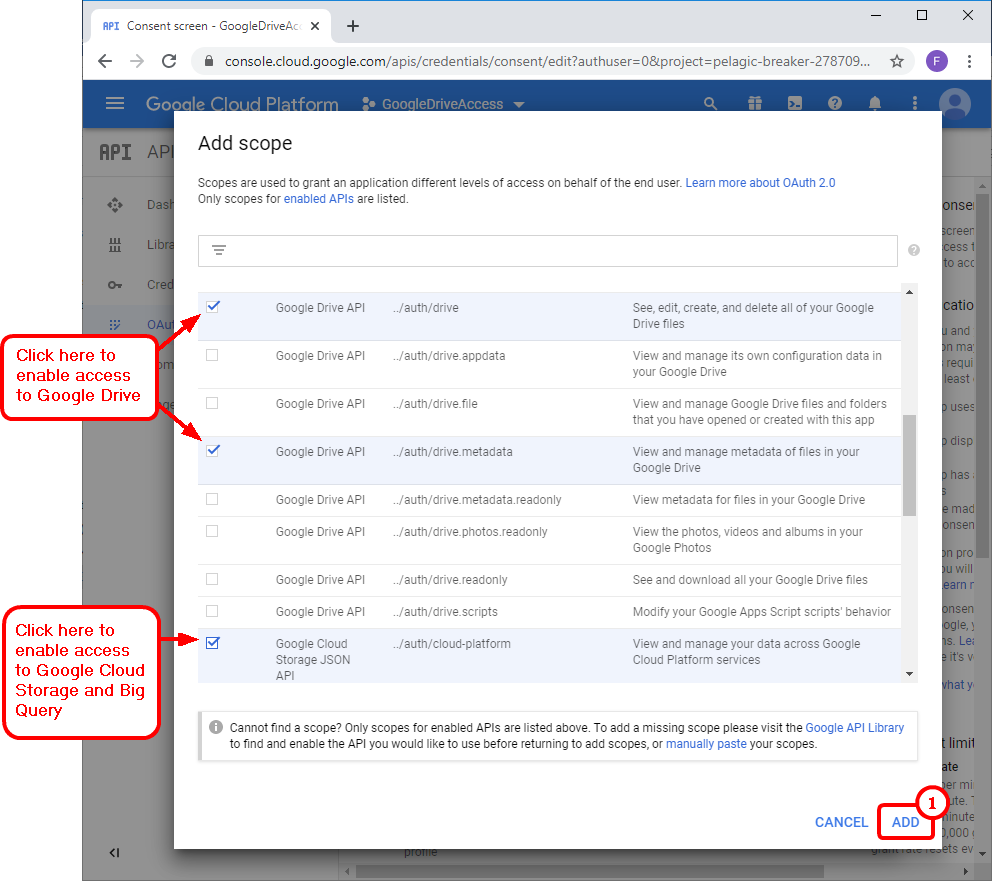
When you have finished selecting your “scopes”, click on the “Add” button: ![]()
9..5. Finish configuring the OAuth consent Screen. At the end, you should have something like this:
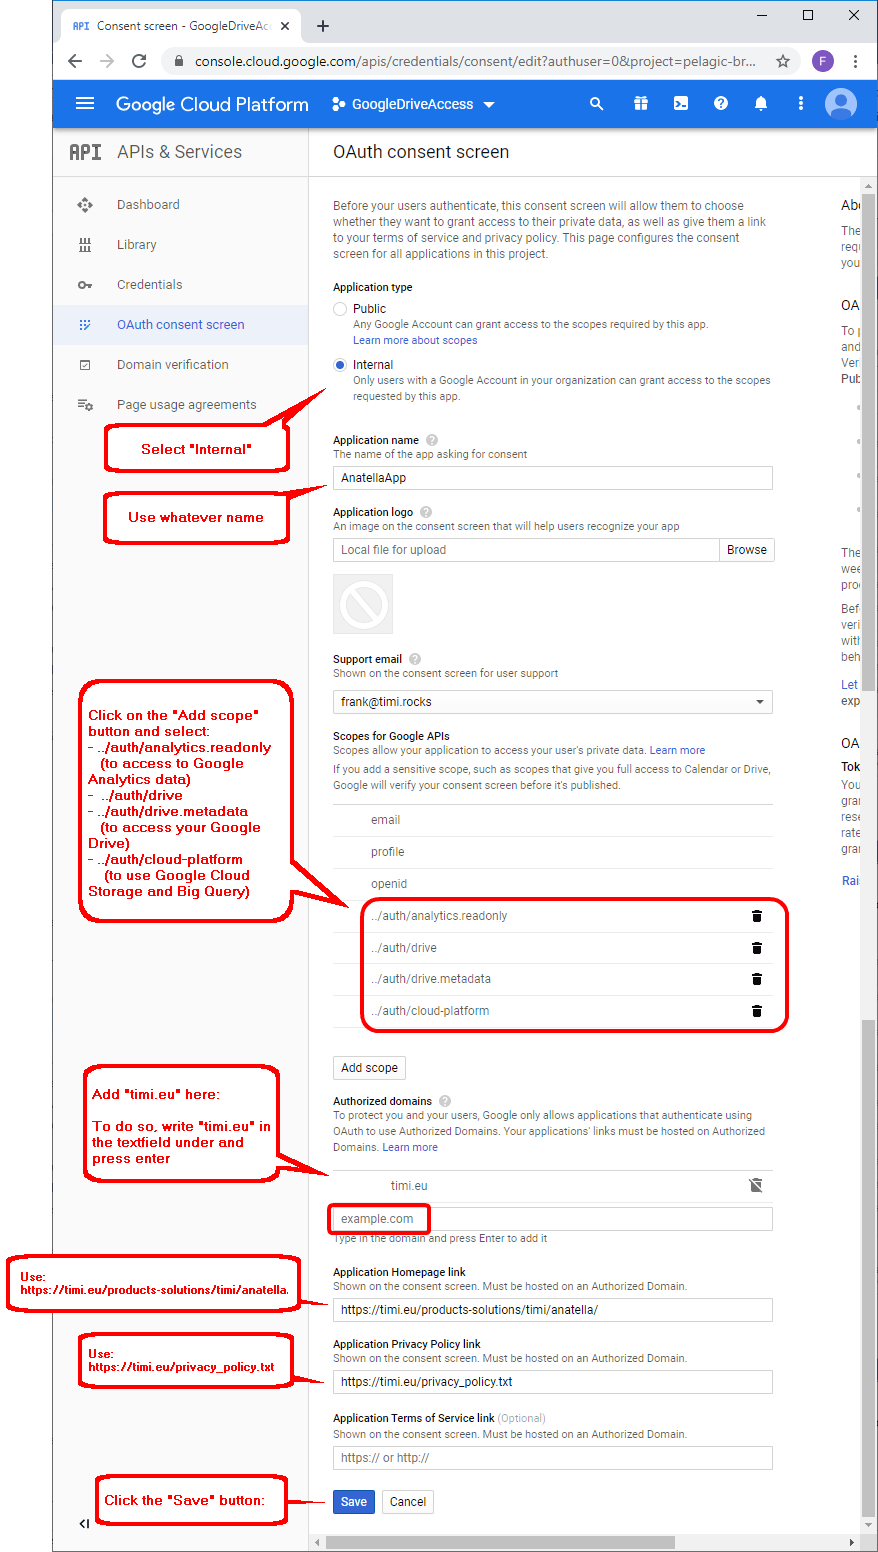
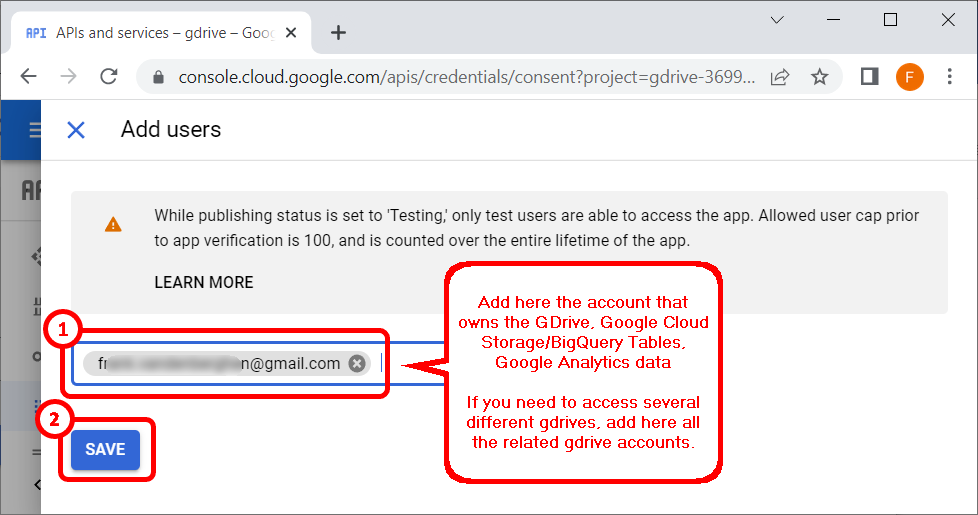
9.6. Add a test user: Click on “OAuth consent screen” in the left menu ![]() and then click the “Add users” button here
and then click the “Add users” button here ![]()

9.7 Add the email from your “test user” (that will use your application) ![]() and click the “save” button
and click the “save” button ![]() :
:
At the end, you should see something like this:

10. Get your Credentials
10.1. Click the “Credentials” option in the left pane: ![]()
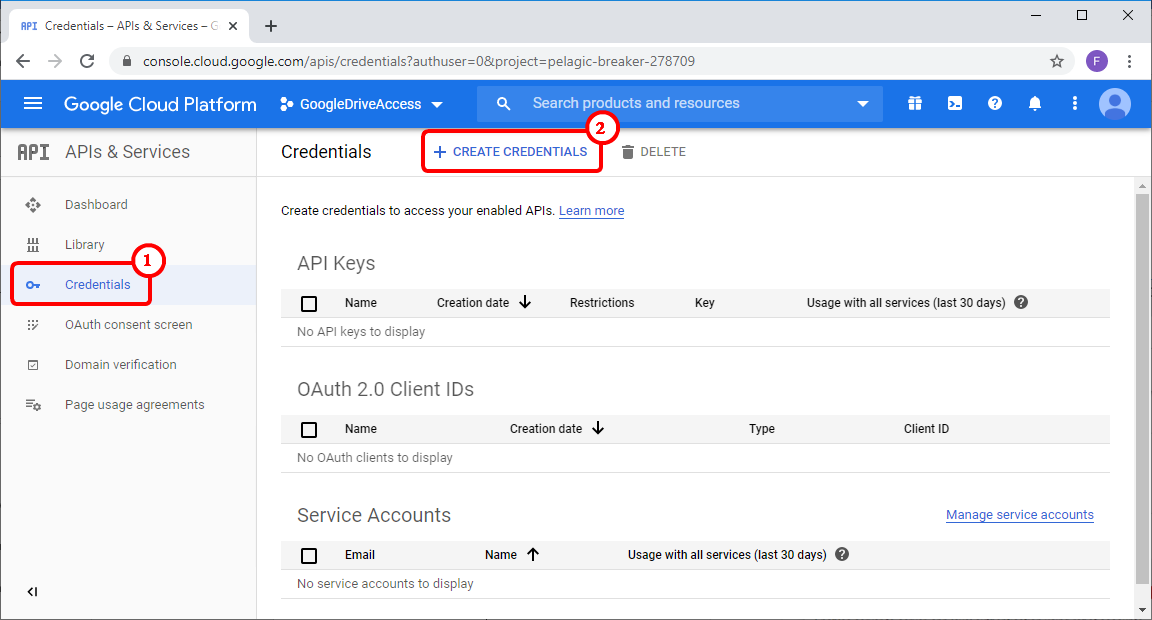
10.2. Click the “Create credentials” button in the right panel: ![]()
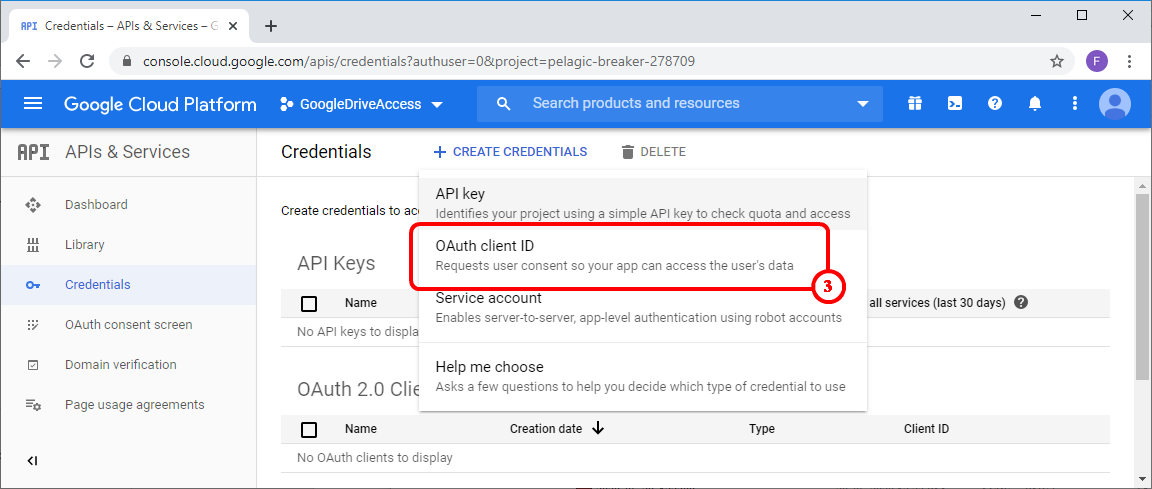
10.3. Select “OAuth Client ID”: ![]()
10.4. Enter the following:
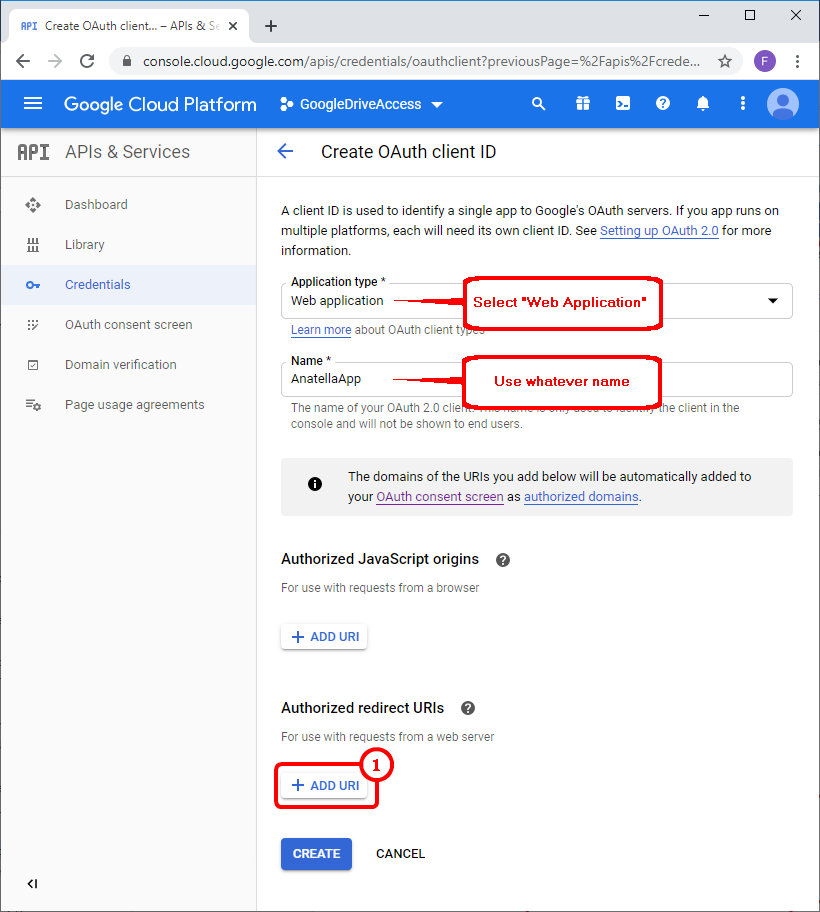
10.5. This step is important!
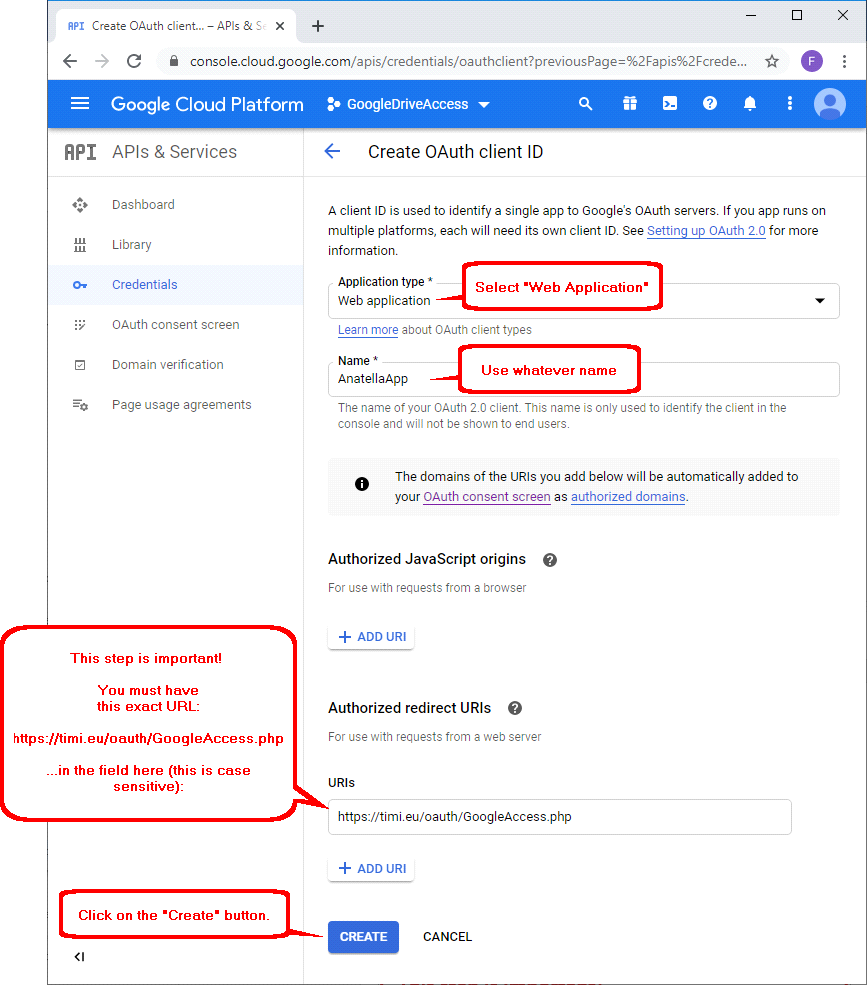
Click the “ADD URI” button in the “Authorized redirect URIs” section: ![]()
...and enter: https://timi.eu/oauth/GoogleAccess.php
10.6. At the end you should have something like this:
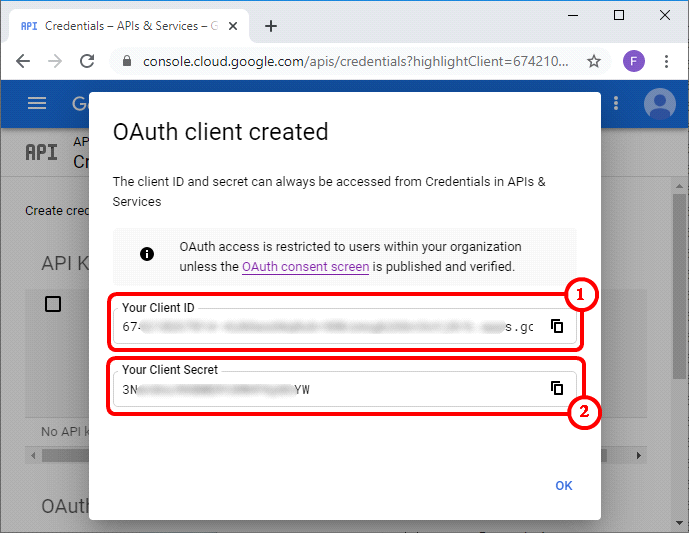
10.7. You receive your “Client ID” ![]() and “Client Secret”:
and “Client Secret”: ![]()
Copy/paste your your “Client ID” and “Client Secret” inside Anatella here:
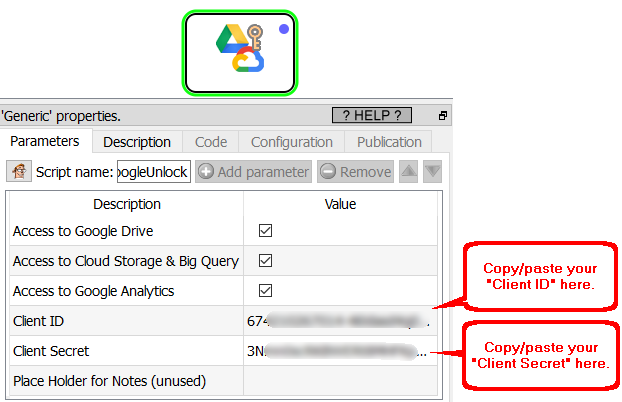
![]()
Inside the Anatella action, the 3 parameters that are named “Access to…” must match the scopes that you selected at step 8.4. For security reasons, you may have limited the scopes to the minimum. For example, if you only intend to...
• ...use Google Analytics: You only activated the following scope:
../auth/analytics.readonly
• ...use GDrive: You only activated the following 2 scopes:
../auth/drive.metadata
../auth/drive
• ...use Google Storage or Big Query: You only activated the following scope:
../auth/cloud-platform
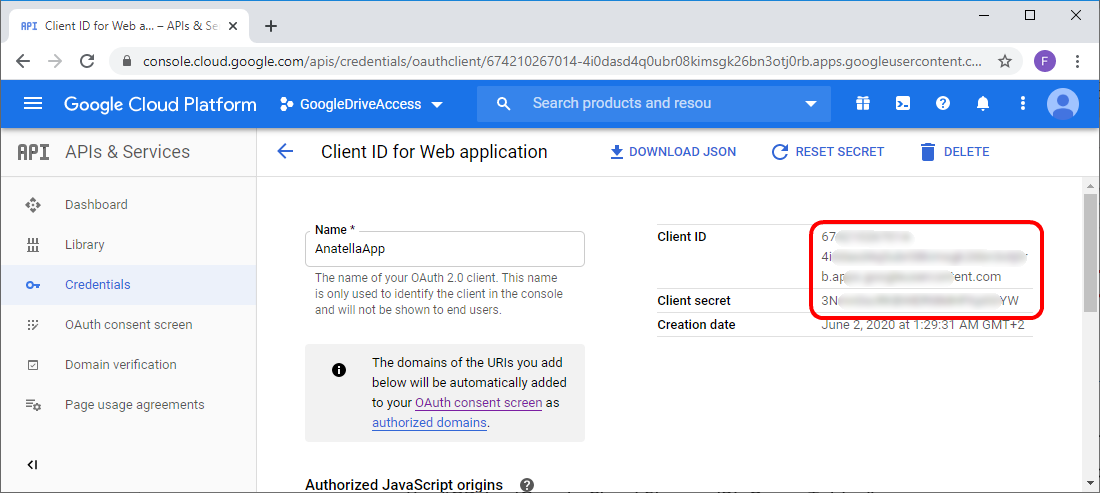
Don’t worry if the Window in your browser closes before you can copy/paste your “Client ID” and “Client Secret”: You can always see again later these 2 informations by clicking the “edit” icon here:
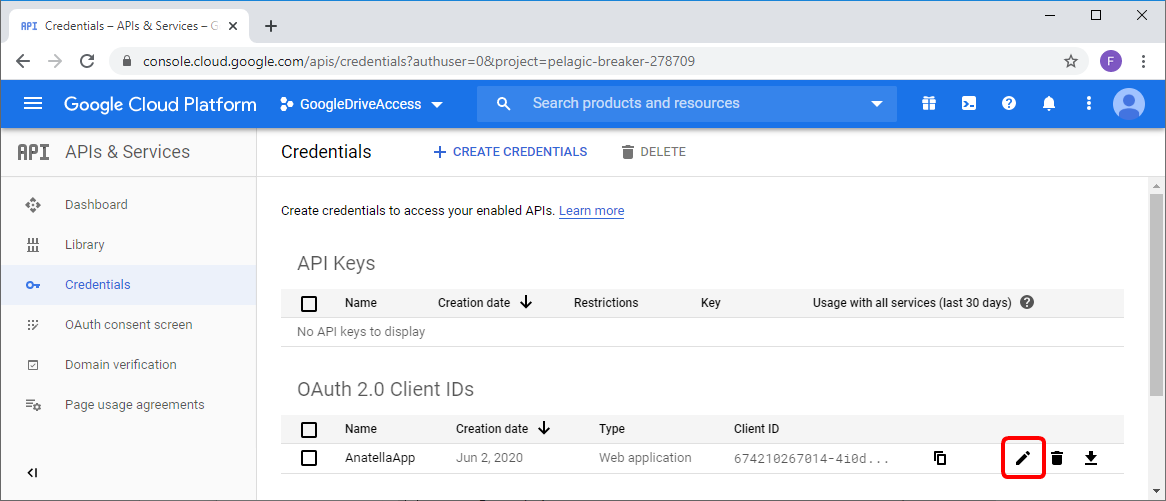
…Then, you’ll again see your “Client ID” and “Client Secret” here:
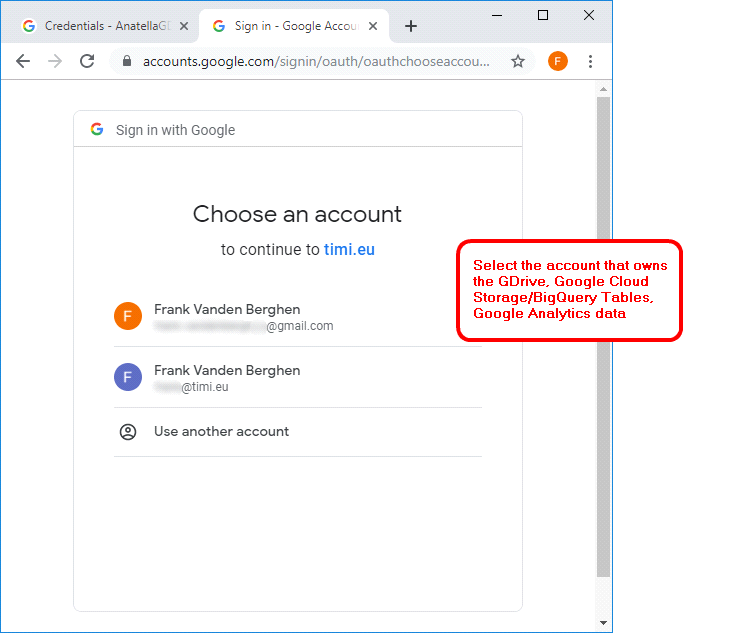
10.8. Run (i.e. click the output pin) the ![]() UnlockGoogle Action in Anatella (with the correct “Client ID” and “Client Secret” obtained from the previous step): A web browser opens: Select the account that owns the “GDrive/Google Cloud Storage/BigQuery Tables”:
UnlockGoogle Action in Anatella (with the correct “Client ID” and “Client Secret” obtained from the previous step): A web browser opens: Select the account that owns the “GDrive/Google Cloud Storage/BigQuery Tables”:
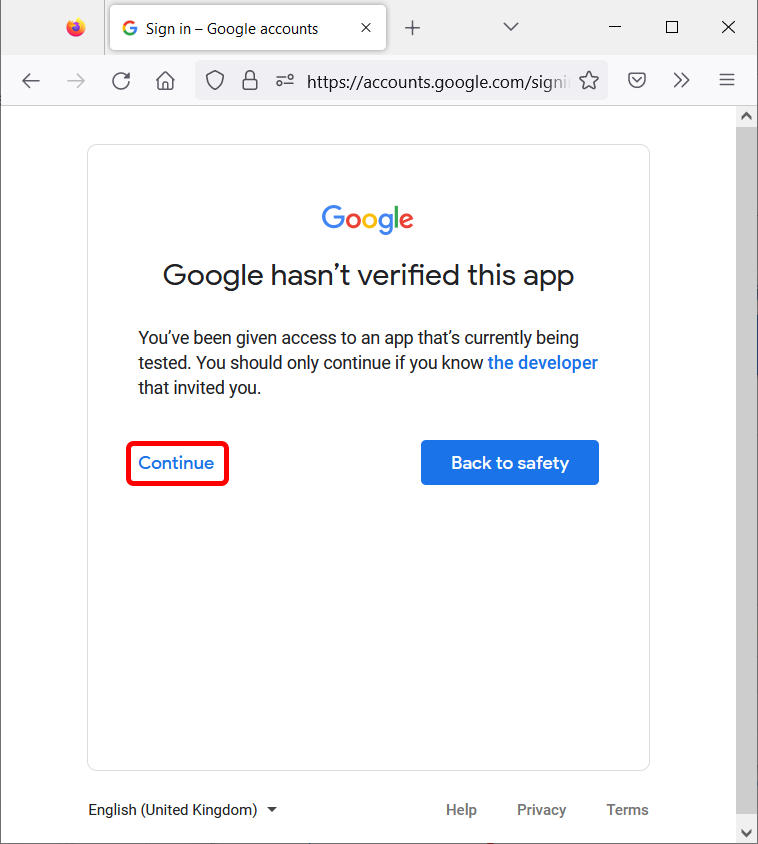
10.9. The following 3 confirmation screens do not appear all the time:
10.9.1. Since your (totally new) application isn’t verified, you get a warning message. This is perfectly normal and expected. Just click on the “Continue” url link:
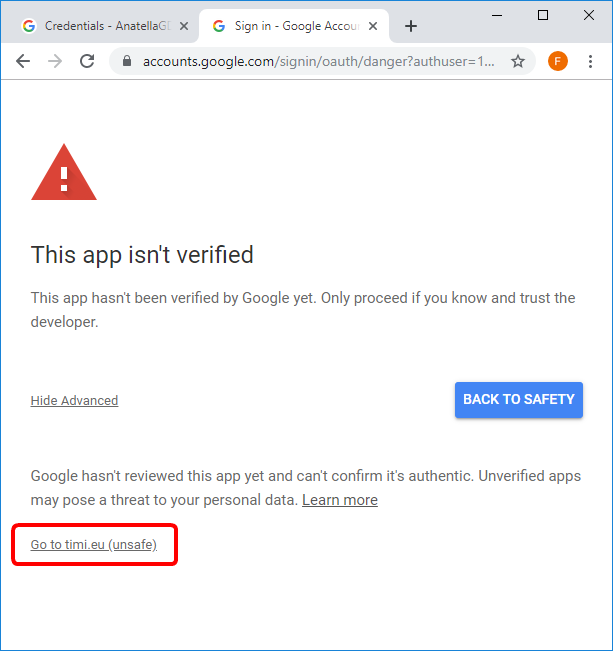
10.9.2. Confirm that you trust your own application by clicking the “Go to timi.eu (unsafe)” url link here:
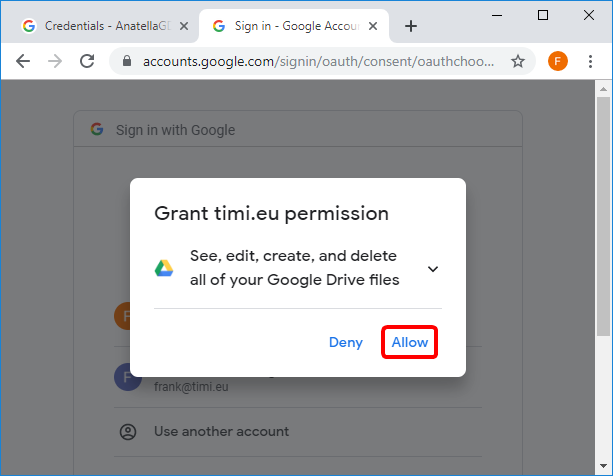
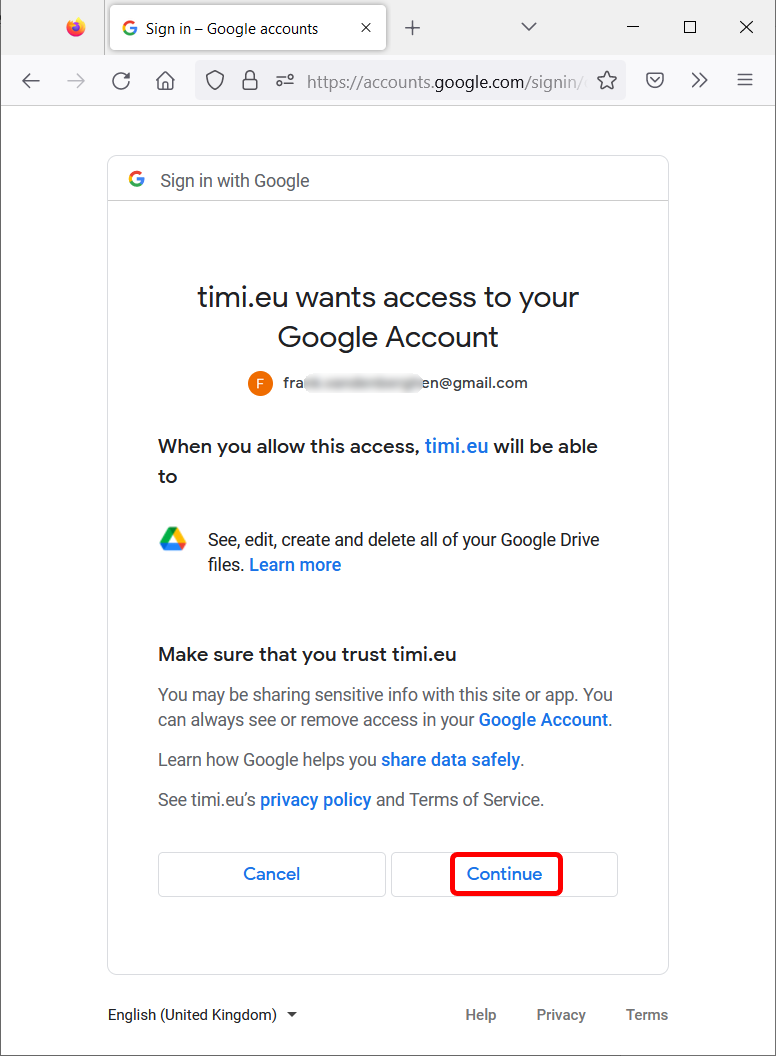
10.10. The following confirmation screens does not appear all the time:
10.10.1. Confirm that you want to access your gdrive files from Anatella: Click the “Allow” button:
10.10.2. Sometime, an additional confirmation window opens. Just click the “Continue” button:
10.11. Finally, you receive your “Refresh Token”!
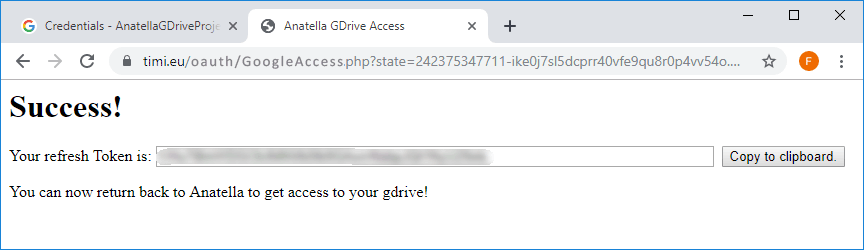
If you don’t see any “Refresh Token” (i.e. the “Refresh Token” field is empty), then you’ll need to redo the whole procedure starting from the step 10.1.
Please write your “Refresh Token” in a safe place. There is no way to retrieve your “Refresh Token” in anyway: If you lose it, you’ll need to redo the whole procedure starting from the step 10.1. You now have your complete credentials:
•A “Client ID” (obtained at step 10.7)
•A “Client Secret” (obtained at step 10.7)
•A “Refresh Token” (obtained at this step 10.11)
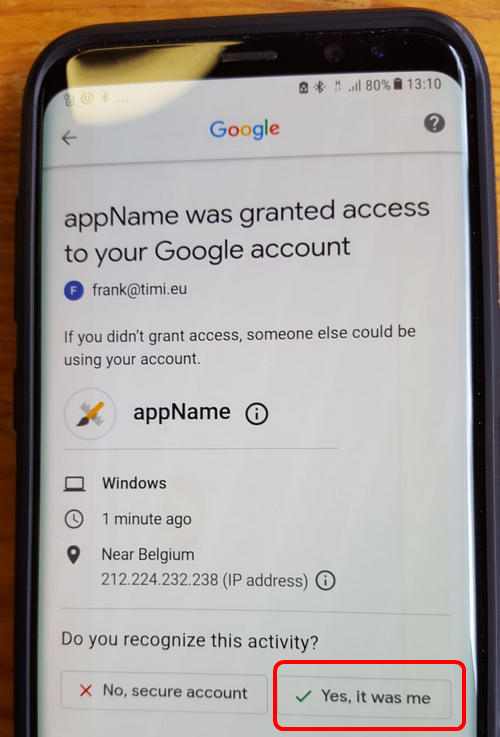
11. After a few seconds, you should also receive on your mobile phone a security message that warns you that someone accessed your Google Account. Just click the “Yes, it was me” button:
12. Save your “Refresh Token” in a safe place.