Icon: ![]()
Function: CreateTable
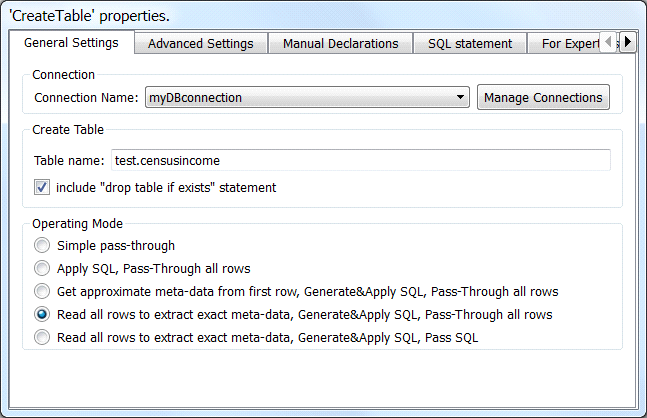
Property window:


Short description:
Generate a CREATE TABLE statement to run inside a SQL database.
Long Description:
To generate the CREATE TABLE statement, we need to know:
•The type of each column: VARCHAR (used for Strings), FLOAT (used for Floating-Point numbers), DEC (used for integer numbers)
•The length of each field. For example: the maximum number of characters inside a column of the String type.
Before executing the ![]() CreateTable Action, you must first define an ODBC connection: See the section 5.1.6. to know how to create an ODBC connection from Anatella to your database.
CreateTable Action, you must first define an ODBC connection: See the section 5.1.6. to know how to create an ODBC connection from Anatella to your database.
The “Operating mode” parameter
There are basically 4 strategies to obtain these 2 informations (i.e. the Type & length of each field).
The “Operating mode” parameter allows you to choose which strategy Anatella will use:
1.“Apply SQL, Pass-Through all rows” option: This does not create any new CREATE TABLE statement. It re-uses an “old” one (that was most certainly “written by hand”).
2.“Get approximate meta-data from the first row, Generate&Apply SQL, Pass-Through all rows” option: This reads only the first row of the input table. At this point, we have an approximate estimation of the type and length of each field.
For example, it can happen that a field contains only integer numbers but is stored inside Anatella using the Unknown/String data-type. In such situation, the ![]() CreateTable Action will NOT detect the correct type to use inside the SQL statement (i.e. it will use the wrong “VARCHAR” type instead of the correct “DEC” type).
CreateTable Action will NOT detect the correct type to use inside the SQL statement (i.e. it will use the wrong “VARCHAR” type instead of the correct “DEC” type).
3.“Read all rows to extract exact meta-data, Generate&Apply SQL, Pass-Through all rows” option: This reads the whole input table: We then have the exact type and length of each field.
Let’s go back to the above/previous example: In this “exact mode”, the ![]() CreateTable Action will correctly use the DEC type inside the SQL statement.
CreateTable Action will correctly use the DEC type inside the SQL statement.
This option is very time consuming because, it stores inside a temporary HD Cache the whole input table (while analysing it), then create & apply the SQL statement, and then re-reads the temporary HD Cache to Pass-through all the rows.
4.“Read all rows to extract exact meta-data, Generate&Apply SQL, Pass SQL” option: This option returns the same SQL statement than the previous option but it’s not so time consuming because it does NOT need to create any HD Cache.
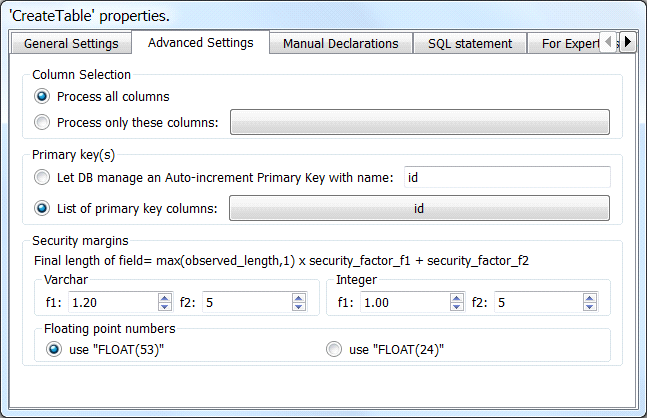
The Security Factors Parameters
The ![]() CreateTable Action computes the (approximate or exact) length of each field by observing the data coming from the current input table. For example: Let’s assume that our input table has a field named “ADDRESS” whose maximum length is 15. It’s quite dangerous to declare “ADDRESS” as a “VARCHAR(15)” because it can happen that, on another input table, we have a longer “ADDRESS” field than 15 characters. When we try to INSERT into our SQL table an “ADDRESS” longer than 15 characters, we will have (at best) some truncation errors. To avoid truncation errors, we need to apply some “security margins”: i.e. We’ll define the “ADDRESS” field slightly larger than 15.
CreateTable Action computes the (approximate or exact) length of each field by observing the data coming from the current input table. For example: Let’s assume that our input table has a field named “ADDRESS” whose maximum length is 15. It’s quite dangerous to declare “ADDRESS” as a “VARCHAR(15)” because it can happen that, on another input table, we have a longer “ADDRESS” field than 15 characters. When we try to INSERT into our SQL table an “ADDRESS” longer than 15 characters, we will have (at best) some truncation errors. To avoid truncation errors, we need to apply some “security margins”: i.e. We’ll define the “ADDRESS” field slightly larger than 15.
The formulae used to compute the length of a field is:
Final_Length_of_Field = max( Max_Observed_Length, 1) x security_factor_f1 + security_factor_f2
The security_factor_f1 and security_factor_f2 are two user-parameters of the ![]() CreateTable Action. We have, by default:
CreateTable Action. We have, by default:
|
security_factor_f1 |
security_factor_f2 |
For VARCHAR type (i.e. for strings) |
1.2 |
10 |
For DEC type (i.e. for integer numbers) |
1 |
5 |
The Manual Declarations Parameters
By default, any columns containing integer numbers will be declared using the “DEC()” type.
By default, any columns containing strings will be declared using the “VARCHAR()” type.
You can override the default behavior of The ![]() CreateTable Action using the Manual Declarations Parameters. For example:
CreateTable Action using the Manual Declarations Parameters. For example:

This will declare:
•the “MSISDN” column as a “VARCHAR(20)” column (disregarding the fact that it only contains integer numbers and should therefore normally declared as “DEC(20)”).
•the “EVENT_DATE” column as a “DATE” column (disregarding the fact that it only contains strings and should therefore normally declared as “VARCHAR(10)”).
Generating a “Draft” SQL statement, editing it and running it.
To generate a “Draft” SQL statement, select as “Operating Mode” either:
“Get approximate meta-data from the first row, Generate&Apply SQL, Pass-Through all rows”
or “Read all rows to extract exact meta-data, Generate&Apply SQL, Pass-Through all rows”
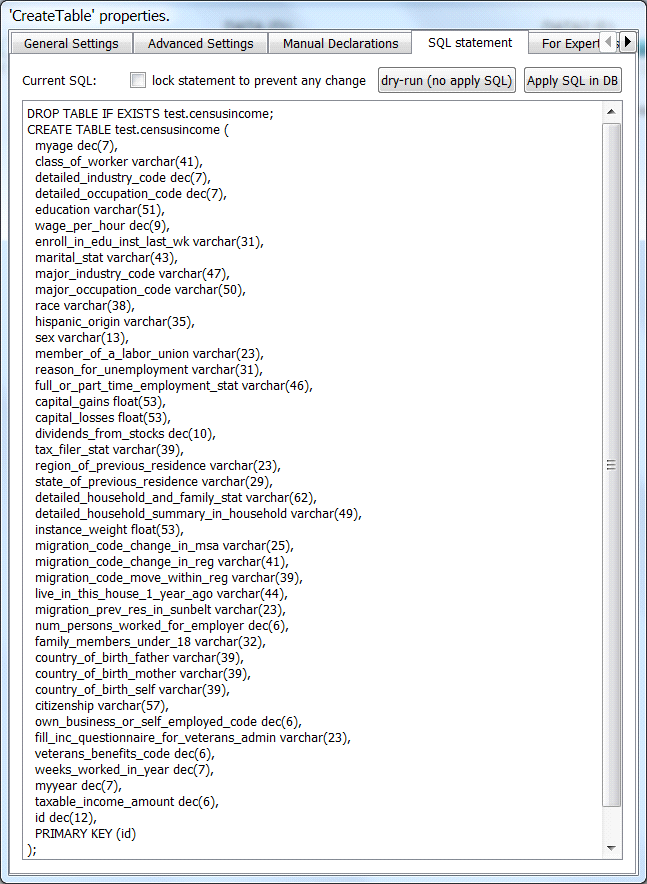
and click the “dry-run (no apply SQL)” button inside the “SQL statement” tab:

If you selected as “Operating Mode” the option “Read all rows”, Anatella might “freeze” for a long time because it needs to “Read all rows” of the input table and this can take a large amount of time.
![]()
Tip: Use the ![]() Sampling Action to prevent Anatella from “freezing” for a long time.
Sampling Action to prevent Anatella from “freezing” for a long time.
Once the analysis of the input table is finished, Anatella will propose a “draft” SQL statement: For example:

At this point, you can check the auto-generated SQL statement and change:
•The Manual Declarations Parameters.
•The Security Factors Parameters.
•The “include ‘drop table if exists’ statement” Parameter.
You will notice that the SQL statement is automatically & instantaneously updated when you change the above parameters (That’s nice! J ).
It can happen that you need to “manually” edit the SQL statement (because the above parameters are not giving you exactly the required results). You can directly click inside the SQL statement textbox and start editing the CREATE TABLE statement. You will notice that, as soon as you “manually” change something inside the SQL statement, the “Lock statement to prevent any change” parameter turns ON (i.e. it’s checked). When the “Lock statement” parameter is ON, you cannot change anymore the SQL statement using any “high-level” parameters (such as the “Manual Declarations Parameters”, the “Security Factors” Parameters, etc.). This is to avoid to inadvertently lose the “manual” editing by changing some security factor, for example.
Once you are happy with your CREATE TABLE statement, you can directly run it (and test it) inside your database by clicking the “Apply SQL in DB” button. Possible errors in your SQL statement are directly reported to you and you can directly correct them.
Expert User Mode
The “CREATE TABLE” statement generated with the ![]() CreateTable Action is 100% standard and should work with most databases.
CreateTable Action is 100% standard and should work with most databases.
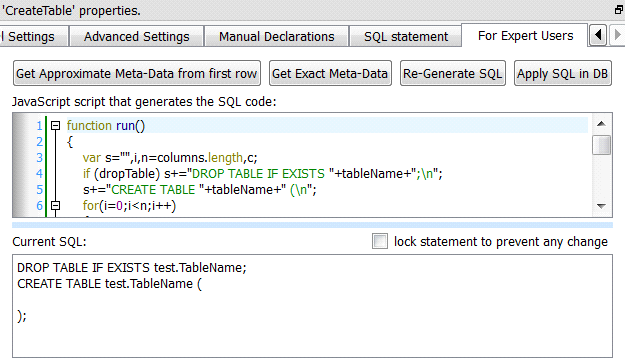
There are however some cases when you want to make some “adjustments” to the SQL statement. A first easy solution is to manually edit the SQL statement. Another solution is to change the (Javascript) code that generates the CREATE TABLE statement. You can edit this code inside the “For Expert Users” tab of the ![]() CreateTable Action. To open this tab, you must be in “Expert-User-Mode”. To switch to expert-user-mode: Click the
CreateTable Action. To open this tab, you must be in “Expert-User-Mode”. To switch to expert-user-mode: Click the ![]() button in the main toolbar of the application.
button in the main toolbar of the application.
The Javascript code that generates the CREATE TABLE statement is using the following pre-defined variables:
•tableName: String variable: Self-Explanatory.
•columns: Array of Object: Each object represents one column. An object contains the following fields:
oname: String variable: Self-Explanatory.
otype: Char variable: the meta-type of the column.
odeclaration: String variable: the Manual Declaration (This is empty if there is no manual declaration for this variable).
•dropTable: Boolean variable: true if the “drop table” parameter is ON.
•useFloat53: Boolean variable: true if the “Float(53)” parameter is ON.
•integerF1, integerF2: Number variables: to define the security factor for the columns containing integer numbers (i.e. “DEC” type).
•varCharF1, varCharF2: Number variables: to define the security factor for the columns containing strings (i.e. “VARCHAR” type).
•autoPK: String variable: the name of the auto-increment primary key column.
•listPK: Array of Strings: the names of the primary key columns.
To run the Javascript code to generate a new SQL statement, click the “Re-Generate SQL” button.
Once you are happy with your CREATE TABLE statement, you can directly run it (and test it) inside your database by clicking the “Apply SQL in DB” button. Possible errors in your SQL statement are directly reported to you and you can directly correct them.