Let’s give a small example of usage. The first operation that you need to do when working with a “Type 1” ODBC datasource is to use the the “Microsoft ODBC Administrator” to create a “link” (also named an “ODBC DSN”) toward the database that you want to use.
In the below example, we’ll create a “link” to access the content of a “MySQL database”. The technique is the same for all the databases (Oracle, Teradata, SQL Server, My SQL, DB2, etc.). You’ll find additional information for the proper setup of an ODBC connection to an Oracle, Teradata, MySQL& Sybase database in the sections 5.1.6.3. to 5.1.6.6.
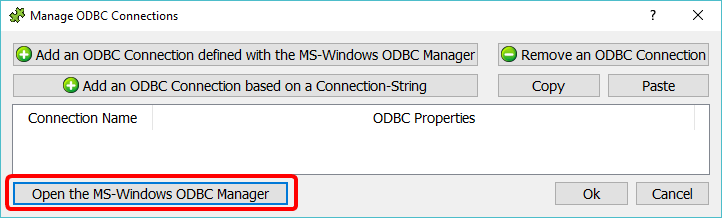
The easiest way to run the “Microsoft ODBC Administrator” is to click the “Open the MSWindow ODBC Manager” button located at the bottom of the “Manage OBC Connections” window:
![]()
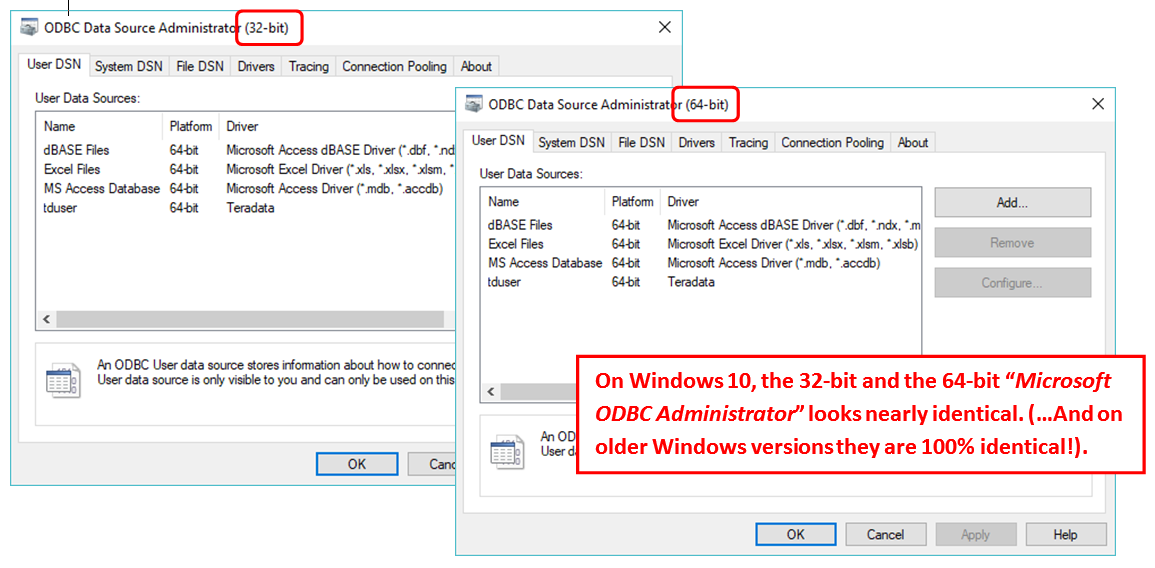
When using a 64-bit Windows OS, there is a little “twist” related to the “Microsoft ODBC Administrator”: There are actually 2 completely different “Microsoft ODBC Administrator” software: one for 32 bit applications and one for 64 bit applications. To add more confusion, these 2 different “Microsoft ODBC Administrator” software looks (nearly) exactly the same.
If you are using Anatella 64-bit, you must use the 64-bit “Microsoft ODBC Administrator” software to define your ODBC DSN.
If you are using Anatella 32-bit, you must use the 32-bit “Microsoft ODBC Administrator” software to define your ODBC DSN.
Don’t worry: When you click the “Open the MSWindow ODBC Manager” button inside Anatella, the correct version of the “Microsoft ODBC Administrator” software appears automatically and there are no risks of errors.
![]()
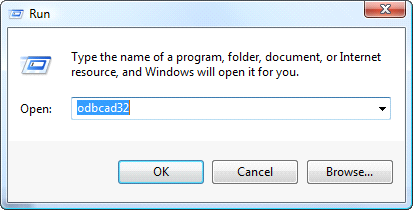
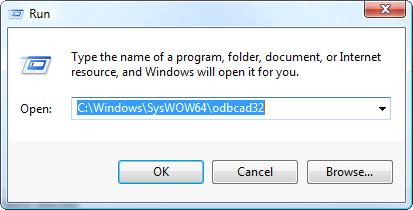
Here is another procedure to run the “Microsoft ODBC Administrator”: Press the [Windows]+[R] keys simultaneously (the “Run” windows pops up) and then:
* To run the 64-bit “Microsoft ODBC Administrator” software, write “odbcad32” inside the textbox and click the OK button:
* To run the 32-bit “Microsoft ODBC Administrator” software (on a 64-bit Windows System), write “C:\Windows\SysWOW64\odbcad32” into the textbox and click the OK button:
We should now see the standard “Microsoft ODBC Administrator” window (This is nearly the same window for the 32-bit version and the 64-bit version of the “Microsoft ODBC Administrator”):
We can now create a new “ODBC DSN” (i.e. a new “Link” to your database).
You can create 2 types of “ODBC DSN”:
1.User DSN
This is the type of DSN that you will create for most of your applications. Only the current user of this machine can see these DSN’s. The ![]() button is used to create a new DSN, Remove button is used to delete an existing DSN, and the Configure button is to reset the configuration of a DSN.
button is used to create a new DSN, Remove button is used to delete an existing DSN, and the Configure button is to reset the configuration of a DSN.
2.System DSN
This type of DSN’s are available to all users on this machine (including users running NT Services). If you run some Anatella scripts as part of an automated Windows Service, you should rather create “System DSN’s”. If you use “simple User DSN” inside a Windows Service, the ODBC connection will be refused inside Anatella because the user executing the Windows Service is not allowed to use “User DSN”.
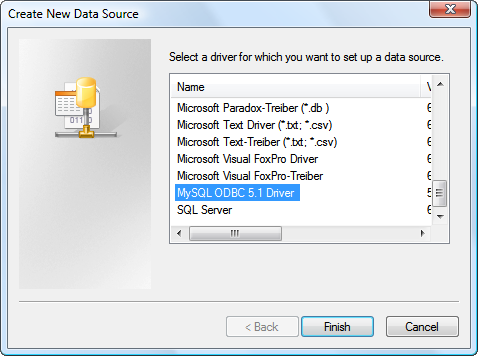
Select the tab (“UserDSN” or “SystemDSN” depending on which type of links you want) and then click on the ![]() button. A new window appears. This new window contains all the ODBC drivers installed on your computer. In this example, we will select the “MySQL ODBC 5.1 driver” because we want to access some table from a MySQL database:
button. A new window appears. This new window contains all the ODBC drivers installed on your computer. In this example, we will select the “MySQL ODBC 5.1 driver” because we want to access some table from a MySQL database:
![]()
If you can’t see an ODBC driver that you just installed, it means that you are using the 64-bit “Microsoft ODBC Administrator” software (for Anatella 64-bit) and you installed some 32-bit ODBC drivers (or vice versa).
Be sure to install 64-bit ODBC drivers to be able to use Anatella 64-bit
(or install 32-bit ODBC drivers, if you want to use Anatella 32-bit).
For your convenience, you can go here to directly download the most common ODBC drivers (for MS-SQLServer, Oracle, Teradata, MySQL, SQLite, Access, Sybase, DB2):
The above drivers have been thoroughly tested and are known to work well with Anatella.
The next screens are different for each ODBC driver. Here are some examples:
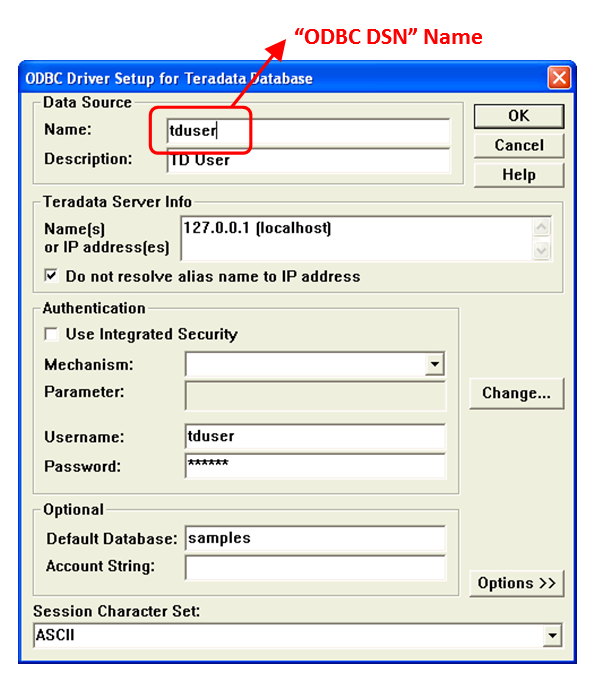
•For a Teradata database, we will have the following configuration window:
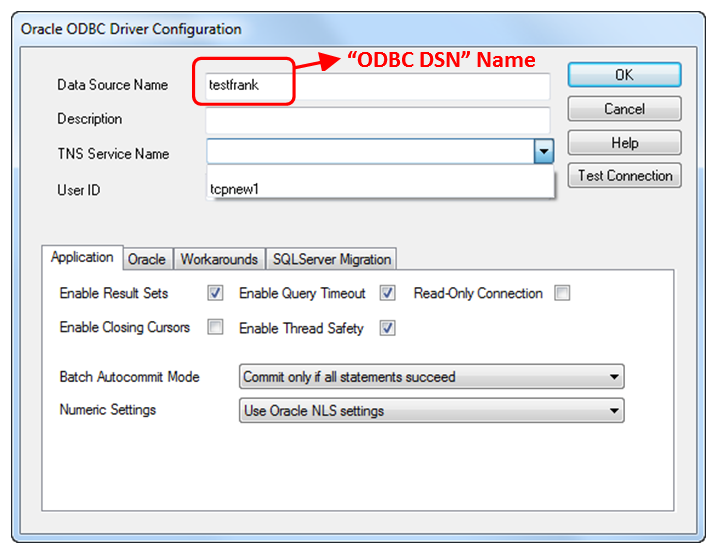
•For an Oracle database, we will have the following configuration window:
•For a MySQL database, we will have the following configuration window:
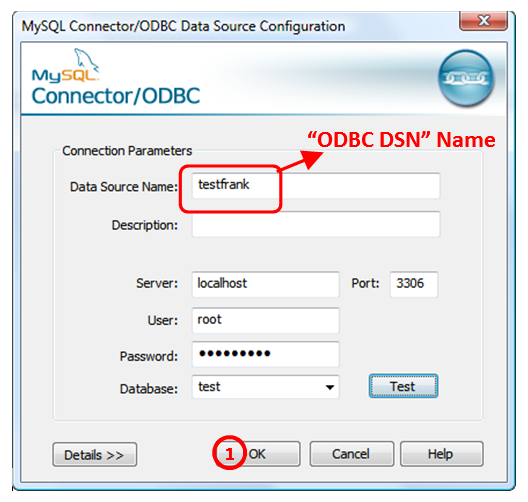
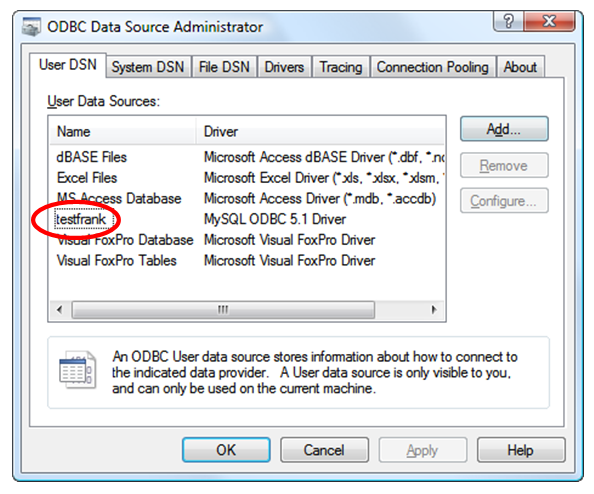
Please note that, inside the above example, we used the string “testfrank” as “ODBC DSN” name. Click the OK button here:![]() . We are now back on the first screen of the “Microsoft ODBC Administrator”. Please note that a new “ODBC link” (named “testfrank”) has been created:
. We are now back on the first screen of the “Microsoft ODBC Administrator”. Please note that a new “ODBC link” (named “testfrank”) has been created:
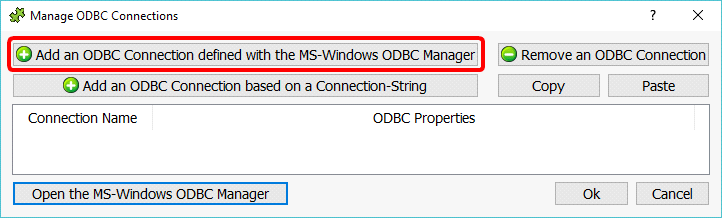
Let’s now “go back” to Anatella (i.e. We close the “Microsoft ODBC Administrator” windows and re-open the Anatella window). Inside the “Manage OBC Connections” window, click the button named “Add an ODBC connection defined with the MS-Windows ODBC Manager” here:
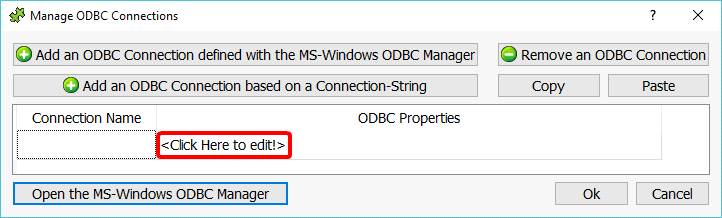
This adds a new connection inside the table listing all ODBC connection available from Anatella. Let’s edit this new connection: Click here:
The ODBC configuration window appears:

At this point, you must pay attention to write here: ![]() the exact same “ODBC DSN” name that you just created inside the “Microsoft ODBC Administrator”. Anatella uses this “ODBC DSN” name to find, amongst all the already available ODBC connections, the one that you just defined.
the exact same “ODBC DSN” name that you just created inside the “Microsoft ODBC Administrator”. Anatella uses this “ODBC DSN” name to find, amongst all the already available ODBC connections, the one that you just defined.
The setup of our new ODBC connection is now complete. This means that we can now use our new ODBC connection inside a ![]() readODBC action (see section 5.2.3) or inside a
readODBC action (see section 5.2.3) or inside a ![]() upsertODBC action (see section 5.26.4).
upsertODBC action (see section 5.26.4).
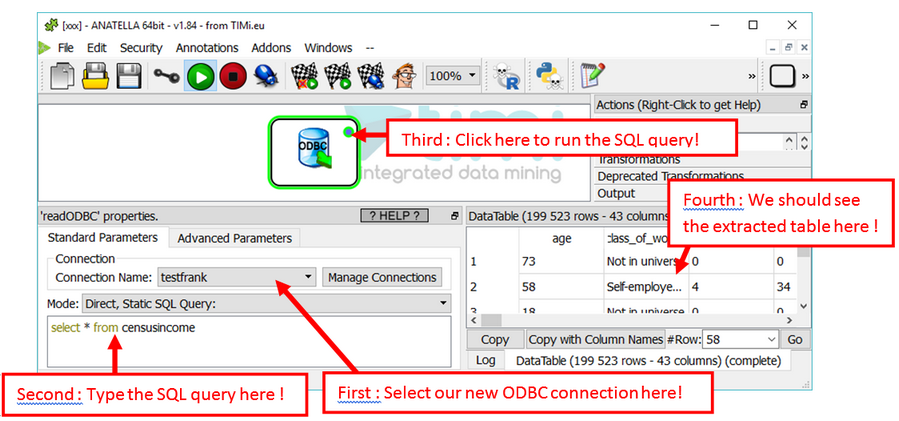
For example: Let’s use a ![]() readODBC action to extract the table “censusincome” from your database:
readODBC action to extract the table “censusincome” from your database: